When building apps in Power Apps, one thing comes up again and again: users need to select a date and time.
Think about common business scenarios:
- Creating a helpdesk ticket
- Booking a meeting room
- Scheduling a field service visit
- Recording an incident time
- Setting SLA deadlines
In most of these situations, capturing just the date is not enough. We usually need the exact time as well.
Power Apps provides a Modern Date Picker control, which works very well for selecting dates. However, many makers quickly notice something:
There is no built-in modern DateTime picker.
So in real-world apps, we usually combine the Date Picker with time controls to capture the full DateTime value.
In this tutorial, I’ll walk you through the entire process, the way I implement it in real projects:
- How the Power Apps Modern Date Picker works
- How to add a time picker
- How to combine date and time
- How to store DateTime in SharePoint
- How to disable weekends
- How to block holidays
- How to implement business rules like SLA deadlines
I’ll explain everything step by step, using practical examples, so you can apply the same approach in your own apps.
The Power Apps Modern Date Picker
The Modern Date Picker in Power Apps is a control that lets users select a date via a calendar interface.
Instead of typing a date manually, users simply open the calendar and click the desired date. This reduces typing errors and makes the app much easier to use.
Microsoft introduced Modern Controls in Power Apps to improve the overall experience. Compared to older classic controls, modern controls offer:
- A cleaner and more consistent design
- Better accessibility
- Improved behavior on mobile devices
- More consistent styling across apps
In business apps, the Date Picker is used in many situations. Some common examples include:
- Helpdesk apps where users record when an issue occurred
- Leave management apps where employees select leave dates
- Booking systems where users choose appointment dates
- Project apps where deadlines must be tracked
- Service apps where technicians schedule site visits
However, one important thing to remember is this:
The Power Apps Date Picker captures only the date, not the time.
If you need something like:
08 Apr 2026 10:45 AM
You must combine the Date Picker with additional controls that allow users to select a time. We’ll build that step by step in this tutorial.
Add a Modern Date Picker in Power Apps
Let’s start by inserting the control into a Power Apps Canvas App.
First, open Power Apps Studio and create a new Canvas App or open an existing one.
Once your screen is open:
- Go to the Insert menu
- Select Modern Controls
- Click Date Picker
Power Apps will place the control onto your screen.
At this point, the control already works. If you preview the app and click the field, you’ll see a calendar appear.
You can choose any date directly from that calendar.
One habit that I strongly recommend is renaming your controls immediately. Power Apps assigns default names like:
DatePicker1
But as your app grows and you have many controls, those names can become confusing.
For example, if the Date Picker represents a ticket date, I usually rename it like this:
dpTicketDate
If it represents a meeting date, I might use:
dpMeetingDate
Using meaningful names makes formulas easier to read and maintain later.
Important Properties of the Modern Date Picker
Once the control is added, the next step is understanding the properties that control its behavior.
The three properties I use most often are:
- DefaultDate
- StartDate
- EndDate
These help you control how users interact with the calendar.
Set the Default Date
The DefaultDate property of a Power Apps date picker determines which date appears when the control loads.
If you don’t set this property, the field usually starts blank.
In many business apps, it makes sense to automatically show today’s date.
For example, in a helpdesk ticket form, the issue is usually reported on the same day.
So I typically set:
Today()
Now, when the screen loads, the Date Picker already shows today’s date.
This reduces the number of clicks users need to perform.
Sometimes you might want to set a fixed starting date instead. For example:
Date(2026,1,1)
This would make the control open with January 1st, 2026, selected.
Restrict the Earliest Date with StartDate
In many business applications, users should not be allowed to select past dates.
For example:
- You cannot schedule a future meeting in the past
- You cannot create a service booking for last week
- You cannot set a future deadline in the past
To prevent this, the Modern Date Picker in Power Apps uses the StartDate property.
Example:
Today()
This means users can select only today or future dates.
All earlier dates appear disabled in the calendar. You can see the exact output in the screenshot below:
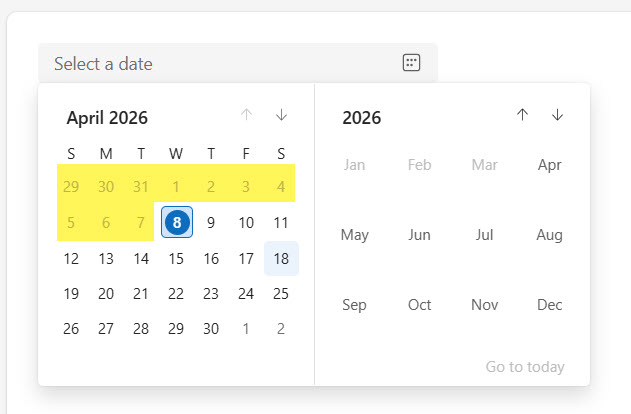
This is a simple but powerful way to prevent invalid input.
Restrict Future Dates with EndDate
The EndDate property of a Date picker in Power Apps defines the latest date users can choose.
For example, suppose your organization allows meeting room bookings only for the next 30 days.
You can enforce that rule with this formula:
DateAdd(Today(),30)
Now the calendar allows users to pick only dates within the next 30 days.
Anything beyond that becomes unavailable.
This keeps scheduling realistic and avoids unnecessary conflicts.
Check out Calculate the Difference Between Two Dates in Power Apps
Retrieve the Selected Date from the Power Apps Date Picker
Whenever a user selects a date, Power Apps stores the value in the SelectedDate property.
Example:
dpMeetingDate.SelectedDate
If you want to display the date in a label, you can format it using the Text function.
Example:
Text(dpMeetingDate.SelectedDate,"dd mmm yyyy")
This would display something like:
09 Apr 2026
You can see the exact output in the screenshot below:
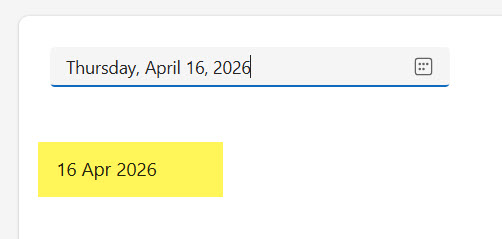
Formatting makes the date easier for users to read.
Add a Time Picker in Power Apps
Now let’s solve the biggest limitation.
Power Apps currently does not provide a modern Time Picker control.
So the common solution is to build one using dropdown controls.
The simplest design includes three dropdowns:
- Hour
- Minute
- AM/PM
Together, these create a full time selection interface.
Your layout might look something like this:
Meeting Date: [Date Picker]Start Time: [Hour] [Minute] [AM/PM]
This pattern is widely used in real Power Apps solutions.
Create the Hour Dropdown
First, we add a Power Apps dropdown for selecting the hour.
The easiest way to generate the list is with the Sequence function.
Example:
Items property:
Sequence(12)
Width property:
80This generates numbers from 1 to 12, which works perfectly for a 12-hour clock.
Create the Minute Dropdown
Next, we add a dropdown for minutes in the Power Apps canvas app.
You can allow users to select every minute:
Items property:
Sequence(60)
This generates values from 0 to 59.
Width property:
80However, many apps do not require that level of precision.
In most business scenarios, 15-minute intervals are enough.
For example:
["00","15","30","45"]
This keeps the interface simple and speeds up scheduling.
Creating the AM/PM Dropdown
Finally, we add a dropdown for AM and PM.
This dropdown is very simple.
Items property:
["AM","PM"]
Now users can fully select the time.
Width property:
80Now, the interface looks like this:

Combine Date and Time into DateTime
Once the user selects both date and time, we need to combine them into a single DateTime value.
Most data sources like SharePoint, Dataverse, and SQL store date and time together.
To combine them, we use the DateTimeValue function.
Example formula:
DateTimeValue(
Text(dpMeetingDate.SelectedDate,"yyyy-mm-dd") & " " &
ddHour.Selected.Value & ":" &
ddMinute.Selected.Value & " " &
ddAMPM.Selected.Value
)
This converts the selected values into a proper DateTime format.
Example result:
09 Apr 2026 02:30 PM
Now the value can be stored in your data source. Here is the exact output in the screenshot below:

Read Power Apps Multiple IF Statements
Save Date and Time to SharePoint
Let’s look at a common real scenario.
Suppose you have a SharePoint list called HelpdeskTickets.
Inside that SharePoint list, you have a column called:
TicketDateTime
Column type: Date and Time
When saving data, you can use the Patch function.
Example:
Patch(
HelpdeskTickets,
Defaults(HelpdeskTickets),
{
TicketDateTime:
DateTimeValue(
Text(dpTicketDate.SelectedDate,"yyyy-mm-dd") & " " &
ddHour.Selected.Value & ":" &
ddMinute.Selected.Value & " " &
ddAMPM.Selected.Value
)
}
)
Now the combined DateTime value is saved directly in SharePoint.
Prevent Selecting Weekends in Power Apps Date Picker
Many organizations operate only on working days.
For example:
- Helpdesk teams may support users only Monday to Friday
- Office bookings may be allowed only on business days
- Service visits may happen only during working days
Power Apps provides a function called Weekday() that helps detect the day of the week.
The function returns a number.
| Day | Value |
|---|---|
| Sunday | 1 |
| Monday | 2 |
| Tuesday | 3 |
| Wednesday | 4 |
| Thursday | 5 |
| Friday | 6 |
| Saturday | 7 |
So we can detect weekends like this:
Weekday(dpMeetingDate.SelectedDate) in [1,7]
If the result is true, the selected date is either Saturday or Sunday.
You can then disable the submit button or show a warning message.
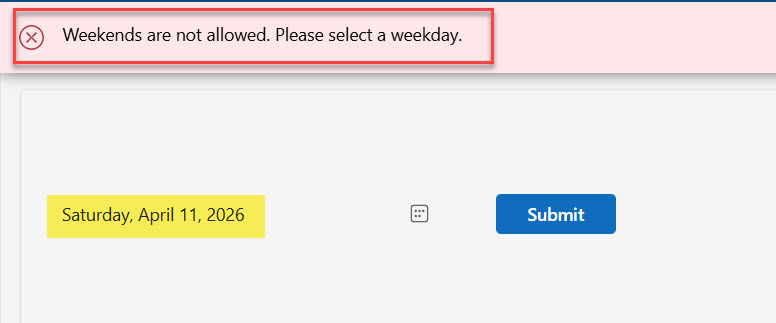
Here is how to show an error message if the weekend is selected using the Notify() function.
OnSelect property:
If(
    Weekday(dpDate.SelectedDate) in [1,7],
    Notify("Weekends are not allowed. Please select a weekday.", NotificationType.Error)
)
I selected a weekend date, and you can see it displays a notification like in the screenshot below:
You can also disable the submit button if the weekend is selected using the DisplayMode property:
DisplayMode property:
If(
   Weekday(dpDate.SelectedDate) in [1,7],
   DisplayMode.Disabled,
   DisplayMode.Edit
)
Result:
- If user selects Saturday or Sunday
- Submit button becomes disabled
Block Company Holidays in Power Apps Date Picker
Weekends are easy to detect, but holidays are different.
Every organization has its own holiday calendar.
The best practice is to store holidays in a data source such as:
- SharePoint List
- Dataverse table
- Excel table
We will store holidays in a SharePoint list.
Example structure:
Here is what the SharePoint list looks like:
List name: Holidays
| Title | HolidayDate |
|---|---|
| New Year | 01-01-2026 |
| Memorial Day | 25-05-2026 |
| Independence Day (US) | 04-07-2026 |
| Columbus Day | 12-10-2026 |
Power Apps can check whether the selected date exists in this SharePoint list.
First, add a SharePoint data source and choose the Holidays SharePoint Online list.
Example validation:
dpMeetingDate.SelectedDate in Holidays.HolidayDate
If the selected date matches a holiday, the app can show a message or prevent submission.
If you want to apply the login on a button click, then write the below formula in the button’s OnSelect property:
If(
   dpMeetingDate.SelectedDate in Holidays.HolidayDate,
   Notify("Selected date is a holiday.", NotificationType.Warning)
)
This approach is flexible because the holiday list can be updated each year without requiring app modifications.
If you want to show a warning message for both holidays and weekends, then write the formula below in the button’s OnSelect property.
If(
    Weekday(dpDate.SelectedDate) in [1,7] ||
    dpDate.SelectedDate in Holidays.HolidayDate,
    Notify("Please select a working day.", NotificationType.Error)
)
Check out How to Set Dropdown Value On Button Click in Power Apps
Automatically Move Weekend Dates
In some apps, instead of blocking weekend dates, you might want to automatically move them to the next working day.
For example, if a deadline falls on Saturday or Sunday, it should move to Monday.
Example formula:
If(
Weekday(dpMeetingDate.SelectedDate)=7,
DateAdd(dpMeetingDate.SelectedDate,2),
If(
Weekday(dpMeetingDate.SelectedDate)=1,
DateAdd(dpMeetingDate.SelectedDate,1),
dpMeetingDate.SelectedDate
)
)
Example behavior:
| Selected | Adjusted |
|---|---|
| Saturday | Monday |
| Sunday | Monday |
This is often used in SLA tracking systems.
Set Default Time Automatically
Sometimes you want the time picker to start with the current time.
This improves usability when users record events that have just happened.
Example for hour dropdown:
Hour(Now())
Example for minute dropdown:
Minute(Now())
Now the time controls automatically show the current system time.
Restrict Time to Office Hours
Many business processes operate only during office hours.
For example:
8 AM – 6 PM
You can restrict the hour dropdown to that range.
Example:
Sequence(11,8)
This produces numbers from 8 to 18.
Users cannot select hours outside the allowed range.
Best Practices I Use in Real Apps in Power Apps
Over time, I’ve learned a few simple practices that make Power Apps easier to maintain.
First, always validate date inputs. Even though the calendar looks simple, users can still select dates that do not make sense for the business process.
Second, whenever possible, store Date and Time in a single column instead of separate fields.
Third, avoid hardcoding holiday dates in formulas. Store them in a SharePoint list instead.
Finally, use variables when combining date and time values. This keeps formulas cleaner and improves performance.
Final Thoughts
The Power Apps Modern Date Picker is simple yet extremely useful, and you will use it in most Power Apps apps.
By combining it with dropdown time controls, you can build a full DateTime selection system that works in many business applications.
The key idea is here:
- Use the Modern Date Picker for date selection
- Use dropdown controls for time
- Combine both into a DateTime value
- Validate dates against weekends and holidays
Once you implement this pattern, you can reuse it in almost every Power Apps solution you build.
You may also like:

I’m Bijay Kumar, a Microsoft Business Application MVP specializing in Power Automate. I have been honored 11 times. With over 18 years in the IT industry, I have practical experience in Power Apps, Power Automate, Power BI, Power Pages, and SharePoint Online. I also co-authored the book Microsoft Power Platform—A Deep Dive. Currently, I develop various apps using Power Apps and automate business processes for many clients in the USA using Power Automate. Read more.