Recently, in a Power Platform training batch, someone asked how to set the textbox value on a button click in PowerApps. It is easy to do. In this tutorial, I will explain how to set the control value on a button click in Power Apps.
I will show three examples below so that it will be easy for you to understand.
- Set textbox value on button click in Power Apps
- Set dropdown value on button click in Power Apps
- Set combobox value on button click in Power Apps
I have created a Power Apps canvas app from scratch for all the examples. You can practice this by following the below steps.
Set Textbox Value on Button Click in PowerApps
In the first example, I will show how to set the textbox value when a button is clicked in a Power Apps canvas app. Here, we will see, how to set the current logged-in user name in the textbox control on a button click. Also, we will change the button text to Show Greeting/Hide Greeting alternatively.
After you create the Power Apps canvas app, follow the below steps to set the textbox control’s value when a button is clicked.
- First, add one button and a textbox control to the Power Apps screen. From the command bar, click on + Insert, and then you can choose the control. Simple and easy way to add controls.
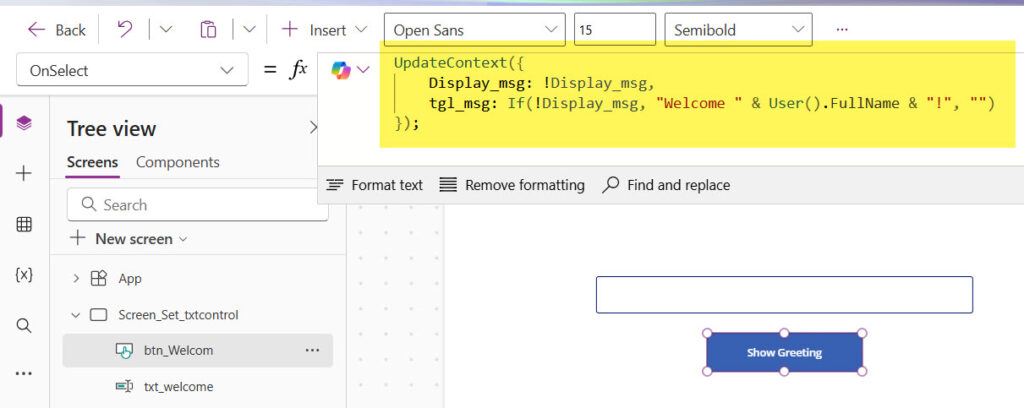
- Now, all the below formulas are in the controls. On the button’s OnSelect property write the below formula.
UpdateContext({
    Display_msg: !Display_msg,
    tgl_msg: If(!Display_msg, "Welcome " & User().FullName & "!", "")
});
You can also look at the screenshot below:
- Then, on the Text property button, write the formula below.
If(Display_msg,"Hide Greeting", "Show Greeting")- Now, select the textbox control and add the below variable name to the Default property.
tgl_msgNow, when you run the application and click on the button for the first time, it will display a message like the one below. You can also see that the button text has changed to “Hide Greeting.”

The next time you click on the button, the textbox control value becomes empty, and also the button text changes.

This is how easily we can set a textbox control value on a button click in a Power Apps canvas app.
Check out How to Clear/Reset Variables in Power Apps?
Set Dropdown Value on Button Click in PowerApps
Now, let me show you the second example. Here, you will learn how to set a dropdown value on a button click on a Power Apps canvas app.
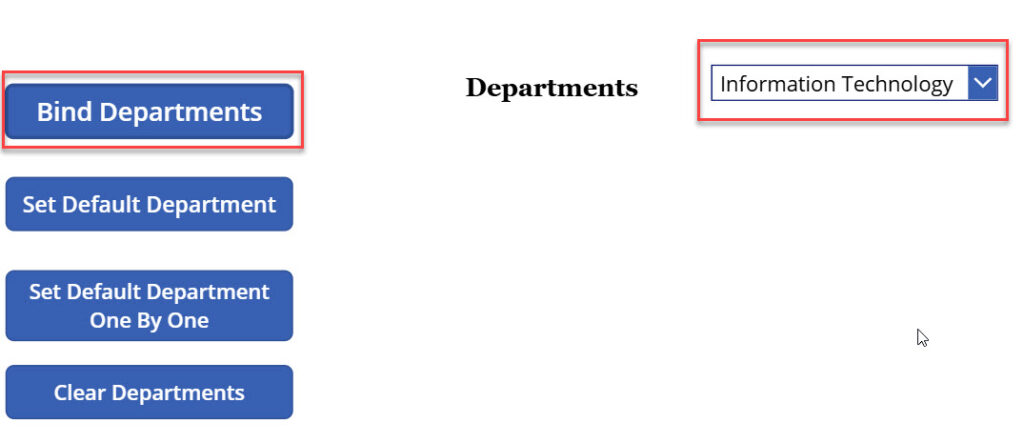
Here, I have taken four buttons, one label control, and one dropdown control. Here, the functionalities of each button are like below:
- Bind Departments buttons: Once the user clicks on this button, the departments will be bound to the dropdown control.
- Set Default Department: It will set a department to default department.
- Set Default Department One By One: This will set the default value to a different department in the dropdown control on each click.
- Clear Departments: This will clear the department dropdown control.
Overall, the Power Apps screen looks like the screenshot below.

Now, here are the formulas you can write on the buttons.
- Select the first button, and on the OnSelect property, write the formula below. Here, we are creating a collection using the ClearCollect function. We will use the SNo: column in the third button.
ClearCollect(
    colEmployees,
    {Department: "Human Resource",SNo:1},
    {Department: "Finance",SNo:2},
    {Department: "Information Technology",SNo:3},
    {Department: "Marketing",SNo:4}
);- Then, select the dropdown control and then write the below collection name in the Items property.
colEmployees.Department- Now, when you run the Power Apps canvas app and then click on the button, it will bind the dropdown control like the one below.
The second button, click will set the value of the dropdown control to the Finance department. To achieve this, write the formula below.
- Select the second button and write the below formula on the OnSelect property.
Set(varDepartment,"Finance");Here, we are creating a variable to set the default property of the dropdown control.
- Then select the Dropdown control, navigate the Default property, and set the variable name.
varDepartmentNow, when the user clicks on the button, the dropdown control’s default value is set to Finance. You can see a screenshot below.

Now, in the third button, every time you click, it will change the default value to the next value.
- Select the third button and write the below formula.
If(varSNo < 4, Set(varSNo, varSNo + 1),Set(varSNo, varSNo - 1));
Switch(
    varSNo,
    1, Set(varDepartment, "Human Resource"),
    2, Set(varDepartment, "Finance"),
    3, Set(varDepartment, "Information Technology"),
    4, Set(varDepartment, "Marketing")
);
Here, by using a Switch case, I am setting the default value of the dropdown control.
We will clear the dropdown control whenever the user clicks on the last button.
- Select the last button, and then write the formula below on the OnSelect property.
Clear(colEmployees);Basically, we are clearing the collection, which clears the dropdown control. As the screenshot below shows, it clears the dropdown control once the user clicks on the button.

This is how to change the dropdown value on a button click in Power Apps.
Check out Create an App in Power Apps using Copilot
Set Combobox Value on Button Click in Power Apps
In this example, I will show how to set the combo box value when a button is clicked in a Power Apps canvas app.
In this screen, I have taken a combobox control and three buttons.
- Bind Priority: When the user clicks this button, the Priority values (High, Low, Normal, Medium) will be bound to the combobox.
- Set Default Priority: It will set the default priority to Normal.
- Clear Priority: When the user clicks on this button, the combo box control values will be cleared.
The full screen looks like below.

Now, write the formulas below.
- Open the Bind Priority button and write the below formula on the OnSelect property.
ClearCollect(
    Prioritycol,
    {Priority: "High"},
    {Priority: "Low"},
    {Priority: "Normal"},
    {Priority: "Medium"}
);- Then select the combo box and write the below formula in the Items property. Here we are providing the collection name.
PrioritycolNow, when the user clicks on the combo control, the values will be set. You can see in the screenshot below:

- On the second button, write the below formula in the OnSelect property.
ClearCollect(
    colPriority,
    "Normal"
);- Then, select the combo box, and on the DefaultSelectedItems property, write the below formula.
colPriorityWhen the user clicks on the button, the default value of the combo box will be set to Normal.
- Now, on the last button click, we will clear the combo box control. Write the formula below in the button’s OnSelect property.
Clear(Prioritycol);
Clear(colPriority);
This is how to set the combo box value on a button click in Power Apps.
Conclusion
In this tutorial, I explained how to set control value in the button click on Power Apps. Here, we saw the below examples.
- Set control value in button click on Power Apps
- Set textbox value on button click in PowerApps
- Set dropdown value on button click in Power Apps
- Set combobox value on button click in Power Apps
- Change dropdown value on button click in Power Apps

I’m Bijay Kumar, a Microsoft Business Application MVP specializing in Power Automate. I have been honored 11 times. With over 18 years in the IT industry, I have practical experience in Power Apps, Power Automate, Power BI, Power Pages, and SharePoint Online. I also co-authored the book Microsoft Power Platform—A Deep Dive. Currently, I develop various apps using Power Apps and automate business processes for many clients in the USA using Power Automate. Read more.