If you’ve ever built a Power Apps canvas app and wondered how to control what your dropdown shows based on what a user clicks — you’re in the right place.
I’ve been building Power Apps solutions for clients and training batches for years, and one of the most common questions I keep getting is: “How do I change the dropdown value when someone clicks a button?” It sounds simple, but there are actually several ways to do this depending on your use case — from hardcoded lists, to SharePoint-connected dropdowns, to the new modern dropdown control.
In this tutorial, I’ll walk you through everything you need to know to set a dropdown value on button click in Power Apps, with examples.
What We’ll Cover
Here’s what I’ll walk you through in this tutorial:
- How the Power Apps dropdown control works (classic vs. modern)
- Setting a dropdown value using a variable on button click
- Binding a dropdown from a SharePoint list and setting its value
- Cycling through dropdown values on each button click
- Clearing/resetting a dropdown on button click
- Using dependent (cascading) dropdowns triggered by a button
- Working with the new modern dropdown control
- Common mistakes and how to fix them
Understanding the Power Apps Dropdown Control
Before we dive into formulas, let me make sure we’re on the same page about how the dropdown control actually works in Power Apps.
The dropdown control saves screen space — it shows only the first item until the user clicks the chevron arrow to expand the list. It can display up to 500 items in the classic control. There are two versions of the dropdown control you need to know about:
Classic Dropdown Control — The one that has been around for years. It has a Default property to set the initial or programmatically set value, a Reset property to restore it to its default, and it accepts simple text values or table columns.
Modern Dropdown Control — Introduced as part of Power Apps modern controls (now generally available as of 2025-2026). It uses DefaultSelectedItems instead of Default, has a cleaner look, and behaves slightly differently when setting values via code. I’ll cover both in this tutorial.
The key properties you’ll use when setting a dropdown value programmatically are:
| Property | Classic Control | Modern Control |
|---|---|---|
| Set initial/default value | Default | DefaultSelectedItems |
| Get selected value | DropdownName.Selected.Value | DropdownName.Selected.FieldName |
| Reset to default | Reset property (boolean) | Change DefaultSelectedItems |
| Allow empty selection | AllowEmptySelection | Not yet natively supported |
| Items source | Items | Items |
Method 1: Set Dropdown Value on Button Click Using a Variable
This is the most common pattern, and the one I recommend starting with. The idea is simple: you store a value in a variable, and the dropdown’s Default property points to that variable. When you change the variable (via a button click), the dropdown updates automatically.
Step-by-Step
Step 1 — Add controls to your screen
Open your Power Apps canvas app. Add:
- One Dropdown control
- One Button control
Step 2 — Set the dropdown Items property
Click your Dropdown control and set the Items property to a static list for now:
["Human Resource", "Finance", "Information Technology", "Marketing"]
Step 3 — Set the dropdown Default property
In the Default property of your dropdown, type the variable name:
varDepartment
This tells the dropdown to always show whatever is stored in varDepartment.
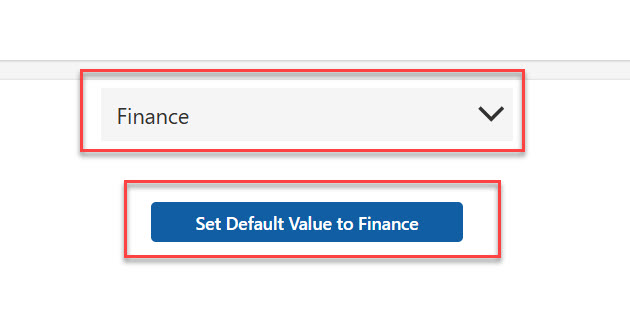
Step 4 — Write the button formula
Click your Button, go to its OnSelect property, and write:
Set(varDepartment, "Finance");
Now, when the user clicks the button, varDepartment becomes "Finance", and because the dropdown’s Default is pointing to varDepartment, the dropdown instantly shows Finance as the selected value.
You can see the exact output in the screenshot below:
Why this works: In Power Apps, the Default property is reactive. It re-evaluates whenever the variable it references changes — so you never have to manually “refresh” the dropdown. The moment your variable updates, the dropdown reflects it.
Check out Calculate the Difference Between Two Dates in Power Apps
Method 2: Bind Dropdown from a SharePoint List and Set Value on Button Click
This is where it gets really practical. Most real-world apps use SharePoint as a data source. Here’s how to bind a dropdown to a SharePoint list and then control its selected value using a button.
Set Up Your SharePoint List
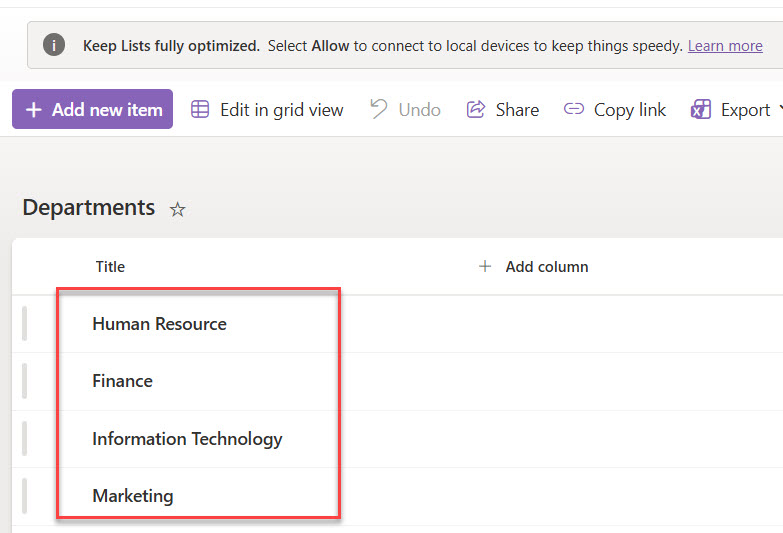
Let me assume you have a SharePoint list called Departments with a column called Title that stores department names like:
- Human Resource
- Finance
- Information Technology
- Marketing
Here is the list with this data or items.
Step-by-Step
Step 1 — Connect SharePoint to your app
In Power Apps Studio, go to Data on the left panel, click + Add data, search for SharePoint, enter your site URL, and select the Departments list.
Step 2 — Set the dropdown Items to the SharePoint list
Select your dropdown control and set the Items property to:
Departments
Then set the Value property (visible under the dropdown’s advanced properties or data pane) to:
Title
This tells the dropdown to display the Title column from your SharePoint list.
Step 3 — Set the Default property using a variable
In the dropdown’s Default property:
varSelectedDept
Step 4 — Button OnSelect formula
On your button’s OnSelect:
Set(varSelectedDept, "Finance");
When you click the button, the dropdown will jump to Finance — even though the list is coming live from SharePoint.
Pro Tip: Using the SharePoint Choice Column
If your SharePoint column is a Choice column (not a lookup or text column), you should use the Choices() function to populate your dropdown Items:
Choices([@Departments].Status)
Replace Departments with your list name and Status with your choice column name. This automatically pulls the choice options without any extra collections or hardcoding.
Read Power Apps Multiple IF Statements
Method 3: Cycle Through Dropdown Values on Each Button Click
This one is a crowd-pleaser. I love showing this pattern in my training sessions because people always say “I didn’t know you could do that.”
The idea: every time a user clicks a button, the dropdown moves to the next value in the list. Think of it like a “Next” button that steps through options one by one.
The Setup
Create a collection first (on a button called Load Departments):
ClearCollect(
    colDepartments,
    {Department: "Human Resource", SNo: 1},
    {Department: "Finance", SNo: 2},
    {Department: "Information Technology", SNo: 3},
    {Department: "Marketing", SNo: 4}
);
Set your dropdown’s Items property to:
colDepartments.Department
And the Default property to:
varDepartment
The Cycle Button Formula
On the Next Department button’s OnSelect, write:
If(
    varSNo < 4,
    Set(varSNo, varSNo + 1),
    Set(varSNo, 1)
);
Switch(
    varSNo,
    1, Set(varDepartment, "Human Resource"),
    2, Set(varDepartment, "Finance"),
    3, Set(varDepartment, "Information Technology"),
    4, Set(varDepartment, "Marketing")
);
Notice I changed the last condition to loop back to 1 instead of going backwards — that way the button cycles cleanly from the last item back to the first.
What’s happening here: First, I increment varSNo (or loop it back to 1 if we’ve hit the end). Then, a Switch statement maps each number to a department name and sets the varDepartment variable, which the dropdown is watching.
Check out Data Table Control in Power Apps Canvas App
Method 4: Set Dropdown Value from a Gallery or Form Selection
This is a scenario I see constantly in real apps: a user clicks a row in a gallery, and the dropdown on a detail/edit screen auto-populates with the value from that gallery row.
Say you have a Gallery connected to a SharePoint list of employees, and when the user clicks on an employee, the Department dropdown on your edit form should show that employee’s department.
The Pattern
On the Gallery’s OnSelect (or on a button inside the gallery item):
Set(varSelectedEmployee, ThisItem);
Then on your dropdown’s Default property:
varSelectedEmployee.Department
That’s it. The dropdown will display the department of whatever employee the user clicked. When paired with a Submit button that runs a Patch() function, you get a fully functional edit form with a pre-populated dropdown.
Check out Set Control Value in Button Click on Power Apps
Method 5: Clear / Reset the Dropdown on Button Click
One of the most-asked questions I see on Reddit and the Power Platform community: “How do I reset a dropdown back to its default or empty state?”
For the classic dropdown, the easiest way is to use a context variable on the Reset property:
On your dropdown’s Reset property:
varResetDropdown
On your Reset button’s OnSelect:
UpdateContext({varResetDropdown: true});
UpdateContext({varResetDropdown: false});
You need to immediately set it back to false — Power Apps detects the change from false → true and triggers the reset. If you leave it as true, it stays locked and won’t reset again on the next click.
Alternative approach (more reliable):
Clear the collection backing the dropdown:
Clear(colDepartments);
This empties the items list entirely, which visually clears the dropdown. You’d then reload the collection with the Load Departments button.
Method 6: Dependent (Cascading) Dropdowns Triggered by a Button
Cascading dropdowns are where one dropdown’s selection filters what appears in another. Let me show you a real SharePoint example.
Scenario
You have two SharePoint lists:
- Regions list: North, South, East, West
- Cities list: Each city has a Region column
When the user picks a Region from the first dropdown and clicks Load Cities, the second dropdown shows only cities in that region.
Setup
First dropdown (Region):
Items:Regions- Name it:
ddRegion
Load Cities button’s OnSelect:
ClearCollect(
    colFilteredCities,
    Filter(Cities, Region = ddRegion.Selected.Title)
);
Second dropdown (City):
Items:colFilteredCitiesValue:Title
Now every time the user clicks Load Cities, the second dropdown refreshes based on whatever region is selected in the first dropdown. You can also make this automatic by moving the ClearCollect formula to the first dropdown’s OnChange property — but the button approach gives users explicit control, which is useful for slow connections.
Check out How to Clear/Reset Variables in Power Apps?
Working with the Modern Dropdown Control
Now let me talk about the modern dropdown control specifically, because it behaves differently from the classic one in a few important ways.
As of March 2026, the modern dropdown control is available for general use in Power Apps. Here’s what you need to know before you try to set its value on button click.
Key Differences
The modern dropdown control uses DefaultSelectedItems instead of Default. This property expects a table or array, not a plain text string. So the approach you use for the classic control won’t work directly — you need to adjust your formula.
Classic control — set default:
varDepartment
(a simple text variable)
Modern control — set default:
If(
    !IsBlank(varDepartment),
    [varDepartment],
    []
)
or
Filter(colDepartments, Department = varDepartment)
The square bracket syntax wraps your value into a single-item array/table, which is what DefaultSelectedItems expects.
Check out How to Work With Power Apps Variables?
Setting Modern Dropdown Value on Button Click
Step 1 — Add the modern dropdown to your screen
In Power Apps Studio, click + Insert, scroll to the Modern section, and pick Dropdown. The modern controls section might be labeled “Modern controls (preview)” in some environments, depending on your tenant settings.
Step 2 — Set Items
Departments
Then, in the Edit fields panel on the right, make sure the display field is set to the correct column (e.g., Department).
Step 3 — Set DefaultSelectedItems on button click
On your button’s OnSelect:
Set(
    varDepartment,
    LookUp(Departments, Title = "Finance")
)
You can see the exact output in the screenshot below:

On the modern dropdown’s DefaultSelectedItems property:
Filter(colDepartments, Department = varDepartment)
This pattern filters the backing collection to return the matching record, which is exactly what DefaultSelectedItems needs.
Resetting the Modern Dropdown
The modern dropdown does not have a Reset property. To reset it, you update DefaultSelectedItems to blank:
// On button's OnSelect:
Set(varDepartment, "");
And ensure your DefaultSelectedItems formula returns an empty table when varDepartment is blank:
If(
    IsBlank(varDepartment),
    Filter(colDepartments, false),
    Filter(colDepartments, Department = varDepartment)
)
Filter(colDepartments, false) always returns an empty table, which effectively shows no selection in the dropdown.
Check out Create an App from an Excel File in Power Apps
Connecting Everything to SharePoint Patch on Button Click
Let me put this all together in a real-world example. You have a form where users pick a Department from a dropdown, and clicking Save patches the selection back to a SharePoint list.
The Save Button Formula
Patch(
    Employees,
    Defaults(Employees),
    {
        Title: txtEmployeeName.Text,
        Department: ddDepartment.Selected.Value
    }
);
Notify("Employee saved successfully!", NotificationType.Success);
Set(varDepartment, "");
Here’s what’s happening line by line:
Patch()writes a new record to the Employees SharePoint listDefaults(Employees)tells Power Apps to create a new row (not update an existing one)TitleandDepartmentare the SharePoint columns being written toddDepartment.Selected.Valuereads the currently selected dropdown textNotify()shows the user a success messageSet(varDepartment, "")resets the dropdown after saving
For the modern dropdown, change ddDepartment.Selected.Value to ddDepartment.Selected.Department — where Department is the field name from your collection.
Common Mistakes (and How to Fix Them)
I’ve seen these come up time and time again — let me save you some debugging time.
Mistake 1: Setting Default to a value that doesn’t exist in Items
If you do Set(varDepartment, "HR") but your dropdown Items list contains "Human Resource", the dropdown will appear blank. Make sure the value you set in your variable exactly matches an item in the dropdown list — including capitalization.
Mistake 2: Expecting the dropdown to update without pointing Default to a variable
This one catches a lot of beginners. If you don’t connect the Default property to a variable, setting a variable with Set() does nothing to the dropdown. The dropdown only reacts when its own properties reference something that changed.
Mistake 3: Using Reset() on the modern dropdown control
The modern dropdown control doesn’t support the Reset property. If you try to wire a Reset boolean to it, nothing will happen. Use the DefaultSelectedItems + Filter() approach instead.
Mistake 4: Not accounting for delegation with large SharePoint lists
If your SharePoint list has more than 500 records, using Filter() directly in the Items property can hit delegation limits. Use ClearCollect() to bring data into a collection first, or apply server-side filters with columns that are delegation-friendly (like text columns and lookups).
Mistake 5: Forgetting AllowEmptySelection on the classic dropdown
By default, the classic dropdown always has something selected — even if you want it blank. Set AllowEmptySelection to true if you want users (or your formulas) to be able to deselect all options.
Quick Reference: Formulas Summary
Here’s a quick cheat sheet of all the patterns covered:
| Goal | Property | Formula |
|---|---|---|
| Set dropdown to a specific value | Button OnSelect | Set(varDept, "Finance") |
| Point dropdown to variable | Dropdown Default | varDept |
| Load from SharePoint on button click | Button OnSelect | ClearCollect(colData, SharePointList) |
| Reset classic dropdown | Button OnSelect | UpdateContext({varReset: true}); UpdateContext({varReset: false}) |
| Modern dropdown — set default | DefaultSelectedItems | Filter(colData, Field = varDept) |
| Modern dropdown — reset | Button + DefaultSelectedItems | Set(varDept, "") → Filter(col, false) |
| Save dropdown value to SharePoint | Button OnSelect | Patch(List, Defaults(List), {Column: dd.Selected.Value}) |
Final Thoughts
In this tutorial, I explained how to set a dropdown value on button click in Power Apps for both classic and modern control. Once you understand the relationship between variables, the Default (or DefaultSelectedItems) property, and the button’s OnSelect, you start seeing this pattern everywhere — in forms, filters, search interfaces, and dashboards.
My recommendation: start with Method 1 (the simple variable approach), get comfortable with it, and then move to the SharePoint-connected patterns in Methods 2 and 6. The modern dropdown control is worth learning too, especially if you’re building new apps from scratch in 2026 — it looks significantly better and aligns with Microsoft’s direction for Power Apps going forward.
If you have any questions or want me to cover a specific scenario — like multi-select dropdowns or dropdown resets inside a gallery — drop a comment below. I read and respond to everyone.

I’m Bijay Kumar, a Microsoft Business Application MVP specializing in Power Automate. I have been honored 11 times. With over 18 years in the IT industry, I have practical experience in Power Apps, Power Automate, Power BI, Power Pages, and SharePoint Online. I also co-authored the book Microsoft Power Platform—A Deep Dive. Currently, I develop various apps using Power Apps and automate business processes for many clients in the USA using Power Automate. Read more.