When building business applications in Power Apps, one of the most common requirements is allowing users to select or confirm options. This might seem simple, but in real-world apps, the logic around selections can become quite complex.
Think about scenarios like:
- Selecting multiple tasks to mark as completed
- Accepting terms and conditions before submitting a form
- Choosing multiple categories for a request
- Enabling additional fields based on user selection
- Selecting items in a gallery for bulk operations
In all these situations, the Checkbox control becomes extremely useful.
Microsoft recently introduced Modern Controls in Power Apps, including the Modern Checkbox. These controls are designed to provide:
- Better visual consistency
- Improved accessibility
- Modern Fluent UI styling
- Cleaner user experience for enterprise apps
Many developers are currently looking for solutions like:
- Power Apps modern checkbox control
- How to get the Power Apps checkbox checked value
- How to set a default value in a Power Apps checkbox
- Power Apps checkbox in gallery
- Power Apps checkbox multiple selection
- Power Apps checkbox patch SharePoint
- Power Apps modern controls vs classic controls
In this tutorial, I will walk you through everything you need to know about the Power Apps Modern Checkbox control, from beginner basics to advanced real-world scenarios.
What is the Power Apps Modern Checkbox Control?
The Modern Checkbox is part of the Modern Controls library in Power Apps.
It allows users to select or deselect an option. Unlike radio buttons, users can select multiple checkboxes at the same time.
Typical UI Example
☑ Accept Terms and Conditions
☐ Subscribe to newsletter
☑ Enable notifications
Each checkbox returns a Boolean value:
true→ checkedfalse→ unchecked
This makes it very easy to control logic inside your Power Apps formulas.
Classic Checkbox vs Modern Checkbox
Many developers ask whether they should use classic or modern controls.
Here is the practical difference.
| Feature | Classic Checkbox | Modern Checkbox |
|---|---|---|
| Styling | Basic | Fluent UI style |
| Responsiveness | Limited | Better |
| Accessibility | Standard | Improved |
| Modern design support | No | Yes |
| Recommended for new apps | No | Yes |
If you are building new apps, I strongly recommend using Modern Controls.
How to Enable Modern Controls in Power Apps
Before you can use the Modern Checkbox, you need to enable modern controls.
Step 1
Open your Power Apps Canvas App.
Step 2
Go to:
Settings → Upcoming features → Preview
Step 3
Enable:
Modern controls and themes
Step 4
Reload the app.
Now you will see Modern controls inside the Insert panel.
How to Add a Modern Checkbox in Power Apps
Let’s create our first checkbox in a Power Apps canvas app. New to Power Apps? Check out a complete tutorial on how to create a responsive Power Apps canvas app.
Step 1
Open your Canvas App.
Step 2
Click:
Insert → Modern Controls → Checkbox
Power Apps will insert a Modern Checkbox control on the screen.
Step 3
Rename the control.
Example:
chkAcceptTerms
Naming controls properly helps maintain large applications.
Important Properties of the Modern Checkbox
Understanding properties is essential to control behavior.
Text
Defines the label shown next to the checkbox.
Example:
"Accept Terms and Conditions"
Checked
This property determines whether the checkbox is selected.
Example:
true
or
false
You can also control it dynamically.
Example:
If(User().Email = "admin@company.com", true, false)
OnCheck
Runs when the checkbox becomes checked.
Example:
Set(varAccepted, true)
OnUncheck
Runs when the checkbox becomes unchecked.
Example:
Set(varAccepted, false)
DisplayMode
Controls whether users can interact with the checkbox.
Example:
DisplayMode.Disabled
or
DisplayMode.Edit
Example scenario:
Disable the checkbox until the user fills out the form.
If(IsBlank(txtName.Text), DisplayMode.Disabled, DisplayMode.Edit)
Check out Patch Function in Power Apps
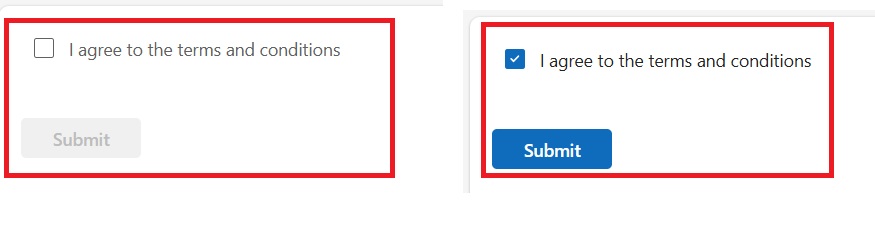
Example 1 – Accept Terms Checkbox
One of the most common uses of a checkbox is to ensure that users accept the terms and conditions before submitting a form. Many registration or request forms require this confirmation.
In this example, we will disable the submit button until the user checks the checkbox.
Step 1 — Add a Checkbox
Insert a checkbox and rename it:
chkTerms
Set the Text property:
"I agree to the terms and conditions"
This checkbox indicates the user’s acceptance of the terms.
Step 2 — Add a Submit Button
Insert a button and rename it:
btnSubmit
This button will submit the form once the checkbox is selected.
Step 3 — Control the Button Using the Checkbox
Set the DisplayMode property of the button:
If(chkTerms.Checked, DisplayMode.Edit, DisplayMode.Disabled)
What this formula does
- If the checkbox is checked → button becomes clickable
- If the checkbox is unchecked → button remains disabled
This ensures users cannot proceed until they accept the terms.
You can check the screenshot below:
Read Sequence Function in Power Apps
Example 2 – Show or Hide Fields Using a Checkbox
In many business apps, additional information is required only when a user selects a specific option. A checkbox can be used to show or hide fields dynamically.
For example, a request form may require manager approval only in certain situations.
Step 1 — Insert a Checkbox
Rename the checkbox:
chkManagerApproval
Set the Text property:
"Require Manager Approval"
When users select this checkbox, they indicate that the request requires approval.
Step 2 — Add a Manager Field
Insert a text input control and rename it:
txtManager
This field will allow the user to enter the manager’s name.
Step 3 — Control Visibility
Set the Visible property of the text input:
chkManagerApproval.Checked
What this does
- If checkbox is checked → manager field appears
- If checkbox is unchecked → field remains hidden
Here is the exact output in the screenshot below:
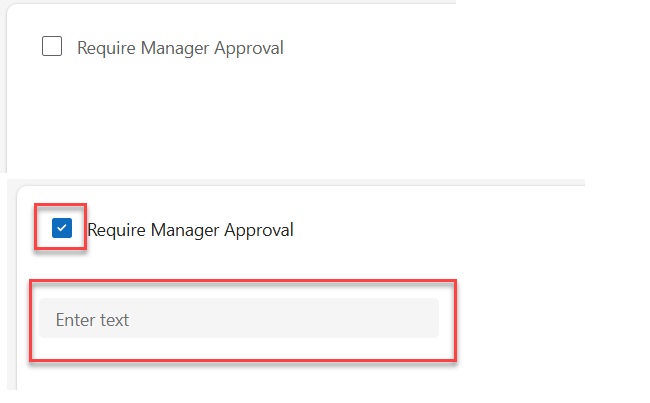
This approach keeps the interface clean and simple, only showing fields when necessary.
Check out Power Apps Modern Date Picker with Time
Example 3 – Using Checkbox Inside a Gallery
A very common requirement in Power Apps is allowing users to select multiple records from a list.
Checkboxes inside a gallery make it easy to perform bulk operations, such as updating multiple records.
Step 1 — Insert a Gallery
Connect the gallery to a data source such as:
Employees
The gallery will display multiple employee records.
Step 2 — Add Checkbox Inside Gallery
Insert a checkbox control inside the gallery template.
Rename it:
chkSelectItem
This checkbox allows users to select individual records.
Step 3 — Store Selected Items
Set the OnCheck property:
Collect(colSelectedEmployees, ThisItem)
Explanation
When a user checks the checkbox, the current record is added to a collection called:
colSelectedEmployees
Step 4 — Remove Items When Unchecked
Set the OnUncheck property:
Remove(colSelectedEmployees, ThisItem)
Explanation
When the checkbox is unchecked, the record is removed from the collection.
This technique allows users to select multiple records and store them temporarily for processing.
Check out How to Set Dropdown Value On Button Click in Power Apps
Example 4 – Bulk Update Using Checkbox Selection
Once users can select multiple records, the next step is usually to perform an action on all selected items.
For example, a manager may want to mark multiple tasks as completed.
Step 1 — Select Records Using Checkboxes
Use the same gallery setup from the previous example, where selected items are stored in:
colSelectedEmployees
This collection holds all selected records.
Step 2 — Add a Button
Insert a button and name it something meaningful such as:
Mark Completed
This button will update all selected items.
Step 3 — Update Records
Set the OnSelect property of the button:
ForAll(
    colSelectedEmployees,
    Patch(
        Employees,
        ThisRecord,
        {Status:"Completed"}
    )
)
What happens here
- The app loops through every selected record
- Each record is updated in the data source
- The status is changed to Completed
This pattern is widely used in approval apps, task management systems, and admin dashboards.
Check out How to Calculate the Difference Between Two Dates in Power Apps
Example 5 – Save Checkbox Value to SharePoint
Checkboxes are often used to store Yes/No values in SharePoint lists.
For example, a request form might include a field indicating whether the request is approved.
Step 1 — SharePoint Column
Create a Yes/No column in SharePoint.
Example column name:
Approved
This column will store the checkbox value.
Step 2 — Add Checkbox in Power Apps
Rename the checkbox:
chkApproved
This checkbox will represent the approval status.
Step 3 — Save Data Using Patch
Use the following formula when submitting the form:
Patch(
    EmployeeRequests,
    Defaults(EmployeeRequests),
    {
        Title: txtTitle.Text,
        Approved: chkApproved.Checked
    }
)
Explanation
- The checkbox returns true or false
- SharePoint automatically maps this value to Yes or No
This makes integration with SharePoint very straightforward.
Example 6 – Load Checkbox Value When Editing Records
When editing an existing record, the checkbox should display the current stored value.
Otherwise, users might accidentally overwrite existing data.
Configure the Checked Property
Set the Checked property of the checkbox:
ThisItem.Approved
Explanation
- If SharePoint value is Yes → checkbox appears checked
- If value is No → checkbox appears unchecked
This ensures the form correctly reflects the existing record data.
Example 7 – Reset Checkbox After Form Submission
After submitting a form, you may want to clear all selections so the next entry starts fresh.
Otherwise, users might accidentally submit incorrect values.
Reset a Single Checkbox
Use the Reset function:
Reset(chkApproved)
This clears the checkbox selection.
Reset Multiple Controls
If your app uses a form control, you can reset everything at once:
ResetForm(Form1)
Explanation
This resets:
- Text inputs
- Checkboxes
- Dropdowns
- Other form fields
It ensures the form returns to its default state.
Advanced Tips Used by Power Apps Developers
After building many production apps, I have learned several useful tricks.
Use Variables to Control Checkbox Logic
Instead of referencing controls everywhere, store values.
Example:
Set(varIsApproved, chkApproved.Checked)
Now reuse:
If(varIsApproved, "Approved", "Pending")
This makes formulas cleaner.
Use Checkbox with Conditional Formatting
Example: highlight rows in gallery.
Gallery TemplateFill:
If(chkSelectItem.Checked, RGBA(200,230,255,1), White)
This improves UX significantly.
Use Checkbox for Feature Toggles
Example scenarios:
- Enable notifications
- Enable advanced settings
- Enable admin mode
Example:
chkAdvancedMode
Then control the visibility of advanced features.
Use Checkbox for Filtering Data
Example:
Show only completed tasks.
Checkbox:
chkShowCompleted
Gallery Items:
If(
    chkShowCompleted.Checked,
    Filter(Tasks, Status="Completed"),
    Tasks
)
Common Mistakes Developers Make
Over the years, I have seen many developers struggle with simple checkbox issues.
Here are the most common ones.
Mistake 1 – Using Text Instead of Checked Property
Wrong:
chkApproved.Text
Correct:
chkApproved.Checked
Checkbox logic must always use Checked.
Mistake 2 – Not Resetting Checkbox
After form submission, users see old selections.
Always reset when needed.
Mistake 3 – Not Using Collections for Multiple Selection
Developers sometimes try to track selections manually.
Use:
Collect()
Remove()
instead.
Mistake 4 – Using Too Many Checkbox Controls
If users must select only one option, use Radio buttons instead.
Checkbox = multiple selection
Best Practices for Using Checkbox in Production Power Apps
When building Power Apps for real business environments, checkboxes may seem like a small UI element, but they can significantly impact usability, data accuracy, and maintainability.
Over the years, while building enterprise apps for SharePoint and Microsoft 365 environments, I have learned that following a few best practices makes apps much easier to maintain and scale.
Below are some practical guidelines I always follow when implementing checkbox controls in production apps.
1. Use Meaningful Control Names
One of the biggest mistakes I see in many Power Apps is leaving controls with their default names.
Power Apps automatically names controls like this:
Checkbox1
Checkbox2
Checkbox3
This works for small apps, but once your application grows, formulas become difficult to understand.
For example, this formula is confusing:
If(Checkbox3.Checked, true, false)
Instead, always rename controls to something meaningful.
Good examples:
chkAcceptTerms
chkManagerApproval
chkSendNotification
chkSelectEmployee
Now the formula becomes much easier to understand:
If(chkManagerApproval.Checked, true, false)
Clear naming improves:
- readability
- maintenance
- collaboration with other developers
2. Keep Checkbox Labels Clear and Descriptive
The label next to a checkbox should clearly explain what the user is agreeing to or selecting.
Poor labels often confuse users and lead to incorrect selections.
Bad example:
Enable
Users will immediately ask: Enable what?
Better example:
Enable email notifications
Another good example:
Require manager approval for this request
When labels are descriptive:
- Users make fewer mistakes
- The app becomes easier to use
- support requests decrease
Always write labels from the user’s perspective, not the developer’s perspective.
3. Avoid Overloading Screens with Too Many Checkboxes
Sometimes developers place too many checkboxes on a single screen, which makes the interface overwhelming.
For example:
☐ Send email
☐ Send SMS
☐ Send Teams message
☐ Send approval request
☐ Send notification to manager
☐ Send notification to HR
☐ Send notification to admin
This quickly becomes difficult for users to understand.
Instead, group related options logically.
For example:
Notifications
☐ Email notification
☐ SMS notification
☐ Teams notification
Approvals
☐ Manager approval required
☐ HR approval required
Grouping options improves:
- user experience
- readability
- decision making
4. Use Checkbox Only for Multiple Selections
A checkbox should be used when users are allowed to select multiple options.
A common design mistake is using checkboxes when only one option should be selected.
For example, this is incorrect:
☐ High
☐ Medium
☐ Low
Users might accidentally select multiple priorities.
The correct control for this situation is Radio buttons.
( ) High
( ) Medium
( ) Low
Understanding when to use the right control improves the overall UX of your app.
5. Use Tooltips for Complex Options
Sometimes checkbox options require additional explanation.
Instead of making the label very long, you can add a Tooltip property to provide extra information.
Example:
Checkbox label:
Enable advanced security validation
Tooltip property:
"Enabling this option will require additional approval from the IT security team."
When users hover over the checkbox, they see more information.
This is especially useful in:
- admin portals
- configuration screens
- advanced settings panels
6. Reset Checkboxes When Necessary
Another common problem in Power Apps forms is that checkboxes remain selected after a form submission.
This can lead to incorrect data entry for the next user.
For example, if a checkbox like this remains checked:
☑ Send notification to manager
The next request might accidentally trigger unnecessary notifications.
To avoid this, reset the checkbox after submission.
Example:
Reset(chkSendNotification)
If you are using forms, resetting the entire form is even better.
ResetForm(Form1)
This ensures every new entry starts with clean default values.
7. Maintain Consistent UI Across the App
Consistency is extremely important in business applications.
If checkboxes behave differently on different screens, users get confused.
For example:
Screen 1:
☐ Send notification
Screen 2:
☐ Notify manager
Both may do the same thing, but inconsistent naming creates confusion.
Instead, keep consistent terminology across the app.
Example:
☐ Send notification to manager
Consistency helps users:
- learn the app faster
- avoid mistakes
- trust the system
8. Use Checkbox Logic Carefully in Large Forms
In complex forms, checkboxes often control conditional logic, such as showing fields or triggering approvals.
Example logic:
If(chkManagerApproval.Checked, true, false)
This might trigger:
- additional fields
- approval workflows
- notifications
In large apps, these conditions can become difficult to manage.
A good practice is to store the checkbox value in a variable.
Example:
Set(varManagerApproval, chkManagerApproval.Checked)
Now you can reuse the variable throughout the app.
If(varManagerApproval, true, false)
This improves performance and keeps formulas cleaner.
9. Test Checkbox Behavior with Real Data
Finally, always test checkbox logic with real scenarios.
Things to verify include:
- What happens when the checkbox is unchecked?
- Does the checkbox reset correctly?
- Does the value save correctly to SharePoint or Dataverse?
- Does the UI behave correctly when reopening the record?
Testing these scenarios prevents many issues in production.
When NOT to Use Checkbox in Power Apps
Developers sometimes misuse checkboxes.
Avoid the checkbox when:
- Only one option must be selected → use Radio buttons
- User must toggle a feature → use Toggle control
- Selecting from large datasets → use Dropdown or ComboBox
Choosing the right control improves user experience.
Conclusion
The Power Apps Modern Checkbox control is simple but incredibly powerful when used correctly.
It helps users make selections, control application logic, and interact with data in meaningful ways.
In this tutorial, we covered:
- What the Modern Checkbox control is
- How to enable modern controls
- Step-by-step implementation
- Practical examples with formulas
- Using a checkbox with galleries and SharePoint
- Advanced techniques used by experienced developers
- Common mistakes and best practices
Once you understand how to use checkboxes effectively, you can build more interactive, user-friendly, and production-ready Power Apps applications.
You may also like:

Bijay Kumar is a Microsoft MVP in Business Applications with over 18 years of experience in the IT industry and more than 12 years as a Microsoft MVP, recognized for his contributions to the Microsoft community. He is the Founder of TSinfo Technologies and the creator of the popular technology platforms SPGuides.com and EnjoySharePoint.com. Bijay also runs the SPGuides YouTube channel, where he shares practical tutorials on Microsoft 365, SharePoint, Power Platform, and Copilot technologies. Read more.