If you’ve built a gallery in Power Apps that shows a list of employees, teammates, or records, you’ve probably wondered — how do I also show who their manager is? Maybe you want a team directory that shows each person alongside their manager, or a request list where reviewers can see the chain of ownership at a glance.
It’s absolutely doable, and once you know the pattern, it’s actually quite repeatable. In this tutorial, I’ll walk you through two scenarios — one where your gallery pulls from a SharePoint list, and one where you’re working with the Office 365 Users connector directly. I’ll also show you the right way to handle performance so your gallery doesn’t crawl when it loads.
Let’s get into it.
If you are new to Power Apps and want to learn it, check out the Power Apps training courses.
What You’ll Need
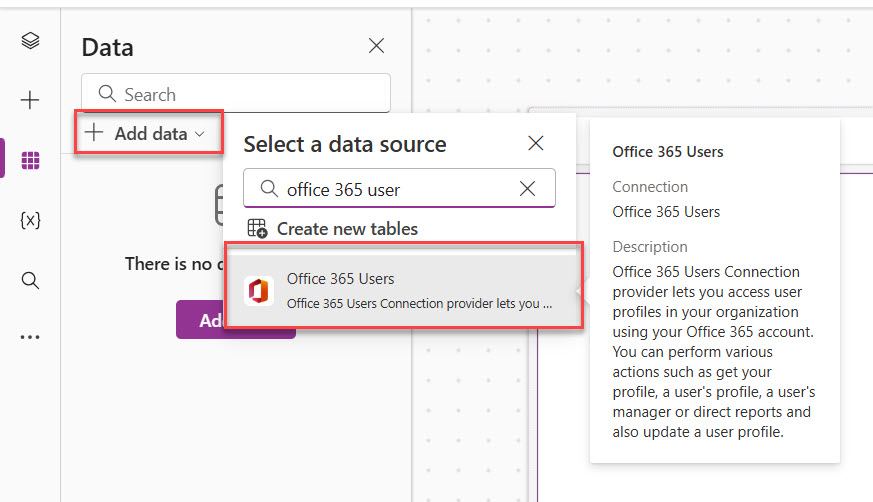
Before anything else, make sure you have the Office 365 Users connector added to your app. This is the connector that lets you call functions like ManagerV2() to look up someone’s manager from Microsoft Entra ID (Azure Active Directory).
To add it:
- Open your canvas app in Power Apps Studio.
- Click Data in the left panel.
- Click Add data.
- Search for Office 365 Users and select it.
- Click Connect.
You can see the screenshot below. This should look like this.
That’s it. You’re ready to use it in your formulas.
If you are a beginner, check out a complete tutorial about creating a responsive apps in Power Apps.
Scenario 1: Gallery Connected to a SharePoint List
This is the most common setup I see. You have a SharePoint list — maybe an Employee Directory, a Leave Requests list, or a Project Tracker — and one of the columns is a Person or Group column (for example, AssignedTo or Employee). You want to show each person’s manager name and email right there in the gallery row.
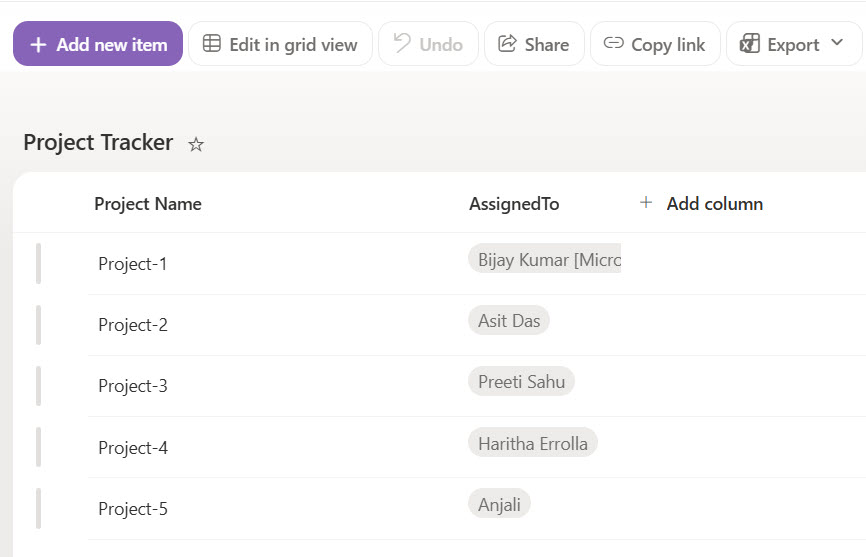
Here, in this case, I have a SharePoint list as Project Tracker. It has two columns:
- Project Name (Title column)
- AssignedTo
You can see in the screenshot below that this is how the SharePoint Online list looks:
Step 1: Add Your Gallery and Connect It to SharePoint
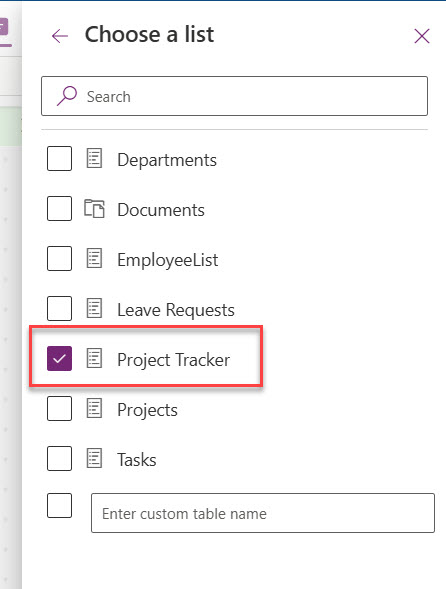
First, add the SharePoint data source, select the SharePoint site, and then select the list above.
Here is a screenshot for your reference.
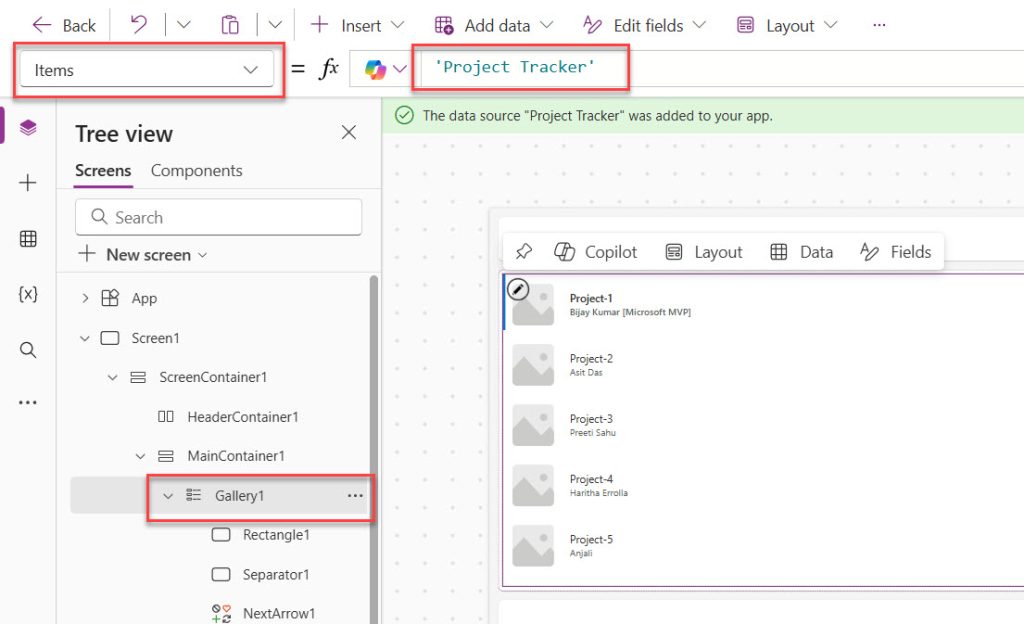
Then, insert a Vertical Gallery on your screen and set its Items property to your SharePoint list:
Project Tracker
Here, Project Tracker is the actual name of the list as it appears in your data sources panel.
You can see how it looks in the screenshot below:
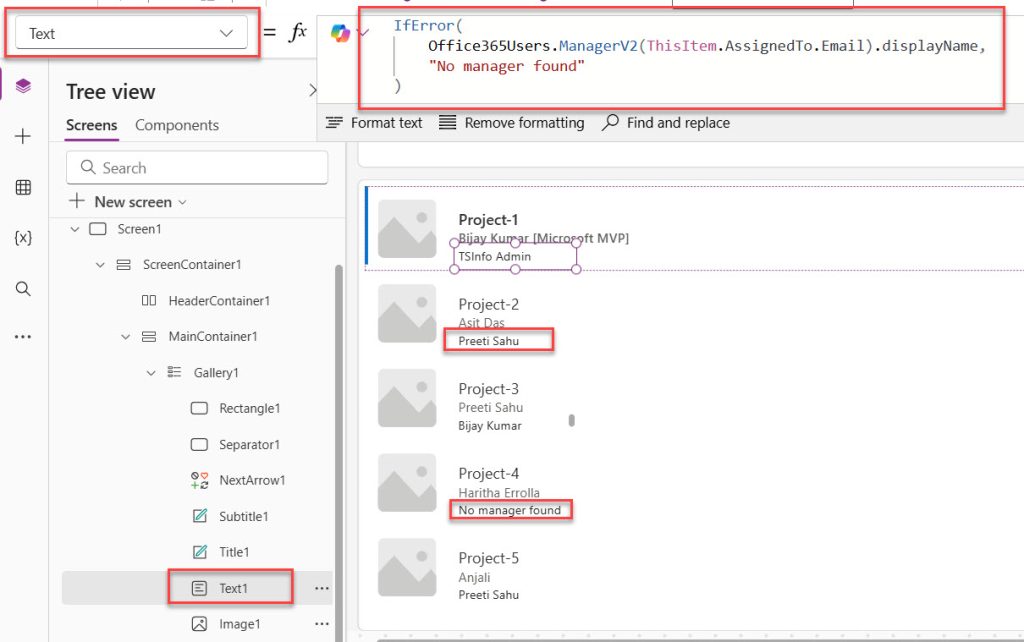
Step 2: Add a Manager Name Label Inside the Gallery
Click once on the gallery to select it, then click once more to go inside the gallery template (you’ll see the blue selection border move to the first item). Now insert a Label control.
Since this is a responsive Power Apps, I have adjusted the Label control coordinates (x and y axis).
Set its Text property to:
IfError(
    Office365Users.ManagerV2(ThisItem.AssignedTo.Email).displayName,
    "No manager found"
)
Replace AssignedTo with the actual name of your Person column in SharePoint. The .Email at the end pulls the email from that person field and passes it to ManagerV2(), which looks up their manager.
The IfError() wrapper is important — if a user doesn’t have a manager set in Entra ID, the formula would throw an error without it. This way it gracefully shows “No manager found” instead.
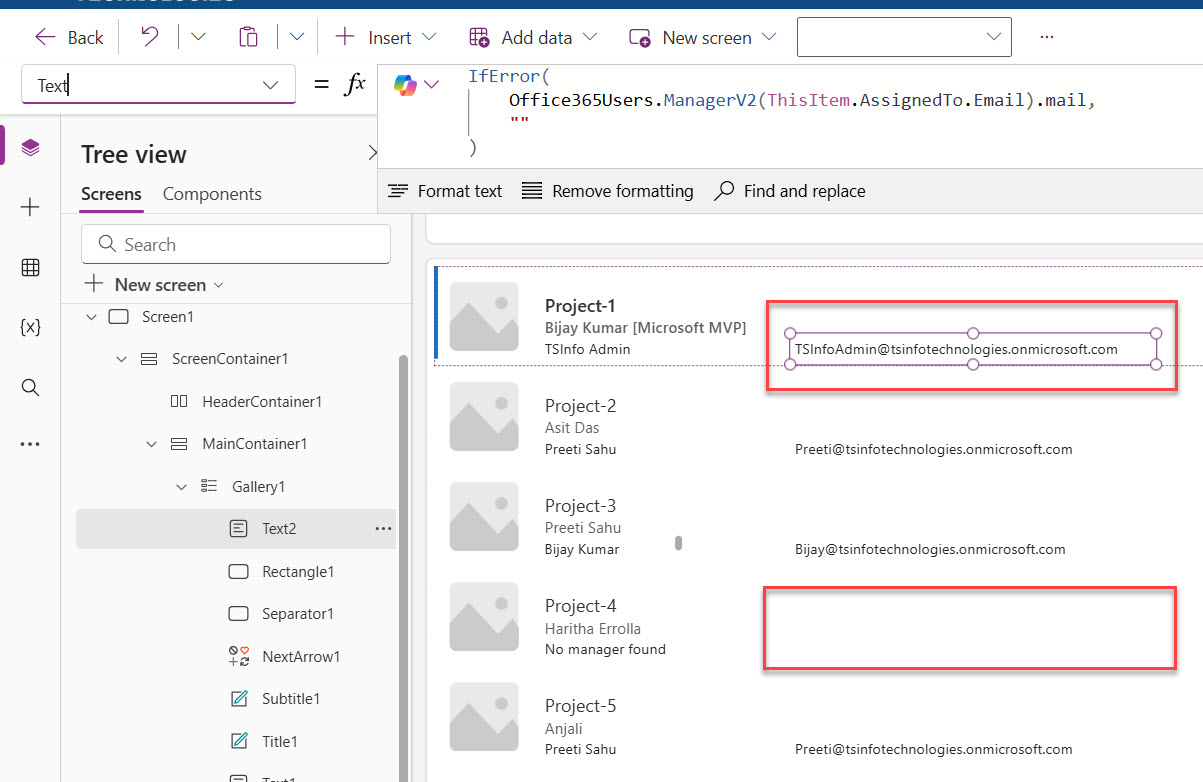
Here is the exact output you can see in the screenshot below:
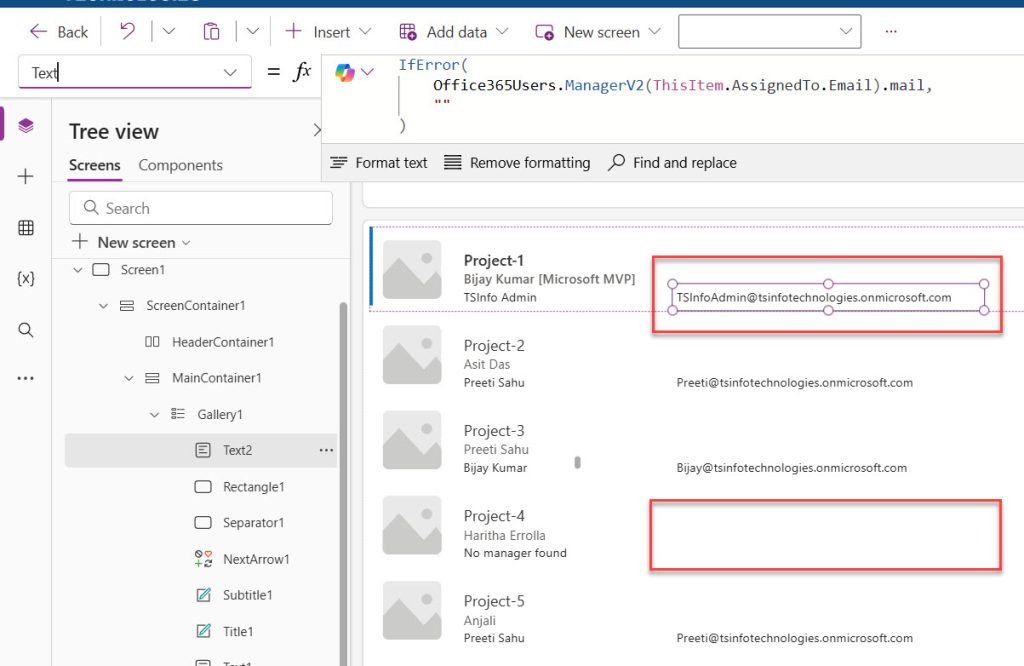
Step 3: Add a Manager Email Label Inside the Gallery
Insert another Label inside the same gallery template. Set its Text property to:
IfError(
    Office365Users.ManagerV2(ThisItem.AssignedTo.Email).mail,
    ""
)
This pulls the manager’s email address. The fallback is an empty string — so if there’s no manager, the field just stays blank rather than showing an error.
Your gallery will now show the manager’s name and email for every row, looked up live from your organization’s directory. You can see the exact output in the screenshot below:
Also, check out How to Get User Details in Power Apps?
Scenario 2: Gallery Sourced from Office 365 Users Connector
Sometimes your gallery isn’t pulling from SharePoint at all — it might be listing users from Entra ID directly. For example, a company directory app where users can search for colleagues.
In this case, the gallery items are already user profile objects from the Office 365 Users connector, and you can look up each person’s manager using the same ManagerV2() function.
Set the Gallery Items to a User Search
Set the gallery’s Items property to:
Office365Users.SearchUser({searchTerm: TextInput1.Text}).value
This populates the gallery with users that match whatever someone types in a search box (TextInput1). Each row in the gallery is now a user profile object.
Add Labels Inside the Gallery
Manager Name label — Text property:
IfError(
    Office365Users.ManagerV2(ThisItem.mail).displayName,
    "No manager"
)
Manager Email label — Text property:
IfError(
    Office365Users.ManagerV2(ThisItem.mail).mail,
    ""
)
Here ThisItem.mail is the email of the person shown in that gallery row. Power Apps uses that to look up their manager from the directory.
Check out Delegation in Power Apps
The Performance Problem (And the Right Fix)
Here’s something you’ll notice quickly if your list has more than a handful of rows: the gallery gets slow. Sometimes very slow.
The reason is that every gallery row is making API calls to the Office 365 Users connector — once for the manager name and once for the manager email. If you have 20 rows and two labels per row, that’s 40 API calls every time the screen loads or refreshes. Power Apps may also throttle those requests, causing some rows to show errors or load late.
The solution is to pre-load all the manager data into a collection before the gallery renders. Instead of the gallery making live API calls while it draws each row, you do all the work upfront and store the results in memory. The gallery then just reads from that collection — no API calls during rendering.
How to Build the Power Apps Collection
In your screen’s OnVisible property (or the App’s OnStart if you need it globally), add this:
ClearCollect(
    colEmployeesWithManagers,
    AddColumns(
        YourSharePointListName,
        "ManagerName",
        IfError(
            Office365Users.ManagerV2(AssignedTo.Email).displayName,
            "N/A"
        ),
        "ManagerEmail",
        IfError(
            Office365Users.ManagerV2(AssignedTo.Email).mail,
            ""
        )
    )
)
What this does step by step:
YourSharePointListName— your original data sourceAddColumns()— adds extra calculated columns to each row"ManagerName"and"ManagerEmail"— the names of those new columnsIfError(Office365Users.ManagerV2(...), "N/A")— looks up the manager for each row and handles errors gracefullyClearCollect(colEmployeesWithManagers, ...)— stores the whole enriched table in a collection calledcolEmployeesWithManagers
Point the Gallery to the Collection
Now update the gallery’s Items property to use the collection instead of your SharePoint list:
colEmployeesWithManagers
Update the Labels Inside the Gallery
Since the manager details are already in the collection, the labels inside the gallery become simple:
Manager Name label — Text property:
ThisItem.ManagerName
Manager Email label — Text property:
ThisItem.ManagerEmail
No more API calls while the gallery is rendering. Everything is already in memory. The gallery loads fast and smoothly, regardless of how many rows there are.
Check out Power Apps Concatenate Strings
Putting It All Together — A Real Example
Let’s say you’re building a Team Directory app connected to a SharePoint list called EmployeeDirectory. The list has these columns:
Title— employee’s name (single line of text)WorkEmail— employee’s email (single line of text)Department— their department
You want each gallery row to show the employee’s name, their email, and their manager’s name and email.
Step 1: In the screen’s OnVisible property:
ClearCollect(
    colDirectory,
    AddColumns(
        EmployeeDirectory,
        "ManagerName",
        IfError(
            Office365Users.ManagerV2(WorkEmail).displayName,
            "No manager"
        ),
        "ManagerEmail",
        IfError(
            Office365Users.ManagerV2(WorkEmail).mail,
            ""
        )
    )
)
Step 2: Set the gallery’s Items to:
colDirectory
Step 3: Inside the gallery, set up your labels:
| Label | Text property |
|---|---|
| Employee Name | ThisItem.Title |
| Employee Email | ThisItem.WorkEmail |
| Manager Name | ThisItem.ManagerName |
| Manager Email | ThisItem.ManagerEmail |
That’s your complete team directory with manager details, built cleanly and performing well.
Read How to Send Emails from Power Apps
Show a Loading Spinner While the Collection Builds
Since loading the collection takes a second or two (especially for large lists), it’s good practice to show a loading indicator so users know the app is working.
In the screen’s OnVisible:
Set(varLoading, true);
ClearCollect(
    colEmployeesWithManagers,
    AddColumns(
        YourSharePointListName,
        "ManagerName",
        IfError(Office365Users.ManagerV2(AssignedTo.Email).displayName, "N/A"),
        "ManagerEmail",
        IfError(Office365Users.ManagerV2(AssignedTo.Email).mail, "")
    )
);
Set(varLoading, false)
Add a Loading label or spinner to the screen and set its Visible property to:
varLoading
Set the gallery’s Visible property to:
!varLoading
Now the gallery is hidden while the collection loads and appears once it’s ready. Small touch, but it makes the app feel polished.
Important Mistakes to Avoid
Here are some mistakes that you should avoid.
- Not using IfError() — Always wrap
ManagerV2()calls inIfError(). Any user without a manager set in Entra ID will cause a formula error that breaks the gallery row. - Calling ManagerV2() directly in gallery labels — This works but it’s slow. Use the
AddColumns+ClearCollectapproach for anything more than a handful of rows. - Using
.Emailvs.mail— For SharePoint Person columns, useThisItem.PersonColumn.Email(capital E). For Office 365 Users connector results, use.mail(lowercase). They’re different object types. - Testing only with your own account — Always test with a real user account. Admin accounts and some service accounts often don’t have managers assigned, so you might not catch the missing-manager scenario during development.
- Forgetting to refresh the collection — If your SharePoint data changes, the collection won’t update automatically unless you re-run
ClearCollect. Add a Refresh button if users need up-to-date data without leaving the screen.
Conclusion
In this tutorial, I explained how to display the manager’s name and email address in a Power Apps gallery. Here is a summary of what we did here:
| Goal | Formula |
|---|---|
| Show manager name in gallery (live) | IfError(Office365Users.ManagerV2(ThisItem.PersonCol.Email).displayName, “N/A”) |
| Show manager email in gallery (live) | IfError(Office365Users.ManagerV2(ThisItem.PersonCol.Email).mail, “”) |
| Pre-load manager data into collection | ClearCollect(colData, AddColumns(ListName, “ManagerName”, IfError(Office365Users.ManagerV2(PersonCol.Email).displayName, “N/A”))) |
| Show manager name from collection | ThisItem.ManagerName |
| Show manager email from collection | ThisItem.ManagerEmail |
The collection pattern is the one I’d always go with in production apps. It’s a bit more setup, but your gallery will be faster, cleaner, and far less likely to hit API throttling issues when multiple users are in the app at the same time.
You may also like the following tutorials:

Bijay Kumar is a Microsoft MVP in Business Applications with over 18 years of experience in the IT industry and more than 12 years as a Microsoft MVP, recognized for his contributions to the Microsoft community. He is the Founder of TSinfo Technologies and the creator of the popular technology platforms SPGuides.com and EnjoySharePoint.com. Bijay also runs the SPGuides YouTube channel, where he shares practical tutorials on Microsoft 365, SharePoint, Power Platform, and Copilot technologies. Read more.