If you’ve spent any time building Power Apps, you’ve probably run into situations where the default form controls just don’t cut it. You need to save data programmatically — maybe based on a button click, a condition, or across multiple screens. That’s exactly where the Patch function comes in, and once you understand it, you’ll use it in almost every app you build.
In this tutorial, I’ll walk you through everything you need to know about the Power Apps Patch function — from the basic syntax all the way to advanced patterns used in production apps.
Why is the Patch Function Required in Power Apps
Most Power Apps tutorials start you off with the EditForm and SubmitForm approach, which works fine for simple CRUD apps. But the moment your app gets more complex — saving data to multiple lists, applying logic before saving, or building multi-step forms — you hit walls.
The Patch function solves this. It lets you:
- Create a new record in a data source without using a form
- Update an existing record with specific field changes only
- Merge records from collections or local variables
- Write to multiple data sources in a single button click
- Control exactly what gets saved, with no dependency on a form context
This is why most enterprise Power Apps developers switch to Patch fairly early. It gives you granular control that form-based saving simply doesn’t offer.
What Is the Power Apps Patch Function?
Think of Patch as a targeted write operation in Power Apps. You tell it three things:
- Where to save the data (your data source — a SharePoint list, Dataverse table, SQL table, etc.)
- Which record to write to (an existing record to update, or
Defaults()to create a new one) - What data to write (the fields and values you want to set)
Think of Patch like writing a record directly into a database table using a formula.
Instead of relying on forms, Patch lets you manually specify:
- Which record to update
- Which fields to update
- What values to store
The Patch function is used to create new records or update existing records in a data source.
In simple terms, Patch sends data from Power Apps to a data source such as:
- SharePoint
- Dataverse
- SQL Server
- Excel tables
- Other connectors
Syntax of the Patch Function in Power Apps
The typical Patch syntax looks like this:
Patch(DataSource, BaseRecord, ChangeRecord)
Let’s break this down because understanding these three components is critical.
1. DataSource
The DataSource is the location where your data is stored in Power Apps.
Examples include:
- A SharePoint list
- A Dataverse table
- A SQL table, etc.
Example:
Employees
This refers to a SharePoint list called Employees.
2. BaseRecord
The BaseRecord tells Power Apps which record you want to modify.
There are two possibilities:
- Create a new record
- Update an existing record
If you’re creating a new record, you typically use:
Defaults(DataSource)
If you’re updating an existing record, you usually pass a record such as:
ThisItem
3. ChangeRecord
The ChangeRecord contains the fields and values that should be updated.
Example:
{
   Title: txtName.Text,
   Department: drpDepartment.Selected.Value
}
This is simply a set of column-value pairs.
Simple.
Create a SharePoint List & Design the Form
Before diving into examples, let’s make sure we’re on the same page about the setup. I’m using:
- Power Apps Canvas App (make.powerapps.com)
- SharePoint Online as the data source (the most common scenario)
- A SharePoint list called “Leave Requests” with the following columns:
Title(Single line of text)EmployeeName(Single line of text)LeaveType(Choice: Annual, Sick, Unpaid)StartDate(Date)EndDate(Date)Status(Choice: Pending, Approved, Rejected)Comments(Multiple lines of text)
You can see the screenshot below; this is how the SharePoint list looks.

After this, go to make.powerapps.com and create a responsive canvas app before proceeding further.
Once the app is ready, add a SharePoint data source and select the “Leave Requests” list we created above.
For this, connect this list to your Power App via Data > Add data > SharePoint.
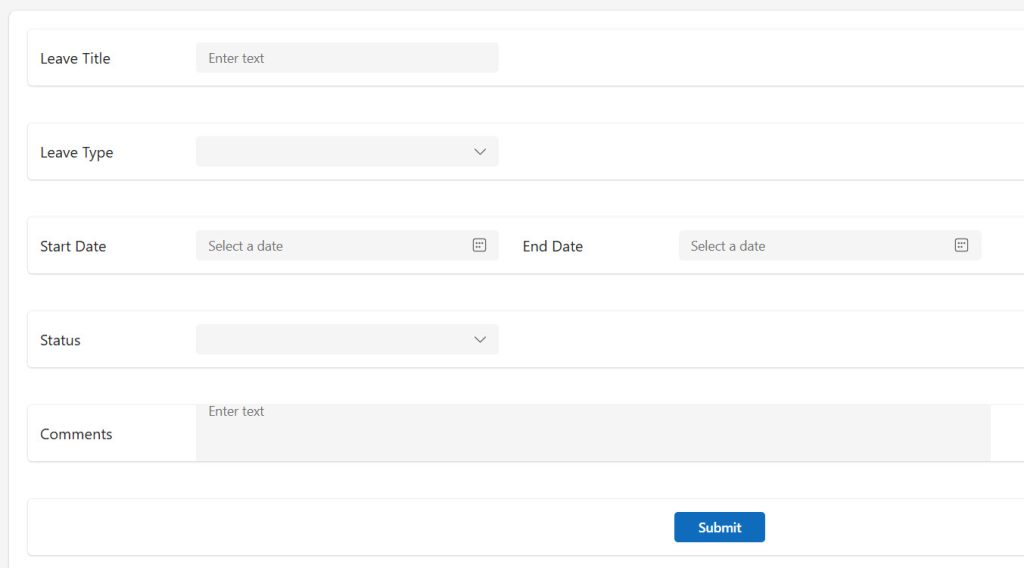
I have also designed the form with a few input controls, such as:
- Leave Title – Text input – txtTitle
- Leave Type – Dropdown – ddLeaveType – Items – [“Annual”, “Sick”, “Unpaid”]
- Start Date – Date picker – dpStartDate
- End Date – Date picker – dpEndDate
- Status – Dropdown – ddStatus – Items – [“Pending”, “Approved”, “Rejected”]
- Comments – Text input – txtComments – Multiline
- Submit – Button – btnSubmit
The form looks like the screenshot below:
Once the form is ready, we can proceed with examples.
Example 1: Creating a New Record with Patch
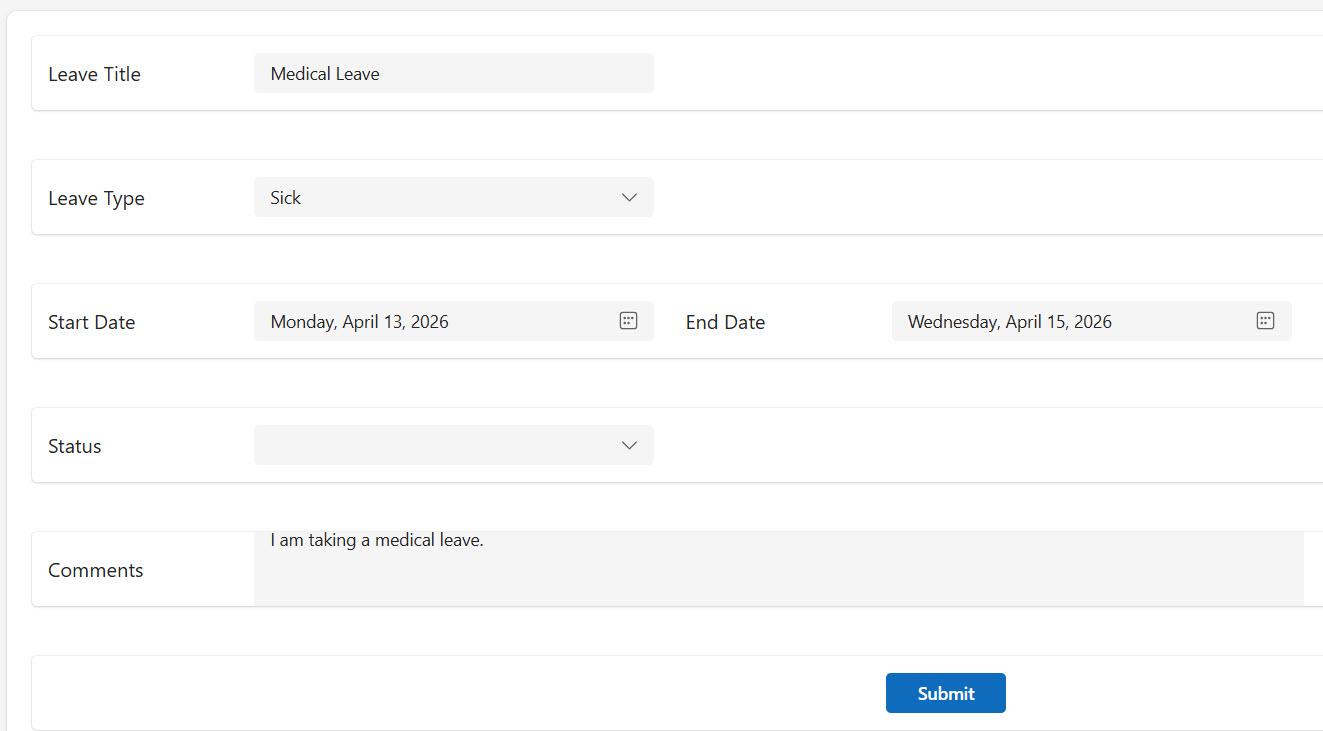
This is the most common use case. You have a form-like screen with text inputs, dropdowns, and date pickers — and when the user taps “Submit,” you want to save everything to SharePoint.
Here’s how that button’s OnSelect property looks:
Patch(
    'Leave Requests',
    Defaults('Leave Requests'),
    {
        Title: txtTitle.Text,
        EmployeeName: User().FullName,
        LeaveType: { Value: ddLeaveType.Selected.Value },
        StartDate: dpStartDate.SelectedDate,
        EndDate: dpEndDate.SelectedDate,
        Status: { Value: "Pending" },
        Comments: txtComments.Text
    }
)
Breaking this down:
Defaults('Leave Requests')tells Patch to create a brand new record — this is the key to new record creationUser().FullNameautomatically grabs the logged-in user’s name, so you don’t need an input for itLeaveType: { Value: ddLeaveType.Selected.Value }— Choice columns in SharePoint require a record with aValueproperty, not just a plain text string. This is one of the most common beginner mistakesdpStartDate.SelectedDateworks with a Date Picker control
You can see I previewed the app, and the screen appears as below. I entered the values and clicked the Submit button.

After running this, a new item appears in your SharePoint list immediately. You can see the exact output in the screenshot below:

Example 2: Updating an Existing Record
Now, say a manager opens a record to approve it. You want to update just the Status and Comments fields — you don’t want to touch anything else.
Patch(
    'Leave Requests',
    LookUp('Leave Requests', ID = galRequests.Selected.ID),
    {
        Status: { Value: "Approved" },
        Comments: "Approved by " & User().FullName
    }
)
What’s happening here:
LookUp('Leave Requests', ID = galRequests.Selected.ID)finds the exact record that the manager selected from a gallery- Only
StatusandCommentsare changed — every other field stays exactly as it was - This is the real power of Patch over SubmitForm: you update only the fields you specify
Example 3: Using Patch with a Variable (Editing a Pre-loaded Record)
A common pattern is to load a record into a variable when the user selects it, let them edit it on screen, and then save with Patch. Here’s how:
On the gallery’s OnSelect:
Set(varSelectedRequest, galRequests.Selected)
On the Edit screen’s Save button OnSelect:
Patch(
    'Leave Requests',
    varSelectedRequest,
    {
        LeaveType: { Value: ddLeaveType.Selected.Value },
        StartDate: dpStartDate.SelectedDate,
        EndDate: dpEndDate.SelectedDate,
        Comments: txtComments.Text
    }
)
This is cleaner than using LookUp every time — the record reference is already stored in the variable, so Patch knows exactly which row to update.
Example 4: Patch with Error Handling
In production apps, you always want to handle the case where Patch fails — network hiccup, permission issue, validation error. Wrap it in IfError:
IfError(
    Patch(
        'Leave Requests',
        Defaults('Leave Requests'),
        {
            Title: txtTitle.Text,
            EmployeeName: User().FullName,
            LeaveType: { Value: ddLeaveType.Selected.Value },
            StartDate: dpStartDate.SelectedDate,
            EndDate: dpEndDate.SelectedDate,
            Status: { Value: "Pending" }
        }
    ),
    Notify("Something went wrong. Please try again.", NotificationType.Error),
    Notify("Your leave request was submitted successfully!", NotificationType.Success)
)
Why this matters: Without error handling, your users have no idea if the save worked or not. IfError runs the first argument (the Patch), and if it fails, executes the error block. If it succeeds, it executes the success block.
Example 5: Patch to Update Multiple Records (Bulk Update)
Sometimes you need to update many records at once — for example, marking all pending requests for a department as approved. This is where ForAll and Patch work together:
ForAll(
    Filter('Leave Requests', Status.Value = "Pending" && Department = "HR"),
    Patch(
        'Leave Requests',
        ThisRecord,
        { Status: { Value: "Approved" } }
    )
)
Important note: ForAll with Patch runs the updates in parallel (not sequentially), which is fast but means you shouldn’t rely on the order of execution. For most bulk update scenarios, this is perfectly fine.
Example 6: Patching to a Dataverse Table
Dataverse (used with model-driven apps and premium connectors) works similarly, but Choice columns are handled differently. In Dataverse, you use the option set value directly:
Patch(
    Employees,
    Defaults(Employees),
    {
        'Full Name': txtName.Text,
        Department: 'Department (Employees)'.HR,
        'Start Date': dpStartDate.SelectedDate
    }
)
The option set value uses dot notation with the actual option label. The exact syntax depends on your table and environment — always check your column’s logical name in the Dataverse column settings.
Example 7: Patch with a People Picker (Person Column in SharePoint)
Person columns in SharePoint are one of the trickiest field types when using Patch. You need to pass a record that includes at least the DisplayName and Email properties:
Patch(
    'Leave Requests',
    LookUp('Leave Requests', ID = varSelectedRequest.ID),
    {
        AssignedTo: {
            DisplayName: peoplePicker.Selected.DisplayName,
            Email: peoplePicker.Selected.Email
        }
    }
)
Where peoplePicker is a People Picker control from the Power Apps modern control set. If you’re using older controls, you’d use an Office 365 Users connector lookup to get the correct user object.
Example 8: Smart Save Button — Handle Both Add and Edit in a Single Click
One of the most practical patterns you’ll use in real apps is a single Save button that intelligently decides whether to create a new leave request or update an existing one. This removes the need for two separate forms or two separate screens — and it makes your app feel much more polished.
How It Works
The logic is simple: you track whether the user selected an existing record. If they did, Patch updates that record. If they didn’t, Patch creates a brand new one. A variable acts as the toggle between the two modes.
Step 1: Set the Variable on Gallery Selection
On the OnSelect property of your gallery items, store the selected leave request in a variable:
Set(varSelectedRequest, ThisItem)
This captures the full record — including its ID — so Patch knows exactly which row to update later.
Step 2: Clear the Variable for New Records
When the user taps a “New Request” or “Add” button to open a blank form, reset the variable so the Save button knows it should create a fresh record:
Set(varSelectedRequest, Blank())
Setting it to Blank() is the key — this is what the IsBlank() check will look for to decide which mode to run.
Step 3: The Smart Save Button
On the Save button’s OnSelect, use this formula:
If(
    IsBlank(varSelectedRequest),
    Patch(
        'Leave Requests',
        Defaults('Leave Requests'),
        {
            Title: txtTitle.Text,
            EmployeeName: User().FullName,
            LeaveType: { Value: ddLeaveType.Selected.Value },
            StartDate: dpStartDate.SelectedDate,
            EndDate: dpEndDate.SelectedDate,
            Status: { Value: "Pending" },
            Comments: txtComments.Text
        }
    ),
    Patch(
        'Leave Requests',
        varSelectedRequest,
        {
            Title: txtTitle.Text,
            LeaveType: { Value: ddLeaveType.Selected.Value },
            StartDate: dpStartDate.SelectedDate,
            EndDate: dpEndDate.SelectedDate,
            Comments: txtComments.Text
        }
    )
)
Breaking this down:
IsBlank(varSelectedRequest)— checks if the variable is empty, meaning no existing record is selected- If it is blank → the first branch runs, using
Defaults('Leave Requests')to create a brand new request. Notice thatEmployeeNameandStatusare included here since these are set automatically on creation and shouldn’t be overwritten during an edit - If it is not blank → the second branch runs, using
varSelectedRequestas the base record. Patch finds the existing row by its ID and updates only the fields you specify —EmployeeNameandStatusare intentionally left out so an edit doesn’t accidentally reset the approval status back to “Pending” - The form control references (
txtTitle.Text,ddLeaveType,dpStartDate, etc.) are the same in both branches — only the Patch target changes
Step 4: Reset After Saving
After the save, always reset the variable and the form so the next action starts clean:
If(
    IsBlank(varSelectedRequest),
    Patch(
        'Leave Requests',
        Defaults('Leave Requests'),
        {
            Title: txtTitle.Text,
            EmployeeName: User().FullName,
            LeaveType: { Value: ddLeaveType.Selected.Value },
            StartDate: dpStartDate.SelectedDate,
            EndDate: dpEndDate.SelectedDate,
            Status: { Value: "Pending" },
            Comments: txtComments.Text
        }
    ),
    Patch(
        'Leave Requests',
        varSelectedRequest,
        {
            Title: txtTitle.Text,
            LeaveType: { Value: ddLeaveType.Selected.Value },
            StartDate: dpStartDate.SelectedDate,
            EndDate: dpEndDate.SelectedDate,
            Comments: txtComments.Text
        }
    )
);
Set(varSelectedRequest, Blank());
Reset(txtTitle);
Reset(txtComments);
Reset(ddLeaveType);
Reset(dpStartDate);
Reset(dpEndDate)
The semicolons chain the actions together: run the smart Patch, reset the variable back to blank, then reset each form control to its default state — all in one button tap.
Why This Pattern Is So Useful
In almost every real leave management app, employees need to both submit new requests and come back to edit a pending one. Rather than building two separate screens with duplicate Patch logic, this single-variable approach keeps your app lean and easy to maintain. If you ever add a new field to the Leave Requests list, you only update this one formula — not two separate save buttons on two separate screens.
This pattern fits perfectly into a gallery + detail panel layout: the gallery on the left shows all leave requests, clicking one opens the panel in edit mode with the existing values pre-populated, and a “New Request” button opens the same panel in add mode with blank fields. One Save button handles both cases with no extra complexity.
Working with Patch and Collections
Patch doesn’t just work with external data sources. You can use it to update records inside local collections too, which is incredibly useful for staging data before a final save or building multi-step wizards.
Add a record to a collection:
Patch(
    colDraftRequests,
    Defaults(colDraftRequests),
    { Title: "Draft Item", Status: "Draft" }
)
Update an existing collection record:
Patch(
    colDraftRequests,
    LookUp(colDraftRequests, ID = varCurrentID),
    { Status: "Ready" }
)
This pattern is super useful when you want to let users build up a set of records locally before committing everything to SharePoint in one go.
Advanced Tips from the Field
Here are some things I’ve learned building real-world apps that you won’t always find in the official docs:
1. Capture the Patch Result
Patch returns the record it just created or modified. You can capture this to immediately work with the new record — for example, to get the auto-generated ID of a new item:
Set(
    varNewRecord,
    Patch(
        'Leave Requests',
        Defaults('Leave Requests'),
        { Title: txtTitle.Text, Status: { Value: "Pending" } }
    )
);
Navigate(ConfirmationScreen, ScreenTransition.Fade)
Now varNewRecord.ID holds the ID of the newly created item, which you can use on the next screen or for a related record write.
2. Chaining Multiple Patches in Sequence
Use semicolons to chain multiple Patch calls and other actions in a single button:
Patch('Leave Requests', Defaults('Leave Requests'), { Title: txtTitle.Text, Status: { Value: "Pending" } });
Patch('Notifications', Defaults('Notifications'), { Message: "New request submitted", RecipientEmail: managerEmail });
Navigate(HomeScreen, ScreenTransition.None)
This lets you write to two different SharePoint lists in one button press.
3. Use With() for Cleaner Code
When your Patch formula is getting long, With() helps you organize it:
With(
    {
        wLeaveType: { Value: ddLeaveType.Selected.Value },
        wEmployee: User().FullName
    },
    Patch(
        'Leave Requests',
        Defaults('Leave Requests'),
        {
            Title: txtTitle.Text,
            EmployeeName: wEmployee,
            LeaveType: wLeaveType,
            StartDate: dpStartDate.SelectedDate
        }
    )
)
This makes the formula more readable and easier to debug.
4. Patching Lookup Columns in SharePoint
SharePoint Lookup columns (not to be confused with the Power Apps LookUp function) require a specific structure:
Patch(
    'Projects',
    Defaults('Projects'),
    {
        Title: txtProjectName.Text,
        Department: { Id: ddDepartment.Selected.ID, Value: ddDepartment.Selected.Title }
    }
)
The Id property is the numeric ID of the related list item, and Value is the display text.
Common Mistakes and How to Avoid Them
Mistake 1: Passing plain text to a Choice column
Wrong:
{ Status: "Pending" }
Right:
{ Status: { Value: "Pending" } }
Choice columns always need the record wrapper with Value.
Mistake 2: Forgetting Defaults() for new records
If you pass {} or First(DataSource) as the BaseRecord when trying to create a new record, you’ll accidentally update an existing one — or get an error. Always use Defaults(DataSource) for new record creation.
Mistake 3: Using Patch inside a Gallery without ThisRecord
If you write Patch inside a gallery item (e.g., a button inside a gallery), always reference ThisRecord explicitly to avoid row scope ambiguity:
Patch('Tasks', ThisRecord, { Status: { Value: "Done" } })
Mistake 4: Not handling delegation warnings with LookUp
If your SharePoint list has thousands of items and you’re using LookUp by a non-indexed column, you could hit delegation limits. Make sure your LookUp columns are indexed in SharePoint, or filter by ID which is always indexed.
Mistake 5: Ignoring the return value of Patch
Patch returns the modified or created record. If you discard this and then try to navigate to a detail screen expecting the new ID, you’ll get blank data. Always capture the result with Set() when you need it downstream.
Best Practices for Production Apps
- Always wrap Patch in
IfError— never let a silent failure confuse your users - Validate inputs before calling Patch — use
IsBlank()checks and show inline errors rather than letting Patch fail at the data source level - Minimize columns in your Patch call — only write the fields you actually need to change; this reduces API calls and improves performance
- Use variables to stage data — build up your record in variables, then do a single Patch at the end rather than patching incrementally
- Index your SharePoint columns — any column you use in a
LookUpinside Patch should be indexed to avoid delegation issues - Test with different permission levels — Patch respects SharePoint permissions, so test your app as a regular user, not just as the app creator
- Avoid Patch inside
ForAllfor large datasets — each row triggers a separate API call. For bulk operations on large lists, consider Power Automate flows instead
Real-World Use Cases
Here are the scenarios where I reach for Patch without hesitation:
- Employee onboarding apps — saving data across multiple SharePoint lists in a single multi-step form
- Approval workflows — updating a request status from a manager’s view with a single tap
- Asset check-in/check-out systems — patching the current assignee and date in real time
- Helpdesk ticket apps — creating new tickets and updating status as agents work through them
- Project management dashboards — letting team members update task status inline from a gallery without navigating away
In all of these, the flexibility of Patch — writing specific fields, to specific records, with full error handling — makes it far more practical than relying on form controls.
Conclusion
The Patch function is genuinely one of the most important functions in Power Apps development. Once you get comfortable with the syntax — Patch(DataSource, BaseRecord, ChangeRecord) — you’ll find it unlocks a level of control over your data that form-based saving simply can’t match.
Start with the basics: creating records with Defaults() and updating them with LookUp(). Then layer in error handling, chained patches, and collection patterns as your apps grow more complex. The key is practice — take one real app scenario and implement it purely with Patch, and you’ll internalize the pattern quickly.
You may also like:
- How to Work With Power Apps Variables?
- Sequence Function in Power Apps
- Power Apps Modern Date Picker with Time

Bijay Kumar is a Microsoft MVP in Business Applications with over 18 years of experience in the IT industry and more than 12 years as a Microsoft MVP, recognized for his contributions to the Microsoft community. He is the Founder of TSinfo Technologies and the creator of the popular technology platforms SPGuides.com and EnjoySharePoint.com. Bijay also runs the SPGuides YouTube channel, where he shares practical tutorials on Microsoft 365, SharePoint, Power Platform, and Copilot technologies. Read more.