When building apps in Power Apps, you often need a way to temporarily store data while the user interacts with the application. For example, imagine a scenario where users select multiple items from a gallery, add products to a cart, or store form inputs before saving them to a SharePoint list or another data source.
However, when building apps, there are many situations where you need to store user inputs or temporary data inside the app itself. For example, you may want to collect multiple records before saving them to a SharePoint list, keep selected items from a gallery, or temporarily hold form data. In such scenarios, the Collect function in Power Apps provides an easy way to store and manage this data within the app.
The Collect function allows you to create and store data in a collection, which acts like a temporary in-memory table inside your app. You can add records to the collection, display them in galleries, modify them, and later save them to a data source if needed.
In this tutorial, we will explore how to use the Power Apps Collect function step by step, including practical examples that demonstrate how to store, retrieve, and manage data efficiently within your app.
Collections in Power Apps
Before diving deeper into the Collect function, it is important to understand the concept of collections, because the Collect function works directly with them.
A collection in Power Apps is essentially a temporary in-memory table that exists only while the app is running.
You can think of a collection as something similar to:
- A temporary Excel table
- A local data table
- A temporary storage container inside the app
Unlike simple variables, which store only one value, collections can store multiple rows and multiple columns of data.
For example, a collection might look like this internally:
| ID | Title | Status |
|---|---|---|
| 1 | Task 1 | Pending |
| 2 | Task 2 | Completed |
Each row represents a record, and each column represents a field.
Collections are extremely useful when building interactive applications because they allow you to manipulate data directly inside the app without constantly communicating with the external data source.
Some of the most common scenarios where developers use collections include:
- Temporarily storing form data
- Building multi-step forms
- Creating shopping carts
- Improving performance by caching data
- Preparing records before saving them
- Managing offline data entry
- Running complex calculations
Collections are particularly useful when working with data sources like:
- SharePoint lists
- Dataverse tables
- SQL databases
- Excel files
Instead of querying the data source repeatedly, you can load data into a collection once and work with it locally.
And the function used to create and add data to collections is the Collect function.
What is the Power Apps Collect Function?
The Collect function in Power Apps is used to create a collection and add records to it.
One interesting behavior of the Collect function is that Power Apps automatically creates the collection if it does not already exist.
This makes it extremely easy to start using collections without any complicated setup.
If the collection already exists, the Collect function simply adds new records to the existing collection.
Syntax
Here is the syntax of the Power Apps collect function.
Collect(CollectionName, Item)
or
Collect(CollectionName, {Column1: Value1, Column2: Value2})
Parameters
- CollectionName: This is the name of the collection where the records will be stored. If the collection does not exist yet, Power Apps automatically creates it.
- Item: This represents the record that you want to add to the collection. It can be a manually defined record, user input, or even data pulled from another data source.
One important thing to understand is that the Collect function always appends data. It does not replace existing records. That means every time the function runs, a new record is added.
Collections are not automatically saved to SharePoint, Dataverse, or any other data source. You control when and how that data moves to permanent storage.
Before doing all these examples, you can create a canvas app in Power Apps and follow along with me.
Example 1: Create a Collection in Power Apps
Let’s start with a simple example.
Suppose we want to create a collection that stores employee information.
Add a button control to your screen.
Then set the OnSelect property of the button to the following formula:
Collect(
    EmployeeCollection,
    {
        ID: 1,
        Name: "John",
        Department: "IT"
    }
)
What happens when this button runs?
When the user clicks the button, Power Apps does several things automatically:
- It checks whether EmployeeCollection already exists.
- If the collection does not exist, Power Apps creates it.
- It creates three columns: ID, Name, and Department.
- It inserts a record with the values we specified.
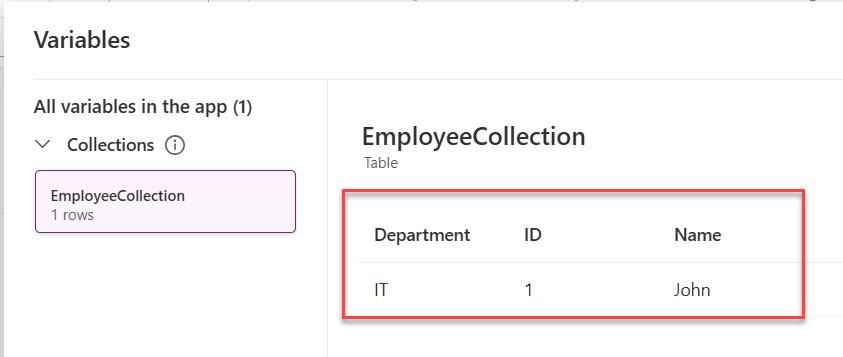
After clicking the button, your collection contains 1 record.
How to View a Power Apps Collection
To see what is inside the collection:
- Open Power Apps Studio
- Click View
- Select Collections. Here is a screenshot for your reference.
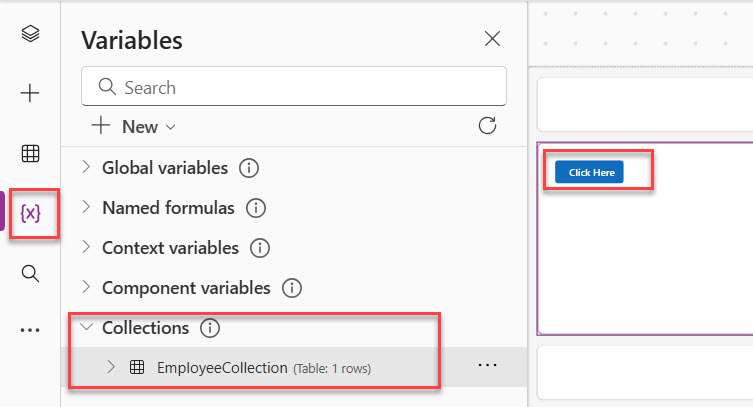
You will now see EmployeeCollection along with its data structure and stored records. You can see the exact output in the screenshot below:
This viewer is extremely useful when debugging your app.
Example 2: Add Multiple Records to a Power Apps Collection
One of the main purposes of the Collect function is to store multiple records dynamically.
Here is an example:
Collect(EmployeeCollection, {ID:1, Name:"John", Department:"IT"})
Collect(EmployeeCollection, {ID:2, Name:"Sarah", Department:"Finance"})
Collect(EmployeeCollection, {ID:3, Name:"Mike", Department:"HR"})
Each time the Collect function runs, a new record is added to the collection.
After running these formulas, the collection will contain three rows.
This approach is useful when you want to build a dataset progressively while users interact with the app.
For example:
- A user adds items to a cart
- A technician records inspection results
- A manager creates multiple tasks
All of these can be stored in a collection first before being saved permanently.
Example 3: Collect a Single Record from Form Inputs
One of the most common real-world uses of the Collect function is capturing user input.
Imagine you have a screen with two text inputs:
txtProductName— where the user types a product nametxtQuantity— where the user types a quantity
You also have a button labeled “Add to List”.
In the OnSelect property of that button, write this:
Collect(
    colProductList,
    {
        ProductName: txtProductName.Text,
        Quantity: Value(txtQuantity.Text)
    }
)
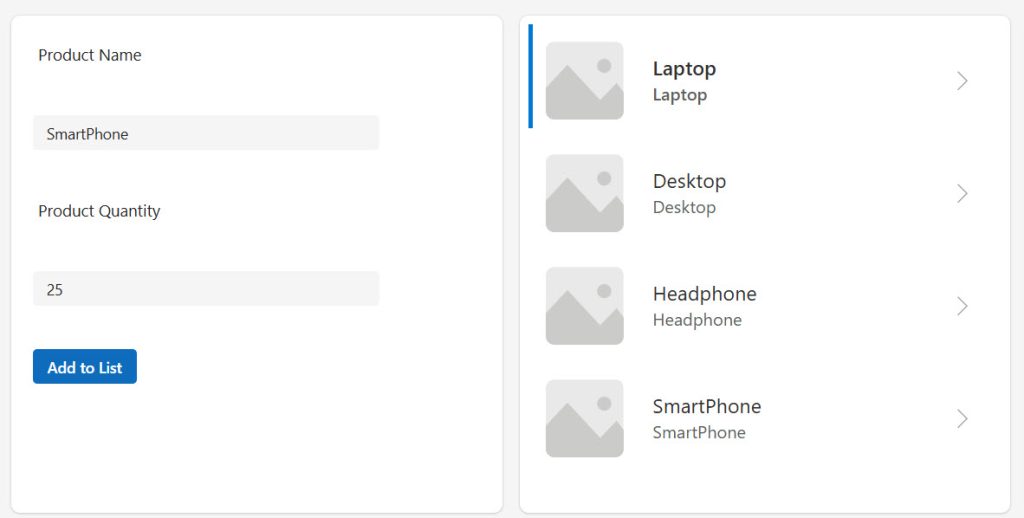
What this does: Every time the user clicks the button, a new row gets added to a collection called colProductList. The row has two fields — ProductName (text) and Quantity (number). The Value() wrapper converts the text input to a number, which is important to avoid data type errors later.
To display this list, drop a Gallery on the screen and set its Items property to colProductList. Your gallery will now show every product the user has added.
You can see the exact output in the screenshot below:
Here is another example:
This is where things get practical. In real apps, you’re usually collecting data that users enter into forms.
Let’s say you have three text input controls:
- TextInput1 (for name)
- TextInput2 (for department)
- TextInput3 (for email)
And a Submit button with this OnSelect property:
Collect(Employees,
    {
        Name: TextInput1.Text,
        Department: TextInput2.Text,
        Email: TextInput3.Text
    }
)
When users fill out the form and click Submit, their data goes straight into your collection.
Pro tip: After collecting the data, reset your text inputs so the form is ready for the next entry:
Collect(Employees,
    {
        Name: TextInput1.Text,
        Department: TextInput2.Text,
        Email: TextInput3.Text
    }
);
Reset(TextInput1);
Reset(TextInput2);
Reset(TextInput3)
That semicolon (;) lets you run multiple actions in sequence.
Example 4: Display Collection Data in a Gallery
Collections are often used as the data source for galleries in Power Apps.
Once data is stored in a collection, displaying it inside the app becomes very easy.
Add a Gallery control to your screen.
Set the Items property of the gallery to:
colProductList
Now the gallery will display all records stored in the Power Apps collection.
Every time the Collect function runs and adds a new record, the gallery updates automatically.
Check out How to Send Emails from Power Apps
Example 5: Using Collect with SharePoint Data
Many Power Apps applications connect to SharePoint lists.
However, constantly querying SharePoint can slow down an app, especially if there are many records.
A common technique developers use is loading SharePoint data into a collection.
Example:
Collect(
    LocalTasks,
    'Project Tasks'
)
This formula copies records from the Project Tasks SharePoint list into the LocalTasks collection.
Once the data is stored locally, the app can perform operations like:
- Filtering
- Sorting
- Searching
- Calculating
All without making repeated calls to SharePoint.
This can significantly improve performance.
Collect From Multiple Sources in Power Apps
Here’s where collections really shine. You can’t directly combine data from different SharePoint lists in a gallery, but you can with collections.
Collect(AllTasks, TaskListOne);
Collect(AllTasks, TaskListTwo);
Collect(AllTasks, TaskListThree)
First line: Load TaskListOne into the collection
Second line: Add TaskListTwo items to it
Third line: Add TaskListThree items
Now you have one collection with tasks from three different sources.
Read Power Apps Concatenate Strings
Example 6: Load Data When the App Starts
Another common pattern is using Collect inside the App OnStart property.
Example:
Collect(
    EmployeeCollection,
    Employees
)
When the app launches, it loads all records from the Employees data source into a collection.
This approach allows the app to work with local data throughout the session.
Benefits include:
- Faster app performance
- Reduced network calls
- Better responsiveness
Example 7: Collect Multiple Records at Once
You’re not limited to one record per Collect call. You can add multiple records in a single call using a table literal:
Collect(
    colColors,
    {Color: "Red", Hex: "#FF0000"},
    {Color: "Green", Hex: "#00FF00"},
    {Color: "Blue", Hex: "#0000FF"}
)
You can also collect an entire data source or a filtered subset of one:
// Collect all active projects
Collect(
    colActiveProjects,
    Filter(Projects, Status = "Active")
)
This is useful for preloading a filtered snapshot of data. If the user is a regional manager, you might only load records relevant to their region.
Check out Power Apps Modern Checkbox Control
Power Apps Collect vs. ClearCollect — When to Use Which
This is one of the most common questions I get.
Collect adds records to an existing collection. If you run it twice, you get two sets of records in the same collection.
ClearCollect replaces the entire collection with fresh data. It clears whatever was there before, then fills it with the new records.
// Collect - ADDS to existing collection
Collect(colItems, {Name: "Apple", Price: 1.50})
Collect(colItems, {Name: "Banana", Price: 0.80})
// colItems now has 2 rows

// ClearCollect - REPLACES the collection
ClearCollect(colItems, SharePointFruitList)
// colItems now only contains what's in SharePointFruitList
Use Collect when: you’re building up a list progressively (like adding items to a cart).
Use ClearCollect when: you’re refreshing data from a source and don’t want duplicates (like reloading a filtered dataset).
Collections vs. Variables vs. Data Sources
Before going further, let me clear up a confusion that trips up almost every beginner.
| Feature | Collection | Variable | Data Source |
|---|
| Feature | Collection | Variable | Data Source |
|---|---|---|---|
| Data type | Table (multiple rows) | Single value | Persistent storage |
| Lives in memory | Yes | Yes | No (external) |
| Survives app close | No | No | Yes |
| Can hold multiple rows | Yes | No | Yes |
| Created with | Collect / ClearCollect | Set / UpdateContext | Patch / SubmitForm |
A variable (using Set or UpdateContext) holds a single value like a number, text, or boolean. A collection holds a full table of records. A data source like SharePoint or Dataverse holds data permanently outside the app.
The Collect function bridges these two worlds — you build up data in memory, then push it to a data source when you’re ready.
Practical Example: Build a Multi-Record Submit App
Let me show you a practical example and usage of the Power Apps collect function.
Let me walk you through a complete, practical build — an Expense Submission App where an employee logs multiple expense items before submitting everything at once.
Step 1: Create the Input Screen
Add these controls to a blank Canvas App screen:
- A text input called
txtDescription - A text input called
txtAmount - A dropdown
ddlCategorywith options like Travel, Meals, Accommodation, Supplies - A button labeled “Add Expense”
- A gallery to show added expenses
- A button labeled “Submit All”
Step 2: Add the Collect Formula
In the OnSelect property of the “Add Expense” button:
If(
    IsBlank(txtDescription.Text) || IsBlank(txtAmount.Text),
    Notify("Please fill in all fields before adding.", NotificationType.Warning),
    Collect(
        colExpenses,
        {
            Description: txtDescription.Text,
            Amount: Value(txtAmount.Text),
            Category: ddlCategory.Selected.Value,
            DateAdded: Today()
        }
    );
    Reset(txtDescription);
    Reset(txtAmount)
)
Breaking this down:
- The
If()block checks that both fields are filled in before collecting. This is basic validation you should always include. Collect()adds the new row tocolExpenses.- The
Reset()calls clear the text inputs after adding, ready for the next entry. - The semicolons chain multiple actions together in one button press.
Step 3: Display the Collection in a Gallery
Set the gallery Items property to:
colExpenses
Add labels inside the gallery to show ThisItem.Description, ThisItem.Amount, and ThisItem.Category.
Step 4: Show a Running Total
To show the total of all expenses added so far, add a label and set its Text property to:
"Total: $" & Text(Sum(colExpenses, Amount), "[$-en-US]#,##0.00")
Sum() works directly on collections, just like it does on data sources. This total updates live every time a new item is collected.
Step 5: Submit All Records to SharePoint
In the OnSelect property of the “Submit All” button:
ForAll(
    colExpenses,
    Patch(
        ExpenseReports,
        Defaults(ExpenseReports),
        {
            Title: Description,
            Amount: Amount,
            Category: Category,
            SubmittedOn: DateAdded,
            SubmittedBy: User().Email
        }
    )
);
ClearCollect(colExpenses, []);
Notify("Expenses submitted successfully!", NotificationType.Success)
What happens here:
ForAll()loops through every row incolExpenses.Patch()sends each row to a SharePoint list calledExpenseReports.ClearCollect(colExpenses, [])empties the collection after submission — this is a clean way to reset without errors.Notify()shows a green confirmation banner.
Check out Patch Function in Power Apps
Advanced Tips for Using the Collect() Function in Power Apps
Here are some tips for using the Power Apps collect() function.
Tip 1: Use Concurrent for Faster App Start
If you’re loading multiple collections on App Start, use Concurrent() to load them in parallel instead of sequentially:
Concurrent(
    Collect(colEmployees, Employees),
    Collect(colProjects, Projects),
    Collect(colDepartments, Departments)
)
This can dramatically reduce your app’s startup time when you’re loading several large tables.
Tip 2: Add a Unique ID to Each Collected Row
When users need to remove specific rows from a collection, you’ll need a way to identify each row. A clean approach is to generate a unique ID at collection time:
Collect(
    colTasks,
    {
        RowID: CountRows(colTasks) + 1,
        TaskName: txtTaskName.Text,
        Assigned: ddlUser.Selected.DisplayName
    }
)
Then, to remove a specific row:
Remove(colTasks, {RowID: galTasks.Selected.RowID})
Tip 3: Collect Nested Records for Complex Structures
Collections can hold complex data, including other tables or records as values. This is useful for things like collecting a record that includes multiple tags or sub-items.
Collect(
    colOrders,
    {
        OrderID: "ORD-001",
        Customer: "Acme Corp",
        Items: Table(
            {Product: "Laptop", Qty: 2},
            {Product: "Mouse", Qty: 5}
        )
    }
)
Working with nested tables requires ForAll and Index to navigate them, but it opens up powerful data modeling options.
Tip 4: Use Collect for Offline-Capable Apps
Power Apps supports offline usage with the LoadData and SaveData functions. Pair them with Collect to persist your collection to local device storage:
// Save collection to device
SaveData(colOfflineData, "OfflineCache");

// Load it back when app starts
LoadData(colOfflineData, "OfflineCache", true)
This way, if a user loses connectivity, their collected data isn’t lost when the app restarts.
Common Mistakes and How to Avoid Them
Mistake 1: Forgetting That Collect Accumulates
If you call Collect() inside App.OnStart or a frequently-triggered property, you’ll end up with duplicate rows every time that property fires. Always check if data should be added or replaced.
Fix: Use ClearCollect instead of Collect when refreshing data from a source.
Mistake 2: Not Converting Data Types
Power Apps is strict about data types in collections. Mixing text and numbers in the same field causes errors downstream.
Fix: Always wrap numeric text inputs with Value():
textValue(txtAmount.Text)
And wrap date inputs with DateValue() if they come from text fields.
Mistake 3: Delegating Filter on a Collection
Collections don’t support delegation. When you filter or sort a collection, everything runs locally in memory. This is normally fine because the data is already in memory — but be aware that if your collection has 50,000 rows, filtering it with Filter() processes all rows on the client.
Fix: Be selective about what you load into collections. Filter at the data source level first, then collect the subset.
Mistake 4: Not Clearing Collections When Navigating Between Screens
If a user fills out a form, navigates away, and comes back, your collection might still hold their previous entries. This causes confusing UX.
Fix: Clear the collection when the user navigates to the form screen:
text// In the OnVisible property of the form screen
ClearCollect(colFormItems, [])
Mistake 5: Trying to Patch a Collection Directly as a Data Source
Collections are not data sources. You cannot SubmitForm to a collection. If you use a Form control, it must be connected to an actual data source. Collections work with Patch, Remove, ForAll, and direct manipulation — not with Form controls.
When NOT to Use Collections
Collections aren’t always the answer. Here’s when you shouldn’t use them:
- For permanent storage: Collections disappear when you close the app. If you need to save data permanently, write directly to your data source.
- For real-time collaboration: If multiple people need to see updates instantly, use your data source directly.
- For simple galleries: If you’re just displaying a SharePoint list with no manipulation, connect your gallery directly to the list.
Debugging Collections
Want to see what’s actually in your collection?
Add a gallery to your screen and set its Items property to your collection name:
OrderItemsOr use the Collections tab in Power Apps Studio (View > Collections). This shows all your collections and their data.
Conclusion
The Power Apps Collect function is one of the most practical and frequently used functions when building real-world Power Apps solutions. It allows developers to create collections, store temporary records, capture user input, and manipulate datasets directly within the app.
In this tutorial, we explored how the Collect function works in Power Apps, how it interacts with collections, and how it can be used in scenarios such as task management apps, shopping carts, and performance optimization.
Start small. Create a simple collection with a button. Then try collecting from a text input. Then from a SharePoint list. Before you know it, you’ll be using collections in every app you build.
Here are some best practices you can follow.
- Name your collections clearly. Use a prefix like
col(e.g.,colCart,colIssues) so they’re easy to identify in your formulas. - Keep collections lean. Only collect the columns your app actually needs. Collecting full tables with 40 columns when you only display 5 wastes memory and slows your app.
- Always validate before collecting. Use
If()orIsBlank()checks before adding records to prevent empty or malformed rows. - Test with realistic data volumes. Collecting 10 rows feels fast. Collecting 5,000 rows and then running
ForAllto submit them will time out. For bulk operations, consider batching with Power Automate. - Document your collections. Leave a comment in your app using
/* colCart: Holds items user adds before checkout */so future developers understand the purpose of each collection. - Use ClearCollect on refresh buttons. Never use Collect on a refresh action, or you’ll end up with doubled data every time the user refreshes.
And if you get stuck, don’t worry. We all do. Just leave me a comment below, and I will reply to you.
You may also like the following tutorials:

Bijay Kumar is a Microsoft MVP in Business Applications with over 18 years of experience in the IT industry and more than 12 years as a Microsoft MVP, recognized for his contributions to the Microsoft community. He is the Founder of TSinfo Technologies and the creator of the popular technology platforms SPGuides.com and EnjoySharePoint.com. Bijay also runs the SPGuides YouTube channel, where he shares practical tutorials on Microsoft 365, SharePoint, Power Platform, and Copilot technologies. Read more.