Look, I get it. You’re building a Power App and need to combine some text. Maybe it’s a first name and a last name. Maybe it’s building an email address. Or perhaps you’re creating a custom message that pulls in data from different columns.
Whatever it is, you need to concatenate strings in Power Apps.
The good news? It’s pretty straightforward once you know the different ways to do it. The bad news? Power Apps gives you multiple options, and it’s not always clear which one to use.
Let me walk you through everything you need to know about concatenating strings in Power Apps. I’ll show you the different methods, when to use each one, and throw in some real examples you can actually use.
What Does “Concatenate” Even Mean?
Before we dive in, let’s make sure we’re on the same page.
Concatenating just means joining pieces of text together. That’s it. Nothing fancy.
If you have “John” in one place and “Smith” in another, concatenating them gives you “John Smith” or “JohnSmith” depending on how you do it.
Simple enough, right?
The Three Main Ways to Concatenate in Power Apps
Power Apps gives you three main ways to join text together:
- The & operator (ampersand)
- The Concatenate() function
- The Concat() function
Each one works a bit differently, and each has its place. Let me break them down.
Method 1: Using the & Operator (My Go-To Method)
This is the simplest and most straightforward way to join strings in Power Apps. It’s also the one I use 90% of the time.
Here’s how it works:
"Hello" & " " & "World"Result: Hello World
See that? You just put an ampersand (&) between the things you want to join.
Real Example: Combining First and Last Names
Let’s say you have a form with two text input fields:
- TextInput1 (for first name)
- TextInput2 (for last name)
And you want to display the full name in a Text label. Here’s what you’d write:
TextInput1.Text & " " & TextInput2.TextIf someone types “Sarah” and “Johnson”, your label will show “Sarah Johnson”.
You can see the exact output in the screenshot below:
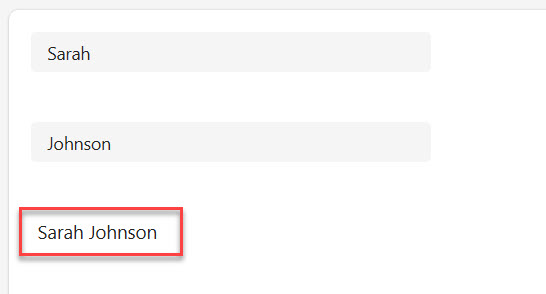
Notice that space in the middle? That’s important. Without it, you’d get “SarahJohnson” – which might be what you want sometimes, but probably not for names.
Using & with SharePoint Data
Here’s a practical scenario. You’ve got a SharePoint list with these columns:
- Title (person’s name)
- Department
- Location
You want to create a label that shows: “Sarah Johnson – HR – New York”
Here’s your formula:
ThisItem.Title & " - " & ThisItem.Department & " - " & ThisItem.LocationEasy, right?
Adding Variables and Text Together
The & operator works with variables, too. Say you’ve got a variable called UserName and you want to create a greeting:
"Welcome back, " & UserName & "!"If UserName is “Mike”, this gives you: Welcome back, Mike!
Quick Tips for Using &
- You can chain as many & operators as you need
- Don’t forget spaces! They won’t appear unless you add them
- You can mix text (in quotes), variables, and control properties
- If something isn’t text, Power Apps usually converts it automatically
Check out Power Apps Modern Checkbox Control
Method 2: The Concatenate() Function
The Concatenate function in Power Apps does the same thing as &, but with function syntax.
Here’s the format:
Concatenate(string1, string2, string3, ...)Same Example, Different Syntax
Remember our first and last name example? Here’s how it looks with Concatenate:
Concatenate(TextInput1.Text, " ", TextInput2.Text)Same result as before: if someone types “Sarah” and “Johnson”, you get “Sarah Johnson”.
Why Would You Use Concatenate Instead of &?
Good question. Honestly, I prefer & because it’s faster to type and easier to read.
But here are situations where Concatenate makes sense:
When you’re already using other functions: Sometimes, Concatenate fits better into complex formulas with lots of nested functions. It can be easier to keep track of your parentheses.
When you’re coming from Excel: If you’re used to Excel formulas, Concatenate might feel more natural because Excel has the same function.
Personal preference: Some people just like the function syntax better. That’s totally fine.
Real Example: Building an Email Address
Let’s say you’re creating a Power App where users enter their employee ID, and you need to generate their company email address.
Concatenate(TextInputID.Text, "@company.com")If someone enters “sjohnson”, this gives you: sjohnson@company.com
You can see the exact output in the screenshot below:

Concatenate with Multiple Items
Here’s a formula that builds a full address:
Concatenate(
    Street.Text,
    ", ",
    City.Text,
    ", ",
    State.Text,
    " ",
    ZipCode.Text
)
This might give you: 123 Main St, Boston, MA 02108
Read Patch Function in Power Apps
Method 3: The Concat() Function (For Collections and Tables)
Now this one is different. And it’s super powerful when you need it.
Concat (without the “enate”) is specifically for working with tables and collections. It takes multiple rows of data and joins them together.
The Basic Format
Concat(Table, ColumnName, Separator)Let me explain each part:
- Table: Your data source (could be a SharePoint list, collection, or gallery items)
- ColumnName: Which column you want to concatenate
- Separator: What you want to put between each item
Real Example: Creating a List of Names
You have a SharePoint list of team members, and you want to display all their names in one label, separated by commas.
Concat(TeamMembers, Title, ", ")If your list has Sarah, Mike, and Jennifer, this gives you: Sarah, Mike, Jennifer
Pretty cool, right?
Example: Getting Selected Items from a Gallery
Here’s a scenario I use all the time. You’ve got a gallery with checkboxes, and you want to see which items the user selected.
Concat(
    Filter(Gallery1.AllItems, Checkbox1.Value = true),
    Title,
    "; "
)
This creates a semicolon-separated list of all the checked items.
Building a SharePoint Choice Column Value
Sometimes you need to create a semicolon-separated string for SharePoint choice columns. Concat is perfect for this:
Concat(
    Filter(CheckboxList, Selected = true),
    ChoiceName,
    ";#"
)
Check out Sequence Function in Power Apps
Handling Blank Values (This Trips People Up)
Here’s something that catches people all the time: what happens when one of your values is blank?
Let’s say you have this formula:
FirstName.Text & " " & MiddleName.Text & " " & LastName.TextIf someone doesn’t have a middle name, you might end up with “Sarah Johnson” – notice that double space? Not great.
Solution: Use the If() Function
Here’s a better approach:
FirstName.Text &
If(!IsBlank(MiddleName.Text), " " & MiddleName.Text & " ", " ") &
LastName.Text
This checks if the middle name exists. If it does, it adds it with spaces. If not, it just adds a single space.
Another Option: The Coalesce() Function
This is cleaner for simple cases:
FirstName.Text & " " & Coalesce(MiddleName.Text, "") & " " & LastName.TextCoalesce returns the first non-blank value. So if MiddleName is blank, it returns “” (empty string).
Check out Power Apps Modern Date Picker with Time
Concatenate Numbers and Dates
Power Apps usually handles this automatically, but it’s worth knowing what happens.
Numbers
If you concatenate a number, Power Apps converts it to text:
"Order Number: " & 12345Result: Order Number: 12345
Dates
Dates get trickier. If you just concatenate a date, you get the full date and time:
"Today is: " & Today()You might get: Today is: 2/6/2026 12:00 AM
Not always what you want. Better to use Text() to format it:
"Today is: " & Text(Today(), "mm/dd/yyyy")Result: Today is: 02/06/2026
Working with Line Breaks
Sometimes you want your concatenated text to span multiple lines.
Use the Char(10) function for line breaks:
"Name: " & FullName & Char(10) &
"Email: " & Email & Char(10) &
"Phone: " & Phone
This displays as:
Name: Sarah Johnson
Email: sjohnson@company.com
Phone: 555-1234
Make sure the label’s AutoHeight property is set to true, or it’ll cut off.
Check out Power Apps Multiple IF Statements
Common Mistakes (And How to Avoid Them)
Let me save you some frustration by pointing out the mistakes I see most often:
Mistake 1: Forgetting Spaces
FirstName.Text & LastName.TextThis gives you “SarahJohnson” instead of “Sarah Johnson”. Always think about your spacing.
Mistake 2: Too Many Quotation Marks
People sometimes write:
"TextInput1.Text" & "TextInput2.Text"Those quotation marks make it literal text. You’d get: TextInput1.TextTextInput2.Text
Only use quotes around the actual text you want to display, not around control or column names.
Mistake 3: Using Concat for Simple Strings
You don’t need Concat for basic string joining. This is overkill:
Concat(["Hello", "World"], Value, " ")Just use:
"Hello" & " " & "World"Save Concat for when you’re working with actual tables or collections.
Performance Tips
Concatenation is usually fast, but here are some things to keep in mind:
- If you’re using Concat on large SharePoint lists (thousands of items), it can slow down. Consider filtering first.
- Don’t put complex concatenation formulas in the OnVisible of every item in a gallery if you can avoid it. It runs for every single row.
- For really complex string building, sometimes it’s better to do it on the SharePoint side with calculated columns.
Check out How to Set Dropdown Value On Button Click in Power Apps
Practical Examples You Can Use Right Now
Let me give you some ready-to-use formulas for common scenarios:
Create a Display Name
LastName.Text & ", " & FirstName.TextResult: Johnson, Sarah
Build a File Name
Text(Today(), "yyyymmdd") & "_" & ProjectName.Text & "_Report.pdf"Result: 20260206_Q1Sales_Report.pdf
Create a Dynamic Welcome Message
"Good " &
If(Hour(Now()) < 12, "morning",
   If(Hour(Now()) < 17, "afternoon", "evening")) &
", " & User().FullName & "!"
Result: Good afternoon, Sarah Johnson!
Combine Multiple Selections
Concat(ComboBox1.SelectedItems, Value, "; ")Result: Option A; Option C; Option D
Wrapping Up
Concatenating strings in Power Apps isn’t complicated once you know your options:
- Use & for simple string joining (my recommendation for most cases)
- Use Concatenate() if you prefer function syntax or it reads better in your formula
- Use Concat() when working with tables, collections, or gallery items
The key things to remember:
- Don’t forget your spaces
- Handle blank values appropriately
- Format dates and numbers when needed
- Use Char(10) for line breaks
Start with the simple & operator, and you’ll be fine for most situations. When you need to work with multiple rows of data, that’s when you reach for Concat().
You may also like:

Bijay Kumar is a Microsoft MVP in Business Applications with over 18 years of experience in the IT industry and more than 12 years as a Microsoft MVP, recognized for his contributions to the Microsoft community. He is the Founder of TSinfo Technologies and the creator of the popular technology platforms SPGuides.com and EnjoySharePoint.com. Bijay also runs the SPGuides YouTube channel, where he shares practical tutorials on Microsoft 365, SharePoint, Power Platform, and Copilot technologies. Read more.