When I build a Canvas app for an issue tracker, leave request process, or expense claim system, I often start with simple formulas directly on controls. That works for a small app, but the same logic soon appears in Labels, Galleries, Buttons, Forms, and multiple screens.
For example, you may repeat a priority-color formula in three places or copy the same validation check before every Patch operation. Updating those copied formulas later is tedious and creates avoidable mistakes.
Power Apps user defined functions solve this problem by letting you write reusable Power Fx logic once and call it anywhere in your app. In this article, you will see 10 practical UDF examples, including text formatting, validation, calculations, status messages, date checks, and role-based screen controls.
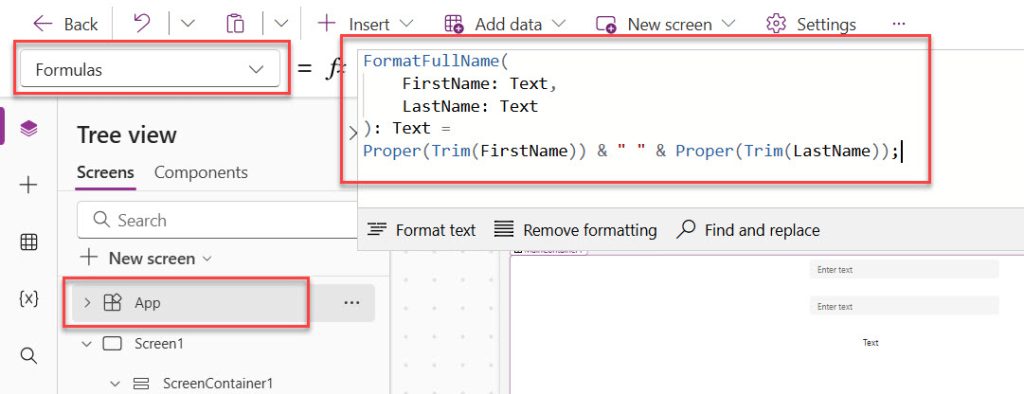
Before trying these examples, open your Canvas app, select App in the Tree view, and choose the Formulas property. Define each function there, then call it from a control property such as Text, Fill, Visible, or OnSelect. A UDF uses this structure: function name, typed input parameters, return type, and the formula that produces the result.
Pro Tip: I usually begin with one small UDF for a repeated formula, such as text formatting or a status color. Once the team sees how much cleaner the app becomes, it is easier to introduce UDFs for validation and business rules.
1. Format a Full Name
This example combines a first name and last name into one properly formatted display name. It works well in employee directories, approval apps, and service desk apps.
Add this formula in App.Formulas:
FormatFullName(
    FirstName: Text,
    LastName: Text
): Text =
Proper(Trim(FirstName)) & " " & Proper(Trim(LastName));
The Trim() function removes unnecessary spaces, while Proper() changes each word to title case.
You can see the formula added like in the screenshot below:
Steps to test it
- Add two Text input controls and rename them
txtFirstNameandtxtLastName. - Add a Label control.
- Set the Label’s Text property to:
FormatFullName(
    txtFirstName.Text,
    txtLastName.Text
)
- Enter
bijayin the first input andkumarin the second input.
You can see the exact output in the screenshot below:
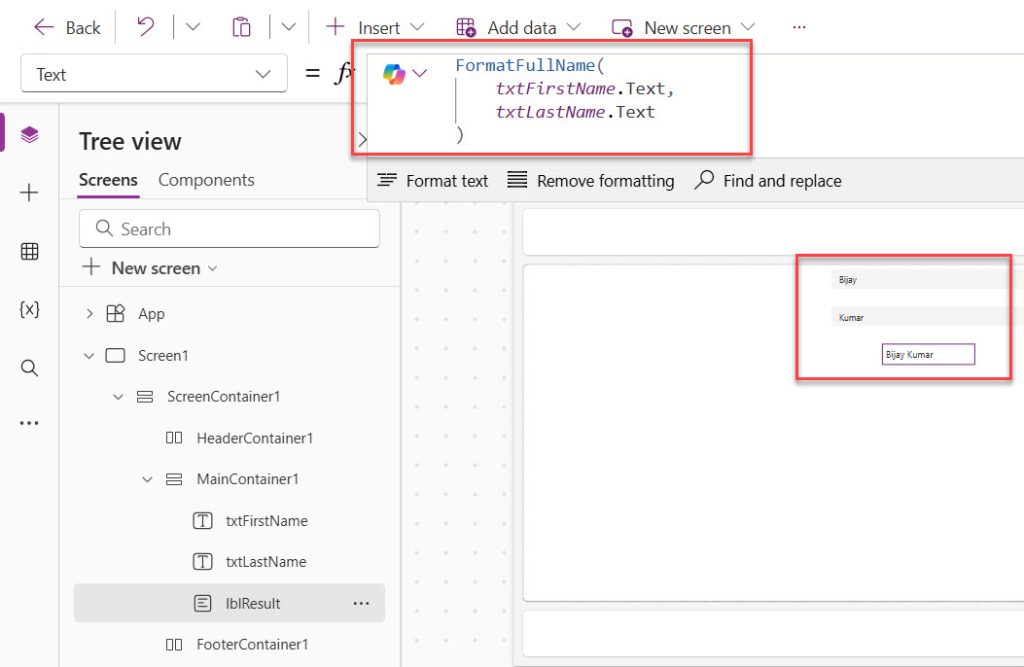
Output: Bijay Kumar
2. Calculate a Discounted Price
Use this UDF in an inventory, purchase request, or product catalog app. It calculates a price after applying a percentage discount.
CalculateDiscountedPrice(
    OriginalPrice: Number,
    DiscountPercent: Number
): Number =
Round(
    OriginalPrice - (OriginalPrice * DiscountPercent / 100),
    2
);
This function accepts a price and discount percentage, then returns the final amount rounded to two decimal places.
Steps to test it
- Add a Text input named
txtPrice. - Add another Text input named
txtDiscount. - Add a Label control.
- Set the Label’s Text property to:
Text(
    CalculateDiscountedPrice(
        Value(txtPrice.Text),
        Value(txtDiscount.Text)
    ),
    "[$-en-US]$#,##0.00"
)
- Enter
250as the price and10as the discount.
Output: $225.00
3. Get a Priority Color
This is one of my favorite Power Apps user defined functions for issue trackers and service desk apps. It keeps priority colors consistent in a Gallery, Form, and details screen.
GetPriorityColor(
    PriorityValue: Text
): Color =
Switch(
    PriorityValue,
    "Critical", Color.Red,
    "High", Color.Orange,
    "Medium", Color.Gold,
    "Low", Color.Green,
    Color.Gray
);
The Switch() function matches the priority text and returns a color. The final Color.Gray value handles blank or unexpected priorities.
Steps to test it
- Add a Dropdown control named
drpPriority. - Set its Items property to:
["Low", "Medium", "High", "Critical"]
- Add a Rectangle, Circle, or Icon control.
- Set its Fill property to:
GetPriorityColor(drpPriority.Selected.Value)
- Select Critical from the Dropdown.
Output: The control displays in red.
For a SharePoint Choice column inside a Gallery, use this version:
GetPriorityColor(ThisItem.Priority.Value)
4. Return a Friendly Issue Status Message
Raw status values such as “New” and “In Progress” do not always tell users what happens next. This UDF creates readable status messages for an issue tracker.
GetIssueStatusMessage(
    StatusValue: Text,
    AssignedToName: Text
): Text =
Switch(
    StatusValue,
    "New", "Your issue is waiting for assignment.",
    "In Progress", "Your issue is being handled by " & AssignedToName & ".",
    "Resolved", "Your issue has been resolved.",
    "Closed", "Your issue is now closed.",
    "The issue status needs review."
);
Use this function in a Label’s Text property:
GetIssueStatusMessage(
    galIssues.Selected.Status.Value,
    galIssues.Selected.'Assigned To'.DisplayName
)
Output example: Your issue is being handled by Alex Johnson.
5. Check Whether Required Fields Are Complete
This UDF returns a Boolean value: true when the user completes both required fields, or false when one is blank.
IsIssueReadyToSubmit(
    IssueTitle: Text,
    IssueDescription: Text
): Boolean =
!IsBlank(Trim(IssueTitle)) &&
!IsBlank(Trim(IssueDescription));
I use this pattern in apps that save records to a SharePoint list or Dataverse table. It prevents incomplete data from reaching the data source.
Steps to test it
- Add Text inputs named
txtIssueTitleandtxtIssueDescription. - Add a Button named
btnSaveIssue. - Set the Button’s DisplayMode property to:
If(
    IsIssueReadyToSubmit(
        txtIssueTitle.Text,
        txtIssueDescription.Text
    ),
    DisplayMode.Edit,
    DisplayMode.Disabled
)
- Run the app without entering a title or description.
- Enter text in both input controls.
Output: The Save button stays disabled until users complete both fields.
6. Format an Employee or Request Number
Many business apps need consistent reference numbers. This example creates a formatted request number, such as REQ-000125.
FormatRequestNumber(
    RequestNumber: Number
): Text =
"REQ-" & Text(
    RequestNumber,
    "000000"
);
Use the function in a Label control:
FormatRequestNumber(125)
Output: REQ-000125
You can also display a SharePoint item ID in a Gallery:
FormatRequestNumber(ThisItem.ID)
This gives each request a clean number that users can quote in emails or support calls.
7. Calculate Days Between Two Dates
This UDF is useful in leave-request apps, onboarding trackers, project trackers, and contract management solutions. By using the function below, you can calculate days between two dates.
GetDaysBetween(
    StartDate: Date,
    EndDate: Date
): Number =
DateDiff(
    StartDate,
    EndDate
) + 1;
The + 1 includes both the start date and end date. For example, a request from 10 August through 12 August counts as three days.
Steps to test it
- Add two Date Picker controls named
dpStartDateanddpEndDate. - Add a Label control.
- Set the Label’s Text property to:
GetDaysBetween(
    dpStartDate.SelectedDate,
    dpEndDate.SelectedDate
) & " day(s)"
- Select 10 August as the start date and 12 August as the end date.
Output: 3 day(s)
8. Identify Whether a Date Falls on a Weekend
This example helps when you build leave apps, booking apps, or staff scheduling apps. It returns true for Saturday or Sunday.
IsWeekend(
    SelectedDate: Date
): Boolean =
Weekday(
    SelectedDate,
    StartOfWeek.Monday
) > 5;
Using StartOfWeek.Monday makes Monday day 1 and Sunday day 7. A result above 5 means the date is Saturday or Sunday.
Use it in a Label’s Text property:
If(
    IsWeekend(dpRequestDate.SelectedDate),
    "Weekend selected",
    "Working day selected"
)
Output example: Selecting a Saturday shows Weekend selected.
You can also stop users from submitting weekend requests:
If(
    IsWeekend(dpRequestDate.SelectedDate),
    Notify(
        "Please select a working day.",
        NotificationType.Error
    ),
    SubmitForm(frmLeaveRequest)
)
9. Calculate an Expense Claim Total
Use this UDF in an expense claim, travel request, or purchase request app. It adds an amount and tax percentage to calculate the total claim amount.
CalculateExpenseTotal(
    Amount: Number,
    TaxPercent: Number
): Number =
Round(
    Amount + (Amount * TaxPercent / 100),
    2
);
Set a Label control’s Text property to:
Text(
    CalculateExpenseTotal(
        Value(txtAmount.Text),
        Value(txtTaxPercent.Text)
    ),
    "[$-en-US]$#,##0.00"
)
If the amount is 500 and tax is 18, the function returns:
Output: $590.00
You can reuse this same logic in a Gallery to calculate totals for multiple expense records.
10. Show or Hide a Control by User Role
This example helps you control the user interface in a Canvas app. For example, you may want only managers to see an Approve button.
CanUserApprove(
    UserRole: Text
): Boolean =
Lower(UserRole) = "manager" ||
Lower(UserRole) = "administrator";
This function converts the role text to lowercase before checking it. That avoids errors when your data contains Manager, MANAGER, or manager.
Steps to test it
- Add a Dropdown control named
drpUserRole. - Set its Items property to:
["Employee", "Manager", "Administrator"]
- Add a Button named
btnApprove. - Set the Button’s Visible property to:
CanUserApprove(drpUserRole.Selected.Value)
- Choose Employee, then choose Manager.
Output: The Approve button remains hidden for Employee and appears for Manager or Administrator.
You now have 10 practical Power Apps user defined functions examples that you can use to reduce repeated Power Fx formulas in your Canvas apps. Start with a simple reusable rule, such as formatting text or validating required fields, then gradually move larger business rules into focused UDFs. I hope you found this article helpful.
You may also like the following tutorials:
- Add Named Formula in Power Apps
- How to Add Hover Effects to Power Apps Gallery
- Get Manager Details for the Current User in Power Apps
- Display Manager Name and Email in a Power Apps Gallery

Bijay Kumar is a Microsoft MVP in Business Applications with over 18 years of experience in the IT industry and more than 12 years as a Microsoft MVP, recognized for his contributions to the Microsoft community. He is the Founder of TSinfo Technologies and the creator of the popular technology platforms SPGuides.com and EnjoySharePoint.com. Bijay also runs the SPGuides YouTube channel, where he shares practical tutorials on Microsoft 365, SharePoint, Power Platform, and Copilot technologies. Read more.