
Have you ever built a canvas app where the same calculation shows up in five different places? Then your boss asks you to change the tax rate, and you spend twenty minutes hunting down every screen where you typed that formula. You fix one label, forget another, and now your app shows two different numbers for the same thing. That’s a maintenance nightmare, and it’s exactly the problem Power Apps named formulas solve.
A named formula in Power Apps works like a named cell in Excel. You assign a name to a formula once, and Power Apps automatically updates that value wherever you reference it, without you writing a single line of “update” code. You don’t set it once and forget it, either—Power Apps recalculates it in real time whenever the underlying data changes, so every screen always shows the correct number.
Think of a sales team tracker built on a SharePoint list called SalesTracker, with columns for SalesRep, Region, Amount, and Status. Instead of writing the same “total approved sales” calculation in three galleries and a label, you write it once as a named formula, and every control that uses it stays in sync automatically. This one change in how you think about app logic can save you hours of debugging later, especially as your app grows past a handful of screens.
In this article, I’ll show you 5 ways to do named formula in Power Apps.
What Makes Named Formulas Different
A named formula lives inside the App object’s Formulas property, and it recalculates automatically whenever the data it depends on changes. Unlike a variable created with Set() or UpdateContext(), you never manually update a named formula—Power Apps controls exactly when it recalculates. This is a big mindset shift if you’re used to working with variables, where you decide when a value updates.
With variables, you write the update logic yourself, usually inside a button’s OnSelect property or in App.OnStart. With named formulas, you specify what the value should be, and Power Apps determines when to recalculate it.
This makes named formulas ideal for values that should always reflect the current data, such as totals, filtered lists, or user role flags. It also means your app has fewer moving parts to break, since there’s no risk of forgetting to update a value somewhere.
Before you start, know that named formulas require a modern Power Apps environment with the Power Fx formula bar enabled. Most apps created in the last couple of years already have this by default, so you likely won’t need to change any settings.
Method 1 – Basic Named Formula for a Simple Value
This method works best when you need a single reusable value, like today’s date or a constant business rule, available across every screen in your app without recalculating it manually each time.
Step 1: Open the App Formulas property
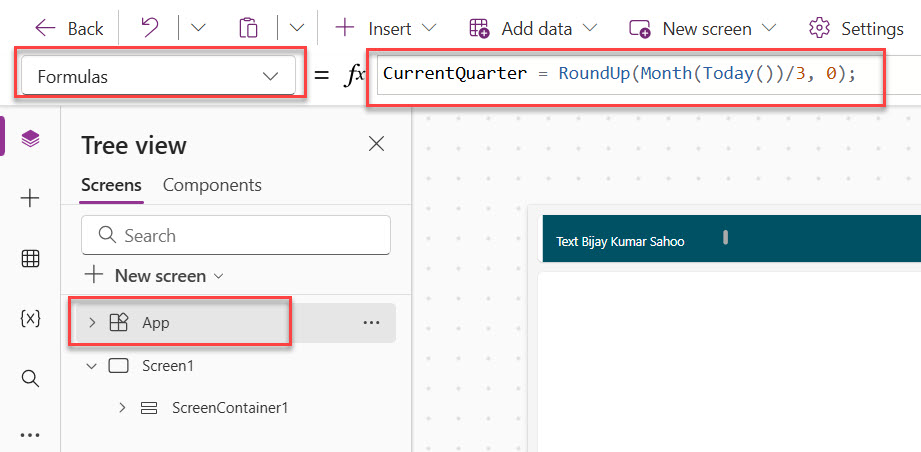
Go to Power Apps Studio → Tree view → App (select App from the dropdown at the top-left of the formula bar), then choose Formulas from the property dropdown. This property is different from OnStart, so don’t confuse the two.
CurrentQuarter = RoundUp(Month(Today())/3, 0);
Here is a screenshot for your reference.
How does this formula work?
RoundUp rounds a number up to the nearest whole number, and Month(Today()) gets today’s month number. Dividing by 3 and rounding up converts any month into its correct calendar quarter (1 to 4). You never need to update this manually—it recalculates itself every single day.
Step 2: Reference the named formula anywhere in your app
Add a Label control (Power Apps Studio → Insert → Text Label) and set its Text property:
"Current Quarter: " & CurrentQuarter
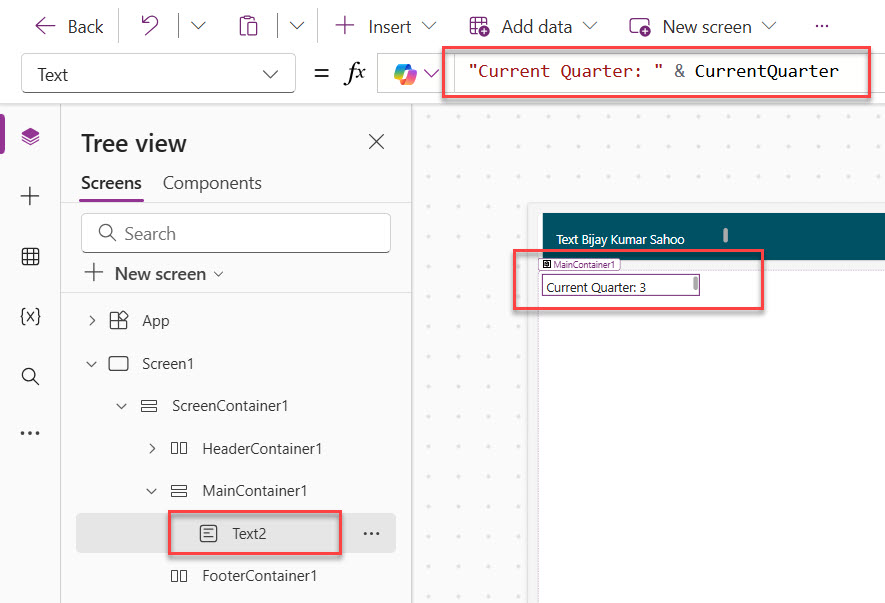
You can now reuse CurrentQuarter on any screen in your app, and it will always show the correct value without any extra code.
Pro Tip: Named formulas must always end with a semicolon, even the last one in the list. Forgetting it is the most common reason a named formula shows an error.
Check out Display Manager Name and Email in a Power Apps Gallery
Method 2 – Named Formula That Filters a Data Source
Choose this method when you want a consistently filtered view of your data—like “approved sales only”—available in multiple galleries without repeating the Filter() logic on every screen.
Step 1: Define the filtered named formula
In App → Formulas, add:
ApprovedSales = Filter(SalesTracker, Status = "Approved");
How does this formula work?
Filter() returns only the records from SalesTracker where Status equals “Approved.” Because this is a named formula, Power Apps automatically re-evaluates it every time the underlying list changes—you never call Refresh() manually for this value.
Step 2: Bind a Gallery to the named formula
Insert a Gallery control (Power Apps Studio → Insert → Layout → Vertical Gallery) and set its Items property:
ApprovedSales
Step 3: Reuse the same named formula on a second screen
Add another gallery on a different screen, maybe a “Manager Dashboard” screen, and set its Items property to the exact same value:
ApprovedSales
Both galleries now stay perfectly in sync. If a sales rep’s status changes from “Pending” to “Approved,” both screens update automatically without any extra code from you.
Pro Tip: If SalesTracker is a large SharePoint list, confirm that Filter() with a simple equality check like Status = “Approved” is delegable. Non-delegable filters silently cap results at 500 or 2000 records, so your totals could quietly become wrong without any error message.
Read Get Manager Details for the Current User in Power Apps
Method 3 – Named Formula for Aggregated Totals
Use this when you need live totals or counts, such as total approved sales amount, shown on a dashboard screen that updates as data changes without you refreshing anything.
Step 1: Create a named formula that sums a column
TotalApprovedAmount = Sum(ApprovedSales, Amount);
How does this formula work?
Sum() adds up the Amount column across every record returned by ApprovedSales. Because named formulas can reference other named formulas, you build a clean chain of logic without repeating the Filter() expression a second time.
Step 2: Display the total on a dashboard label
Text(TotalApprovedAmount, "$#,##0")
Step 3: Add a record count alongside the total
You can chain a second named formula right after the first one in the same Formulas property:
ApprovedSalesCount = CountRows(ApprovedSales);
Now both TotalApprovedAmount and ApprovedSalesCount stay live on your dashboard, updating instantly whenever a sales rep’s record changes status.
Pro Tip: Named formulas can reference each other in any order because Power Apps figures out the dependency chain for you—you don’t need to worry about which one loads first or write them in a specific sequence.
Check out Delegation in Power Apps
Method 4 – Named Formula for User Role or Access Logic
This method is suitable for scenarios where you need to show or hide controls based on who is logged in, such as allowing only regional managers to edit records in your sales tracker.
Step 1: Define a role-check named formula
IsRegionalManager = User().Email in ["manager1@company.com", "manager2@company.com"];
How does this formula work?
User().Email returns the signed-in user’s email address. The in operator checks whether that email exists inside your list of manager addresses, returning true or false automatically the moment the app loads.
Step 2: Use the named formula to control visibility
Select an Edit button (Power Apps Studio → Insert → Button, modern Fluent-based control) and set its Visible property:
IsRegionalManager
Step 3: Reuse the same logic to lock form fields
On an Edit form (Power Apps Studio → Insert → Forms → Edit form), set the DisplayMode property of a data card to:
If(IsRegionalManager, DisplayMode.Edit, DisplayMode.View)
This way, regular sales reps can view records, but only managers can actually edit them, all controlled from a single named formula.
Pro Tip: For real security, pair this with server-side permissions on the SharePoint list or Dataverse table—hiding a button only changes what users see, not what they can technically access through other means like Power Automate flows.
Check out Power Apps Notify Function
Method 5 – Named Formula with a User-Defined Function
Choose this experimental approach when the same calculation requires different inputs each time, such as calculating commission for any sales amount you pass in, rather than a fixed value.
Step 1: Define a user-defined function alongside your named formulas
CalculateCommission(SaleAmount: Number): Number = SaleAmount * 0.1;
How does this formula work?
A user-defined function works like a named formula but accepts a parameter (SaleAmount) and returns a calculated result. You write the logic once, then call it with different values wherever you need it, which named formulas alone cannot do.
Step 2: Call the function inside a gallery label
Text(CalculateCommission(ThisItem.Amount), "$#,##0")
Step 3: Reuse the function with a different tier
You can define a second function with a different rate for senior sales reps:
CalculateSeniorCommission(SaleAmount: Number): Number = SaleAmount * 0.15;
Now you have two clean, reusable functions instead of two long, repeated formulas scattered across your app.
Pro Tip: User-defined functions are still an experimental feature, so check Power Apps Studio → Settings → Upcoming features and enable them before use, and avoid relying on them in production apps until Microsoft marks them as fully supported.
Check out Power Apps Collect Function
Things to Keep in Mind
- Named formulas are immutable: Once Power Apps calculates a named formula, you cannot use Set() to override it—if you need a changeable value, use a variable instead.
- Check delegation before filtering large lists: Filter() on a SharePoint list or Dataverse table only pushes the query to the server for delegable operators; non-delegable filters truncate your data silently on large tables.
- Named formulas beat App.OnStart for initialization: Loading data through App.OnStart runs once at launch and can slow down startup, while named formulas calculate on demand and stay current automatically.
- Global variables still have their place: Use Set() for values users actively change, like a toggle or a selected filter, since named formulas cannot be manually updated at runtime.
- Canvas apps only, for now: Named formulas and user-defined functions currently work only in Canvas Apps, not in model-driven apps, so keep that in mind if you switch between app types.
- Don’t forget the semicolon: Every named formula in the Formulas property needs a trailing semicolon, including the very last one, or the whole property fails to save.
Named formulas in Power Apps offer five practical ways to centralize logic, ranging from simple constants to filtered data and user-defined functions with parameters. For most sales tracker style apps, start with a filtered named formula for your core dataset, then layer aggregation and role-based formulas on top as your app grows in complexity. I hope you found this article helpful.
You may also like:

Bijay Kumar is a 13-times Microsoft MVP in Business Applications with over 18 years of experience in the IT industry, recognized for his contributions to the Microsoft community. He is the Founder of TSinfo Technologies and shares practical, tested tutorials on Power Apps, Power Automate, Copilot Studio, and Power BI here on Power Platform FAQs. Read more.