
I built a leave request app for a client last year, and the manager kept complaining about one thing: the Department dropdown showed “Sales” four times because four employees belonged to that department. That’s a classic duplicate values problem, and it’s the first thing every Power Apps builder runs into once real data gets involved.
The fix is a single function called Distinct. I use it in almost every Canvas app I build, whether the data comes from a SharePoint list, Dataverse, or an Excel table. It takes a messy column full of repeated values and gives you back a clean, unique list in seconds.
In this guide, I’ll show you exactly how the Distinct function works, walk through real formulas using a leave request app example, and point out the delegation gotcha that trips up almost every beginner.
What Does Distinct Do in Power Apps
The Distinct function in Power Apps scans a table and pulls out unique values from one column, dropping every duplicate along the way. Think of it as asking Power Apps, “give me each value in this column only once.”
The basic syntax looks like this:
Distinct(Table, Formula)
Table is your data source — a SharePoint list, a Dataverse table, an Excel table, or even a collection you built with Collect. Formula is usually just the column name you want unique values from, though it can be a more complex expression too.
Here’s the part that catches almost everyone off guard the first time: Distinct always returns a single-column table, and that column is named Result, not the name of your original column.
So if you write Distinct('Leave Requests', Department), you don’t get a column called Department back. You get a column called Result.
I’ll show you exactly where this matters in a minute, especially since the steps look a little different depending on whether you’re using the classic Dropdown or the newer modern Dropdown control.
Building a Distinct Dropdown in Power Apps Step by Step
Let’s use a real example — a leave request app where employees pick their department from a dropdown before submitting a request. The SharePoint list behind this app has one row per leave request, so the Department column repeats constantly.
Step 1: Connect Your Data Source
Open your Canvas app and connect to the SharePoint list. If you’re starting from scratch, this is the same process I cover in my guide on how to build an app from scratch using Power Apps. Once connected, your list appears in the Data panel on the left.
Step 2: Add a Dropdown Control
Insert a Dropdown control onto your screen. Power Apps now ships two versions of this control side by side: the classic Dropdown and the modern Dropdown control (built on Fluent UI).
New apps default to modern controls, so unless you’ve switched that setting off, you’re likely working with the modern version. Rename the control to something meaningful like ddDepartment so your formulas stay readable later.
Step 3: Set the Items Property
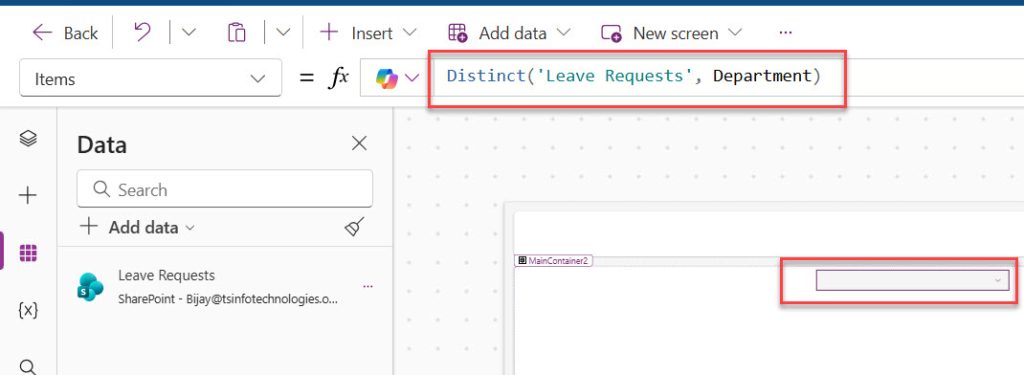
Click the dropdown, go to the Items property, and enter this formula:
Distinct('Leave Requests', Department)
This tells Power Apps to scan every record in the Leave Requests list, look at the Department column, and return each unique department name exactly once. If you had 200 leave requests but only 5 actual departments, you get 5 rows back, not 200.
This is how I bind the modern dropdown list:
Step 4: Fix How the Dropdown Displays the Result Column
Here’s where that Result column naming quirk comes into play, and this is where the classic and modern Dropdown controls genuinely differ.
If you’re using the classic Dropdown, click the control, open the Value property in the Advanced settings, and set it to:
Result
That tells the classic control which column to display, since Distinct’s output is always named Result rather than Department.
If you’re using the modern Dropdown control, there’s no Value property at all. Instead, the modern control uses ItemDisplayText to decide what text shows in the list, and it defaults to ThisItem.Result automatically when your Items source is a table like the one Distinct returns.
In most cases, you don’t need to touch anything, but if the dropdown displays blank text, open the Fields section in the right-hand properties pane, select Edit, and confirm the field mapped to the display text is set to Result. You can also set it directly in the formula bar with:
ItemDisplayText: ThisItem.Result
When a user picks a value, the way you read it also changes between the two controls. On the classic Dropdown, you’d reference ddDepartment.Selected.Result. On the modern Dropdown control, it’s the same pattern — ddDepartment.Selected.Result — since Selected still returns a record from the Items table, but there’s no Value property involved in getting there.
If you need to set a default selection, the modern control also swaps out the old Default property for DefaultSelectedItems, which expects a single-item table that matches the schema of Items, not just a plain text value. For a Distinct-based dropdown, that looks like:
DefaultSelectedItems: [LookUp(Distinct('Leave Requests', Department), Result = "Sales")]
Pro tip: I’ve found that forgetting to check ItemDisplayText is the single most common reason a Distinct-based modern dropdown shows up blank. With the classic control, you’d fix this through the Value property, but the modern control hides this setting inside the Fields pane, so it’s easy to miss if you’re used to building with classic controls.
Using Distinct with Filter for Cascading Dropdowns
A lot of real apps need cascading dropdowns — pick a department, then only see the employees in that department. This is where combining Distinct with Filter pays off, and it’s a pattern I use constantly in service desk and leave request apps.
Set the Items property of your second dropdown, say for Employee Name, to:
Distinct(
  Filter('Leave Requests', Department = ddDepartment.Selected.Result),
  EmployeeName
)
Filter narrows the list down to only records matching the selected department first. Then Distinct removes duplicate employee names from that filtered subset. This two-step approach — filter first, then distinct — is more efficient than trying to do both in one messy formula, and it’s much easier to debug when something goes wrong.
This pattern works the same whether your second dropdown is classic or modern, since both read the selected department through ddDepartment.Selected.Result.
If you’re new to writing conditional logic like this, it helps to also understand how multiple If statements work in Power Apps since a lot of cascading dropdown logic ends up combining Filter, Distinct, and conditional checks together.
Using Distinct with Choice Columns
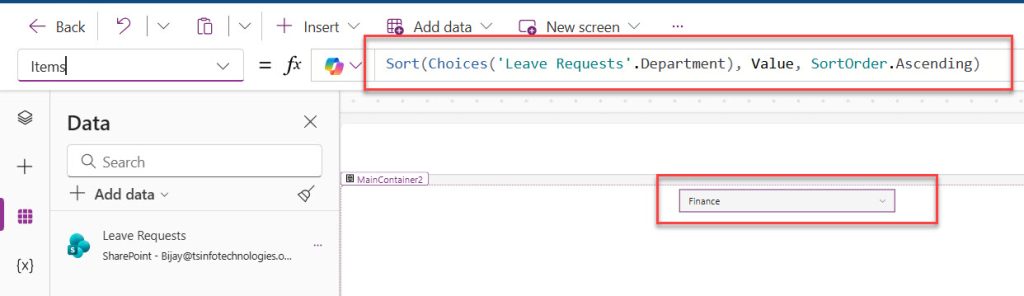
If your Department field is a Choice column in SharePoint rather than plain text, Distinct behaves a little differently. Choice columns already store a fixed set of options, so you’ll often get better results using the Choices function instead:
Sort(Choices('Leave Requests'.Department), Value, SortOrder.Ascending)
Here is the item property you can see in the screenshot below:
But if you specifically need Distinct to work against a Choice column’s selected values across records, wrap it like this:
Distinct(Choices('Leave Requests'.Department), Value)
I generally reach for Choices first on genuine Choice columns because it reflects the actual configured options, even ones not yet used in any record. Distinct only shows values that already exist somewhere in your data.
Using Distinct in a Gallery
Distinct isn’t limited to dropdowns. I’ve used it inside a Gallery to show a summary list of unique locations from a facilities request app. Set the Gallery’s Items property to:
Distinct('Leave Requests', Department)
Then inside the Gallery, reference the value with ThisItem.Result instead of the original column name. This is handy for building quick summary screens — for example, a manager’s dashboard showing one card per department instead of one card per leave request.
Watch Out for Delegation Warnings
This is the part beginners skip past and later regret. Delegation is how Power Apps decides whether a formula can be processed entirely by the data source server, like SharePoint or Dataverse, or whether Power Apps has to pull data locally and process it itself.
Distinct is not a delegable function against most data sources, including SharePoint lists. That means when you write Distinct('Leave Requests', Department) against a list with more than 500 or 2,000 records, Power Apps only looks at the first chunk of records, not the entire list. You’ll usually see a blue delegation warning underline the formula in the formula bar.
Practically, this means your dropdown might miss a department if that department only appears in record number 3,000 out of 5,000. I’ve hit this exact issue on a client project with a large equipment inventory list, and the fix was to keep the underlying list smaller or use a helper approach, like a separate lookup list containing just the unique department names, updated whenever a new department gets added.
If you want to fully understand which formulas are safe at scale and which ones aren’t, read through my dedicated post on Power Apps delegation before you build anything against a list expected to grow past a few thousand rows.
Things to Keep in Mind
- Distinct is not delegable. Against large SharePoint or Dataverse tables, it only processes the first portion of records, so results can be incomplete once your list grows.
- The output column is always named Result. Don’t assume your original column name carries through — on classic Dropdowns set the Value property to Result, and on modern Dropdown controls check the ItemDisplayText field mapping instead.
- Classic and modern Dropdown controls handle defaults differently. Classic uses a simple Default property, while the modern Dropdown control needs DefaultSelectedItems set to a single-item table matching your Items schema.
- Use Filter before Distinct for cascading dropdowns. Filtering first keeps the formula readable and reduces the amount of data Distinct has to process.
- Choice columns often work better with Choices. Reach for Choices when you need every configured option, even unused ones, and Distinct when you only need values that already exist in records.
- Test with realistic data volumes. A dropdown that works fine with 50 test records can silently break once a list hits a few thousand rows.
- Consider a helper list for large data sets. If delegation limits cause missing values, maintain a small separate list of unique values instead of relying on Distinct against the full table.
Frequently Asked Questions
Why is my Power Apps dropdown blank after using Distinct?
On a classic Dropdown, this almost always happens because you forgot to set the Value property to Result. On a modern Dropdown control, check the ItemDisplayText setting in the Fields pane instead, since it needs to point to Result as well.
Does Distinct work with SharePoint lists?
Yes, Distinct works fine with SharePoint lists for smaller data sets. Just be aware it’s not delegable, so on lists with more than a few thousand records, it may only scan the first batch and miss some unique values.
What’s the difference between Distinct and Choices in Power Apps?
Distinct pulls unique values from data that already exists in your records, working with text columns, collections, or any table. Choices pulls the full list of configured options from a SharePoint Choice or Lookup column, including options that haven’t been used yet in any record.
Can I sort the results from Distinct?
Yes, wrap your Distinct formula inside a Sort function, like Sort(Distinct('Leave Requests', Department), Value, SortOrder.Ascending). This alphabetizes your unique values before they display, and it works the same way whether you’re feeding a classic or modern Dropdown control.
Why does Distinct only show some of my values on a large list?
This is a delegation limitation. Distinct can’t be fully delegated to SharePoint or most connectors, so Power Apps only evaluates the first chunk of records within your delegation limit, which defaults to 500 but can be raised to 2,000 in app settings.
Can I use Distinct on a collection instead of a live data source?
Yes, and it works exactly the same way. If you’ve built a collection using Collect, you can run Distinct(YourCollection, ColumnName) against it just like you would a SharePoint list, and since collections live in memory, delegation limits don’t apply.
You May Also Like
- Power Apps Delegation — understand which formulas run fully on the server versus locally on large data sets.
- Patch Function in Power Apps — learn how to save and update records without relying on a standard Form control.
- Power Apps Variables — get comfortable with storing and reusing values across your app’s screens.
- Set Dropdown Value on Button Click in Power Apps — a natural next step once you’ve built dropdowns with Distinct.
- Build an App from Scratch Using Power Apps — start here if you’re still setting up your first Canvas app.
The Distinct function solves one of the most common annoyances in Power Apps: duplicate values cluttering your dropdowns and galleries. Start simple with Distinct(DataSource, ColumnName), remember that classic and modern Dropdown controls handle the Result column differently, and always sanity-check your results against delegation limits once real data volumes kick in. I hope you found this article helpful.

Bijay Kumar is a 13-times Microsoft MVP in Business Applications with over 18 years of experience in the IT industry, recognized for his contributions to the Microsoft community. He is the Founder of TSinfo Technologies and shares practical, tested tutorials on Power Apps, Power Automate, Copilot Studio, and Power BI here on Power Platform FAQs. Read more.