When building business applications using Power Apps, many organizations want their apps to do more than just collect data. For example, imagine an employee submitting a leave request or a manager approving a task. In these situations, users often expect an automatic email notification so that the next person in the process is informed immediately.
However, many beginners face a common challenge: Power Apps does not have a simple “Send Email” button like traditional applications. Instead, you typically need to connect Power Apps with services like Outlook or Power Automate to trigger the email when a button is clicked.
By using connectors such as Office 365 Outlook or integrating Power Automate flows, you can easily send emails when users perform actions like submitting a form, clicking a button, or updating a record.
In this article, we will explore how to send emails from Power Apps step-by-step, including practical examples.
Why Would You Want to Send Emails from Power Apps Anyway?
Before we jump into the how, let’s talk about the why. Here are some common scenarios:
- You’ve built an approval app and need to notify managers when someone submits a request
- You want to send confirmation emails to users after they fill out a form
- You need to alert your team when certain conditions are met in your app
- You want to send reports or summaries to stakeholders
The point is – email integration makes your apps actually useful in the real world.
The Two Main Ways to Send Emails
Here’s the thing: there are two primary methods to send emails from Power Apps.
- Office 365 Outlook connector (the easy way)
- Power Automate (the flexible way)
Let me explain both, and you can pick what works for you.
Method 1: Using the Office 365 Outlook Connector
This is the quickest way to get started. It’s built right into Power Apps, and you don’t need to set up anything fancy.
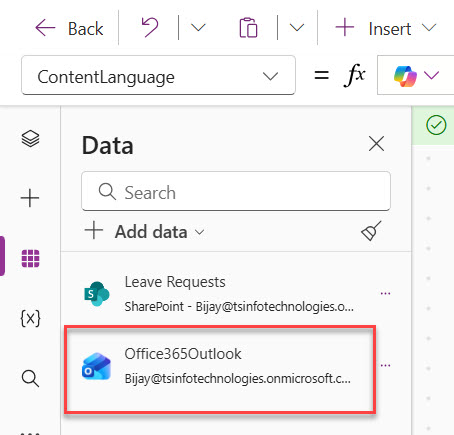
Step 1: Add the Connection
First, you need to add the Office 365 Outlook connection to your app.
- Open your Power App in edit mode
- Click on Data in the left sidebar (it looks like a cylinder icon)
- Click Add data
- Search for “Office 365 Outlook”
- Click on it and connect
That’s it. You’ve now added the connector to your app. You can see in the screenshot below:
Step 2: Add a Button
Let’s add a button that will actually send the email.
- Go to Insert in the top menu
- Click Button
- Place it wherever you want on your screen
- Change the button text to something like “Send Email” (click on the button and edit the Text property)
Step 3: Write the Email Formula
Now here’s where the magic happens. Click on your button and find the OnSelect property in the dropdown at the top left.
Here’s the basic formula:
Office365Outlook.SendEmailV2(
    "recipient@email.com",
    "Subject Line Here",
    "Body of the email goes here"
)
Let me break this down:
- The first part (recipient@email.com) is who you’re sending to
- The second part is your subject line
- The third part is the email body
Making It Dynamic
Nobody wants to send the same email every time. Let’s make it dynamic.
Say you have a text input where users type their email (let’s call it TextInput_Email), another for the subject (TextInput_Subject), and one for the message (TextInput_Body).
Your formula would look like this:
Office365Outlook.SendEmailV2(
    TextInput_Email.Text,
    TextInput_Subject.Text,
    TextInput_Body.Text
)
Now the email will send whatever the user types in those fields.
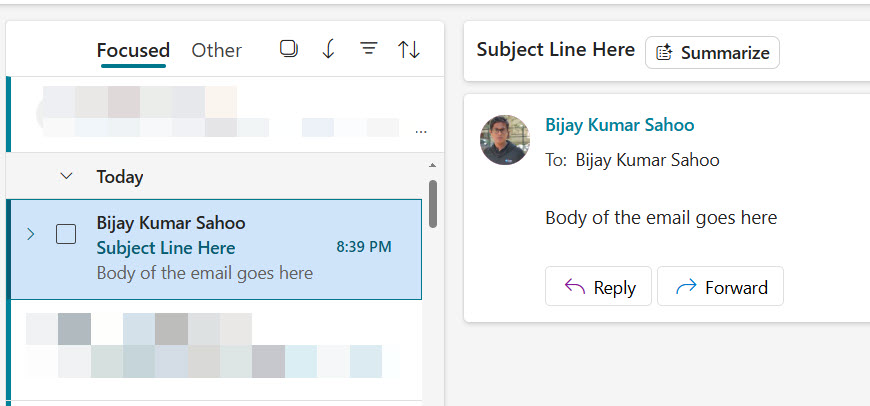
You can see in the screenshot below that I sent an email to my email address.
Sending to Multiple People
Want to send the email to multiple recipients? Just separate the email addresses with a semicolon:
Office365Outlook.SendEmailV2(
    "person1@email.com;person2@email.com;person3@email.com",
    "Subject Line Here",
    "Body of the email goes here"
)
Adding CC and BCC
The SendEmailV2 function has more parameters you can use:
Office365Outlook.SendEmailV2(
    "recipient@email.com",
    "Subject Line Here",
    "Body of the email goes here",
    {
        CC: "cc@email.com",
        BCC: "bcc@email.com",
        Importance: "High"
    }
)
Those curly brackets contain optional parameters. You don’t have to use all of them – just pick what you need.
Using HTML in Your Email Body
Plain text emails are boring. You can use HTML to format your emails:
Office365Outlook.SendEmailV2(
    "recipient@email.com",
    "Subject Line Here",
    "<html><body><h1>Hello!</h1><p>This is a <strong>formatted</strong> email.</p></body></html>",
    {
        IsHtml: true
    }
)
Notice the IsHtml: true parameter. That tells Outlook to render the HTML instead of showing the raw code.
Adding a Confirmation Message
You probably want to let users know the email was sent. Add this formula after your email code:
Office365Outlook.SendEmailV2(
    TextInput_Email.Text,
    TextInput_Subject.Text,
    TextInput_Body.Text
);
Notify("Email sent successfully!", NotificationType.Success)
That semicolon separates the two actions. The Notify function shows a green success message at the top of the screen.
Check out Power Apps Concatenate Strings
Method 2: Using Power Automate (The Better Way for Complex Scenarios)
The Office 365 connector works fine for simple emails, but Power Automate gives you way more control. Plus, it doesn’t freeze your app while sending the email.
Why Use Power Automate Instead?
Here’s when you should consider Power Automate:
- You need to send emails with attachments
- You want to add conditions (only send if something is true)
- You need to pull data from SharePoint or other sources before sending
- You want the email to send in the background without the user waiting
- You need error handling and retry logic
Create Your Flow
Let’s build a simple flow together.
Step 1: Start a New Flow
- Go to Power Automate
- Click Create
- Choose Instant cloud flow
- Name it something like “Send Email from Power App.”
- Select PowerApps as the trigger
- Click Create
Step 2: Add Input Parameters
You need to tell the flow what information the Power App will send.
- Click + New step
- Search for “PowerApps” and select Ask in PowerApps (you’ll do this for each piece of info you need)
Actually, scratch that. The easier way is to just add the email action first, and Power Automate will automatically create the inputs.
Step 3: Add the Email Action
- Click + New step
- Search for “Send an email”
- Choose Send an email (V2) from Office 365 Outlook
Now fill in the fields:
- To: Click in the box and select Ask in PowerApps
- Subject: Click and select Ask in PowerApps
- Body: Click and select Ask in PowerApps
Power Automate will automatically create input parameters for each one.
Step 4: Save Your Flow
Click Save at the top. Your flow is now ready to use.
Connecting the Flow to Your Power App
Now let’s hook this up to your Power App.
Step 1: Add the Flow to Your App
- Open your Power App in edit mode
- Click Power Automate in the left sidebar (it looks like a lightning bolt)
- Click Add flow
- Find your flow in the list and click on it
Step 2: Call the Flow from a Button
Click on your button and set the OnSelect property to:
'SendEmailfromPowerApp'.Run(
    TextInput_Email.Text,
    TextInput_Subject.Text,
    TextInput_Body.Text
)
Notice the single quotes around the flow name – you need those if your flow name has spaces.
The order of the parameters matters. They need to match the order that Power Automate expects them (usually the order you added them in the flow).
Step 3: Add a Success Message
'SendEmailfromPowerApp'.Run(
    TextInput_Email.Text,
    TextInput_Subject.Text,
    TextInput_Body.Text
);
Notify("Email sent!", NotificationType.Success)
Read Power Apps Modern Checkbox Control
Send Emails When Forms Are Submitted
Here’s a super common scenario: you want to send an email automatically when someone submits a form in your app.
Let’s say you have a submit button that saves data to SharePoint. Here’s how to add email functionality:
Patch(
    YourSharePointList,
    Defaults(YourSharePointList),
    {
        Name: TextInput_Name.Text,
        Email: TextInput_Email.Text,
        Comments: TextInput_Comments.Text
    }
);
Office365Outlook.SendEmailV2(
    "manager@company.com",
    "New Form Submission",
    "A new form was submitted by " & TextInput_Name.Text
);
Notify("Form submitted and email sent!", NotificationType.Success)
This does three things in order:
- Saves the data to SharePoint
- Sends an email
- Shows a confirmation message
Common Problems and How to Fix Them
Let me save you some headaches by sharing issues I’ve run into.
Problem: “Name isn’t valid”
This usually means you haven’t added the Office 365 Outlook connector to your app. Go back to the Data section and add it.
Problem: Nothing happens when I click the button
Check your OnSelect formula for syntax errors. Look for:
- Missing quotes around text
- Missing commas between parameters
- Typos in field names
Problem: Email sends, but looks terrible
If you’re using HTML, make sure you’ve set IsHtml: true in your formula. Also, test your HTML in a regular email client first to make sure it works.
Problem: Flow doesn’t run from Power Apps
Make sure you’ve actually added the flow to your app through the Power Automate panel. Also check that the number of parameters in your Run formula matches what the flow expects.
Problem: “You don’t have permission to send as this user”
This happens when you’re trying to send from a shared mailbox. You need to either send from your own mailbox or have your IT admin set up proper permissions.
Best Practices
Here are some tips I’ve learned the hard way:
Always add error handling: Emails can fail for lots of reasons. Use the IsError function to check if something went wrong.
Set(EmailResult, Office365Outlook.SendEmailV2(
    TextInput_Email.Text,
    TextInput_Subject.Text,
    TextInput_Body.Text
));
If(
    IsError(EmailResult),
    Notify("Email failed to send!", NotificationType.Error),
    Notify("Email sent successfully!", NotificationType.Success)
)
Don’t send emails in a loop without testing: If you accidentally create a formula that sends 1000 emails, you’re going to have a bad day. Test with small numbers first.
Use Power Automate for important emails: If the email absolutely must be sent, use Power Automate. It has retry logic built in.
Keep email bodies simple: Complex HTML can break in different email clients. Stick to basic formatting.
Store email templates somewhere: Instead of hardcoding email content, consider storing templates in SharePoint or a collection. Makes updates way easier.
Wrapping Up
In this tutorial, I explained different methods to send emails from Power Apps. Start with the simple Office 365 connector method for basic needs, then move to Power Automate when you need more power.
The key things to remember:
- Add the Office 365 Outlook connector to your app first
- Use SendEmailV2 for basic email sending
- Switch to Power Automate for complex scenarios
- Always test with your own email first
- Add error handling so you know if something fails
Now go build something useful. And when your app sends that first email successfully, you’ll feel pretty good about it.
Got stuck somewhere? Double-check your formula syntax – that’s usually where the problem is. And make sure you’ve set up the right permissions in your Microsoft 365 environment.
You may also like:
- Patch Function in Power Apps
- Sequence Function in Power Apps
- How to Set Dropdown Value On Button Click in Power Apps

Bijay Kumar is a Microsoft MVP in Business Applications with over 18 years of experience in the IT industry and more than 12 years as a Microsoft MVP, recognized for his contributions to the Microsoft community. He is the Founder of TSinfo Technologies and the creator of the popular technology platforms SPGuides.com and EnjoySharePoint.com. Bijay also runs the SPGuides YouTube channel, where he shares practical tutorials on Microsoft 365, SharePoint, Power Platform, and Copilot technologies. Read more.