When I build business apps in Power Apps, I often run into situations where the app needs to behave differently depending on a value selected by the user.
For example, imagine you are building a ticket management system for an IT helpdesk. Each ticket has a status such as:
- New
- In Progress
- Waiting for Approval
- Closed
Now, depending on the status, the app should behave differently. For instance:
- Show different colors in a gallery
- Display different messages
- Navigate to different screens
- Trigger different logic
Many beginners try to handle this situation using multiple nested If statements. It might start simple, but very quickly it becomes something like this:
If(Status="New",...,
If(Status="In Progress",...,
If(Status="Waiting for Approval",...,
If(Status="Closed",...))))
This kind of formula becomes hard to read, difficult to maintain, and prone to mistakes.
When apps grow larger, this problem becomes even more frustrating. Developers start wondering:
- Is there a cleaner way to handle multiple conditions?
- How do experienced Power Apps developers structure this logic?
- How do I make formulas easier to read and maintain?
This is exactly where the Power Apps Switch function becomes extremely useful.
The Switch function allows you to evaluate a single value and return different results based on matching cases. It makes formulas shorter, cleaner, and easier to understand compared to long nested If statements.
In this tutorial, I’ll walk you through:
- What the Power Apps Switch function is
- When to use it instead of If
- How to implement it step-by-step
- Practical real-world examples
- Advanced techniques used by experienced developers
- Common mistakes and best practices
By the end, you’ll be comfortable using Switch in real production Power Apps applications.
Power Apps Switch Function
The Switch function in Power Apps evaluates one expression and compares it against multiple possible values.
If a match is found, it returns the corresponding result.
Basic Syntax
Here is the basic syntax of the Power Apps Switch function:
Switch(
    Formula,
    Match1, Result1,
    Match2, Result2,
    Match3, Result3,
    DefaultResult
)
How it works
- Formula
The value you want to evaluate. - Match1, Match2, Match3
Possible values to compare. - Result1, Result2, Result3
What Power Apps should return when a match is found. - DefaultResult
Optional fallback value if no match occurs.
Simple Example
Here is a simple example of the Power Apps Switch function.
Switch(
    Dropdown1.Selected.Value,
    "New", "Ticket just created",
    "In Progress", "Work is ongoing",
    "Closed", "Ticket completed",
    "Unknown Status"
)
Here is what happens step-by-step:
- Power Apps checks the value of Dropdown1.Selected.Value.
- If the value is New, the formula returns Ticket just created.
- If the value is In Progress, it returns Work is ongoing.
- If the value is Closed, it returns Ticket completed.
- If none of these match, it returns Unknown Status.
Why Use Switch Instead of IF?
Before we get into the how, let me show you why this matters.
Let’s say you’re building an approval app, and you want to show different colors based on status. Here’s the IF way:
If(Status = "Approved", Green,
   If(Status = "Rejected", Red,
      If(Status = "Pending", Yellow,
         If(Status = "Draft", Gray, White))))
Yuck, right? Now here’s the Switch way:
Switch(Status,
   "Approved", Green,
   "Rejected", Red,
   "Pending", Yellow,
   "Draft", Gray,
   White
)
Way cleaner. Way easier to read. Way easier to maintain when your boss asks you to add another status next month.
Switch vs. If: When to Use What in Power Apps
People ask me this all the time. Here’s my rule of thumb:
Use IF when:
- You’re checking if something is true or false
- You only have one or two conditions
- Your conditions are complex (like checking multiple fields)
Use Switch when:
- You’re checking one value against multiple possibilities
- You have 3 or more conditions
- All your conditions are checking the same thing
Example of when to use IF:
If(Amount > 1000 And Manager = Blank(), "Needs Approval", "Proceed")Example of when to use Switch:
Switch(Status, "Draft", Gray, "Submitted", Yellow, "Approved", Green)Step-by-Step: Using Switch in Power Apps
Let’s walk through a practical implementation of the Switch function in Power Apps.
Scenario
We are building a task management app using Microsoft Power Apps.
Each task has a priority level:
- High
- Medium
- Low
We want to show different colors depending on priority.
Step 1: Insert a Gallery
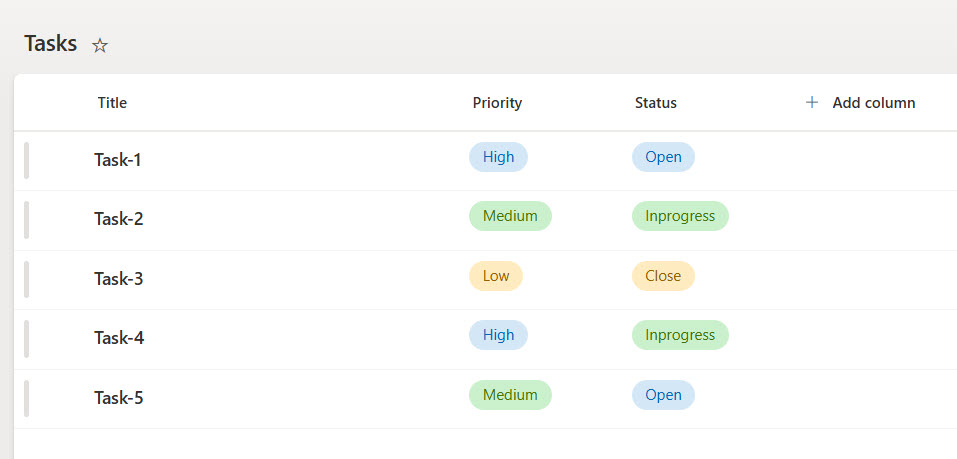
Add a gallery showing tasks from a SharePoint list.
Example fields:
- Title
- Priority (Choice column values as: High, Medium, and Low)
- Status (Choice Column values as: Open, InProgress, and Close)
The SharePoint task list with some records looks like the screenshot below.
Step 2: Select the Label or Card
Inside the gallery, select a label or container where you want to apply formatting.
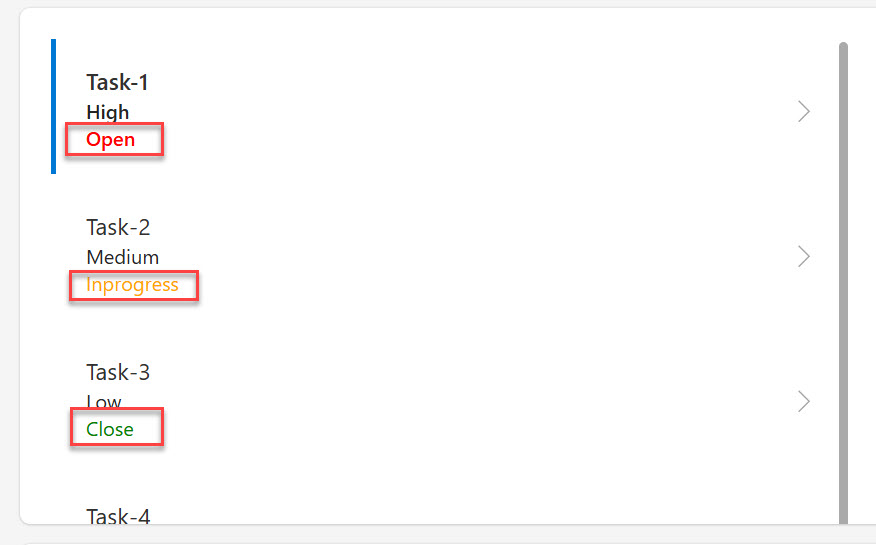
Step 3: Use Switch in the Color Property
Write the formula below.
Property: Color.
Switch(
    ThisItem.Priority.Value,
    "High", Color.Red,
    "Medium", Color.Orange,
    "Low", Color.Green,
    Color.Black
)
Here:
- If Priority is High, text becomes red.
- If Priority is Medium, text becomes orange.
- If Priority is Low, text becomes green.
- If something unexpected appears, the default is black.
This is much easier to read than multiple nested If formulas.
You can see the screenshot below: the exact example, and this is how the Gallery items appear.
Here, I chose a vertical gallery layout with Title, subtitle, and body.
Now, let me show you some real-world examples of using the Switch function in Power Apps.
Check out How to Calculate the Difference Between Two Dates in Power Apps
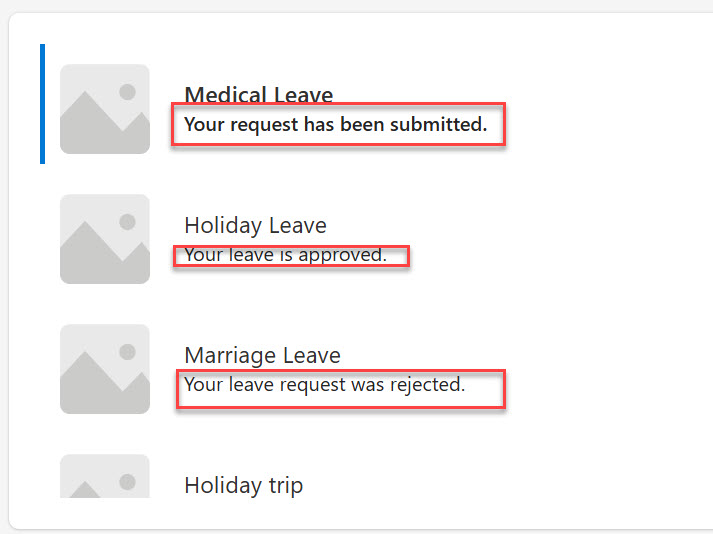
Real-World Example #1: Using Switch to Display Messages
Imagine an employee leave request system.
Each request has a status:
- Submitted
- Approved
- Rejected
- Pending
We want to show a message to the user.
Like the above example, you can add a gallery control to display all the leave requests.
Then, in the Text property of the label, write the following formula.
Switch(
    ThisItem.Status.Value,
    "Submitted", "Your request has been submitted.",
    "Approved", "Your leave is approved.",
    "Rejected", "Your leave request was rejected.",
    "Pending", "Waiting for manager review.",
    "Status unavailable"
)
This formula is perfect for:
- Labels
- Notifications
- Status messages
You can see the exact output of how it is appearing in the screenshot below:
Real-World Example #2: Navigate to Different Screens
Here’s another common scenario. You’ve got different types of users, and you want to send them to different screens when they log in.
Put this in the OnSelect of your login button:
Switch(UserType,
   "Admin", Navigate(AdminDashboard, ScreenTransition.Fade),
   "Manager", Navigate(ManagerDashboard, ScreenTransition.Fade),
   "Employee", Navigate(EmployeeDashboard, ScreenTransition.Fade),
   Navigate(ErrorScreen, ScreenTransition.None)
)
Simple. Clean. Easy to understand when you come back to it six months later.
Read How to Set Dropdown Value On Button Click in Power Apps
Real-World Example #3: Dynamic Text
Let’s say you’re building a form, and you want to show different help text based on what field the user is looking at.
For the Text property of your help label:
Switch(SelectedField,
   "Email", "Please enter your company email address",
   "Phone", "Format: (555) 123-4567",
   "Department", "Select your primary department",
   "Start Date", "Enter your first day of employment",
   "Select a field to see help text"
)
This gives your users contextual help without cluttering your screen with a bunch of labels.
Real-World Example #4: Calculated Values
Here’s where Switch gets really powerful. Let’s say you’re building an expense tracker, and different expense types have different approval limits.
Switch(ExpenseType,
   "Travel", 2000,
   "Equipment", 1000,
   "Training", 1500,
   "Office Supplies", 500,
   "Meals", 100,
   250
)
Now you can use this in a comparison:
If(ExpenseAmount > Switch(ExpenseType, "Travel", 2000, "Equipment", 1000, ...),
   "Requires Manager Approval",
   "Auto-Approved")
Check out Power Apps Modern Date Picker with Time
Real-World Example #5: Updating Fields with Switch
Switch can also be used inside Patch operations in Power Apps.
Example scenario: update task priority levels.
Here is the formula.
Patch(
    Tasks,
    ThisItem,
    {
        PriorityLevel:
        Switch(
            DropdownPriority.Selected.Value,
            "High", 3,
            "Medium", 2,
            "Low", 1,
            0
        )
    }
)
This converts user-friendly text into numeric values stored in the database.
Check out Sequence Function in Power Apps
Combining Switch with Other Functions
Here’s where things get interesting. You can nest Switch functions, though I’d be careful about going too deep—remember, we’re trying to keep things readable.
Example: Department and Role Based Logic
Switch(Department,
   "Sales", Switch(Role,
      "Manager", "View All Sales",
      "Rep", "View Own Sales",
      "View Nothing"
   ),
   "IT", Switch(Role,
      "Admin", "Full System Access",
      "Support", "Limited Access",
      "No Access"
   ),
   "Limited Access"
)
This works, but honestly, if you find yourself doing this a lot, you might want to think about using a lookup table in SharePoint instead. More on that in a bit.
Using Switch with SharePoint Data
Since you’re probably using SharePoint with Power Apps (most people are), let me show you how Switch works with SharePoint columns.
Let’s say you have a SharePoint list called “Tasks” with a choice column called “Priority”. You want to sort your gallery based on priority.
First, add a calculated column to your gallery items:
SortByColumns(Tasks,
   "PriorityValue", Descending
)
But wait—Priority is text (High, Medium, Low), not numbers. So add this formula to create PriorityValue:
AddColumns(Tasks,
   "PriorityValue", Switch(Priority.Value,
      "High", 3,
      "Medium", 2,
      "Low", 1,
      0
   )
)
Now your complete formula looks like:
SortByColumns(
   AddColumns(Tasks,
      "PriorityValue", Switch(Priority.Value,
         "High", 3,
         "Medium", 2,
         "Low", 1,
         0
      )
   ),
   "PriorityValue", Descending
)
Read Patch Function in Power Apps
Common Mistakes (And How to Avoid Them)
Mistake #1: Forgetting the Default Value
I see this all the time. Someone writes a Switch function without a default, and then weird stuff happens when the data doesn’t match.
Always include a default value. Always. Even if you think your data is perfect, it probably isn’t.
Mistake #2: Case Sensitivity Issues
Switch is case-sensitive. “approved” and “Approved” are different things.
If your data might have case variations, use Lower() or Upper():
Switch(Lower(Status),
   "approved", Green,
   "rejected", Red,
   Gray
)
Mistake #3: Too Many Options
If you’ve got more than 8-10 options in your Switch statement, stop. You’re doing it wrong.
Instead, create a lookup table in SharePoint. Make a list called “StatusColors” with columns for Status and Color. Then use LookUp:
LookUp(StatusColors, Status = ThisItem.ProjectStatus, Color)This is way more maintainable, especially when values change.
Advanced Trick: Using Switch for Icon Selection
Here’s something cool I use all the time. You can use Switch to dynamically change icons in your app.
Set the Icon property of an icon control:
Switch(FileType,
   "PDF", Icon.DocPdf,
   "Word", Icon.WordDocument,
   "Excel", Icon.ExcelDocument,
   "Image", Icon.Picture,
   Icon.Document
)
Pair this with the color trick from earlier, and you’ve got a really professional-looking file list.
Performance Considerations
Look, I’m not going to sugarcoat this—if you’re using Switch in a gallery with thousands of items, you might see some lag. Power Apps has to evaluate that formula for every single item.
If performance becomes an issue:
- Move the logic to SharePoint using calculated columns
- Use delegation-friendly functions where possible
- Consider creating a separate data source with the calculated values already done
Wrapping Up
The Switch function is one of those things that seems simple but makes a huge difference in how clean and maintainable your apps are.
Start using it anywhere you’ve got more than two IF statements doing basically the same thing. Your future self (and anyone else who has to work on your app) will thank you.
A few key things to remember:
- Always include a default value
- Watch out for case sensitivity
- Don’t go overboard—if you’ve got tons of options, use a lookup table
- Keep it readable—that’s the whole point
The best way to learn this is to just start using it. Next time you’re about to write a nested IF statement, stop and ask yourself: “Could this be a Switch instead?”
Nine times out of ten, the answer is yes.
Now go make your apps cleaner. You’ve got this.
You may also like the following tutorials:

Bijay Kumar is a Microsoft MVP in Business Applications with over 18 years of experience in the IT industry and more than 12 years as a Microsoft MVP, recognized for his contributions to the Microsoft community. He is the Founder of TSinfo Technologies and the creator of the popular technology platforms SPGuides.com and EnjoySharePoint.com. Bijay also runs the SPGuides YouTube channel, where he shares practical tutorials on Microsoft 365, SharePoint, Power Platform, and Copilot technologies. Read more.