Imagine you’ve built a Power Apps canvas app for your HR team. Users fill in an employee onboarding form and hit the Submit button. The data saves to SharePoint — but the screen just sits there, completely silent. No confirmation, no error, nothing. Users start clicking the button again and again, thinking it didn’t work. Now you have duplicate records in your SharePoint list, and a confused team asking, “Did it save or not?”
This is one of the most common problems I see in Power Apps built by beginners and even intermediate developers. The app works perfectly under the hood, but there’s zero feedback to the person using it. Users don’t know if their action succeeded, failed, or is still processing. This creates confusion, duplicate data, and a poor experience overall.
That’s exactly where the Notify function in Power Apps comes in. It lets you display a banner notification at the top of the screen — a short, clear message that tells the user exactly what happened. You can show a green success message, a red error alert, a yellow warning, or a plain informational message. And the best part? It takes just one line of Power Fx formula to set up.
In this tutorial, I’ll walk you through everything you need to know about the Power Apps Notify function — from the basic syntax to advanced real-world scenarios. By the end, you’ll know how to use Notify for form submissions, data validation, conditional feedback, and more. These examples will be helpful even if you’ve been using Power Apps for years.
What Is the Power Apps Notify Function?
The Notify function in Power Apps displays a banner message at the top of the screen when triggered. It’s a built-in Power Fx function available in all Canvas Apps. Think of it as the Power Apps equivalent of a JavaScript alert — but cleaner, less intrusive, and more user-friendly.
The notification auto-dismisses after a set timeout (default is 10 seconds), or the user can manually close it. You can control the type of message (success, error, warning, information), what text it shows, and how long it stays on screen.
Here’s the key thing: Notify does not block the app flow. Unlike a popup dialog, the user can keep interacting with the app while the notification is visible.
Power Apps Notify Function Syntax
Below is the syntax of the Power Apps Notify() function.
Notify( Message [, NotificationType [, Timeout]] )
Parameters explained:
- Message (Required) — The text string you want to display to the user. This can be a hardcoded string, a variable, or a dynamic expression.
- NotificationType(Optional) — Controls the visual style and color of the banner. There are four options:
- NotificationType.Information — Blue banner (default)
- NotificationType.Success — Green banner
- NotificationType.Warning — Yellow/orange banner
- NotificationType.Error — Red banner
- Timeout (Optional) — The number of milliseconds the notification stays visible before auto-dismissing. Default is 10,000 ms (10 seconds). Set it to
0to keep it visible indefinitely until the user dismisses it manually.
Return value: Notify returns true when called successfully. This is useful when chaining it inside more complex formulas.
Step-by-Step: Add Notify to a Button in Power Apps
Here’s exactly how to wire up the Notify function to a button in your canvas app.
Step 1: Open Power Apps Studio and open your canvas app (or create a new one).
Step 2: From the Insert menu, add a Button control to your screen.
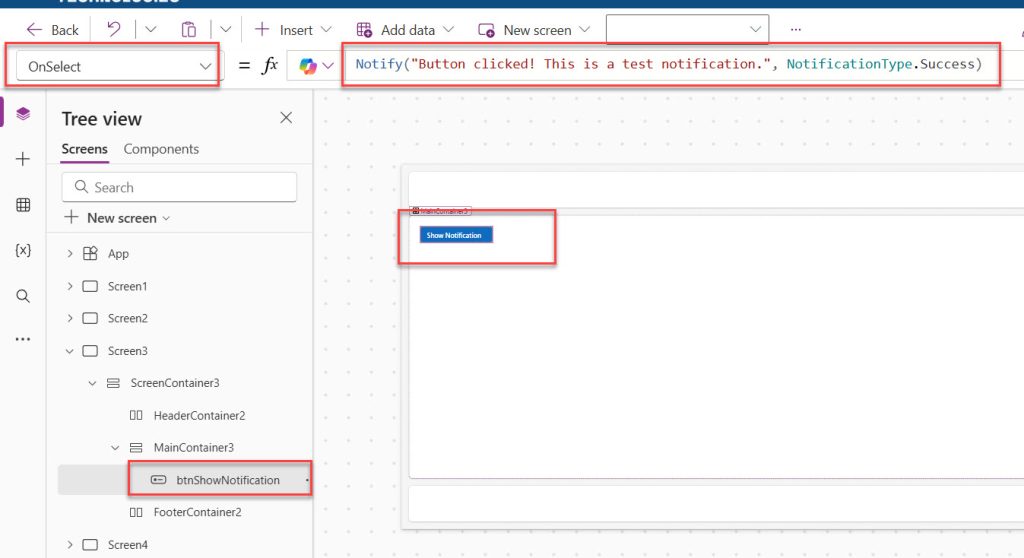
Step 3: With the button selected, look at the property dropdown on the top left. Make sure OnSelect is selected.
Step 4: Enter this formula in the formula bar:
Notify("Button clicked! This is a test notification.", NotificationType.Success)
Here is how to add the formula in the button’s onselect property, check out the screenshot below:
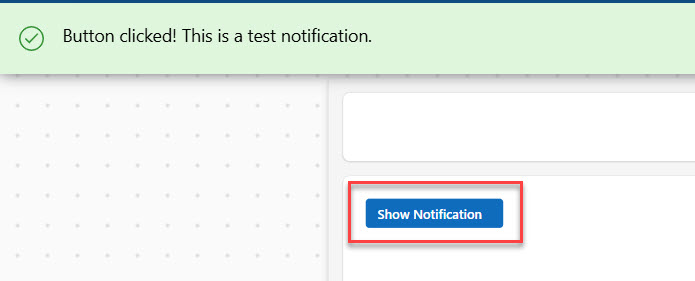
Step 5: Save and Preview the app (F5). Click the button. You should see a green banner appear at the top of the screen.
That’s it. You now have your first working notification. You can see the exact output in the screenshot below:
Check out Set Control Value in Button Click on Power Apps
Basic Power Apps Notify Examples to Get Started
Let me start with the simplest possible examples so you can see exactly how this works.
Power Apps gives you four notification types. Each one looks different and means something different.
Example 1: Simple Information Notification
This is for neutral messages.
Notify("This is an informational message.")

or

Notify("This is an informational message.", NotificationType.Information)
This displays a blue banner at the top of the screen with your message. Since no NotificationType is specified, it defaults to NotificationType.Information. The notification disappears after 10 seconds.
Just general information, nothing urgent.
Use it for:
- General tips
- Status updates
- Helpful reminders
- Non-critical information
Example 2: Success Notification
This is for good news. Use it when something works correctly.
Notify("Record saved successfully!", NotificationType.Success)
This shows a green banner — the kind of message users love to see. Use this after a successful form submission, data patch, or any completed action.
I use this one all the time for:
- Successful form submissions
- Records created or updated
- Files uploaded
- Data saved
Example 3: Error Notification
This is for when things go wrong.
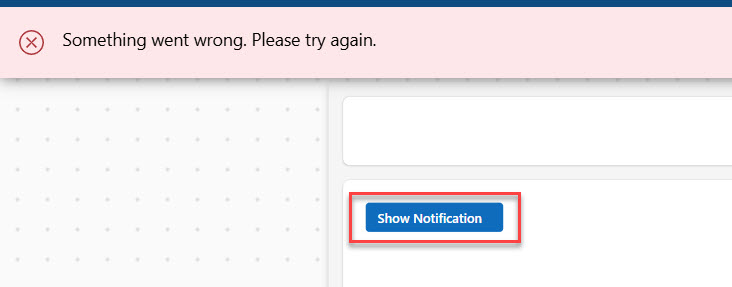
Notify("Something went wrong. Please try again.", NotificationType.Error)
The notification appears in red. It grabs attention and tells users there’s a problem. Here is a screenshot for your reference.
Use this for:
- Failed form submissions
- Connection errors
- Missing required fields
- Any error that stops the user from completing their task
Example 4: Warning Notification
This is for cautions or heads-ups.
Notify("This action cannot be undone.", NotificationType.Warning)
A yellow/orange banner for cautionary messages — when you want to alert the user before they do something irreversible.
Good for:
- Warnings before deleting something
- Letting users know about potential issues
- Reminding users about important information
Example 5: Persistent Notification (No Auto-Dismiss)
Notify("Your session is about to expire. Please save your work.", NotificationType.Warning, 0)
By setting the timeout to 0, the notification stays on screen until the user manually clicks the X to close it. This is useful for critical warnings that must be acknowledged.
From here, you can build much more powerful scenarios — which is exactly what we’ll do next.
Real-World Use Cases and Scenarios of Notify() Function
The Notify function is most useful when combined with other Power Apps functions like Patch, SubmitForm, If, and IsBlank. Let me walk through the scenarios I use most often in production apps.
Use Case 1: Confirm a Form Submission
This is probably the most common use case. After a user fills out a form and clicks Submit, you patch the data to SharePoint and then notify the user whether it worked or not.
SubmitForm(EmployeeForm);
If(
    EmployeeForm.Error = "",
    Notify("Employee record submitted successfully!", NotificationType.Success),
    Notify("Error: " & EmployeeForm.Error, NotificationType.Error)
)
What’s happening here:
SubmitForm(EmployeeForm)submits the form.- The
Iffunction checks whetherEmployeeForm.Erroris empty. If there’s no error, a success message shows. If there is an error, the actual error message gets appended to the notification text using the&operator — so the user sees something meaningful like “Error: Patch failed because of a required field.”
Use Case 2: Validate Required Fields Before Submitting
Instead of letting users submit incomplete forms, show a warning notification first.
Here is how I have added a form using some Power Apps modern controls. Here is how the form looks. I have also added the SharePoint list data source. Check the screenshot below:
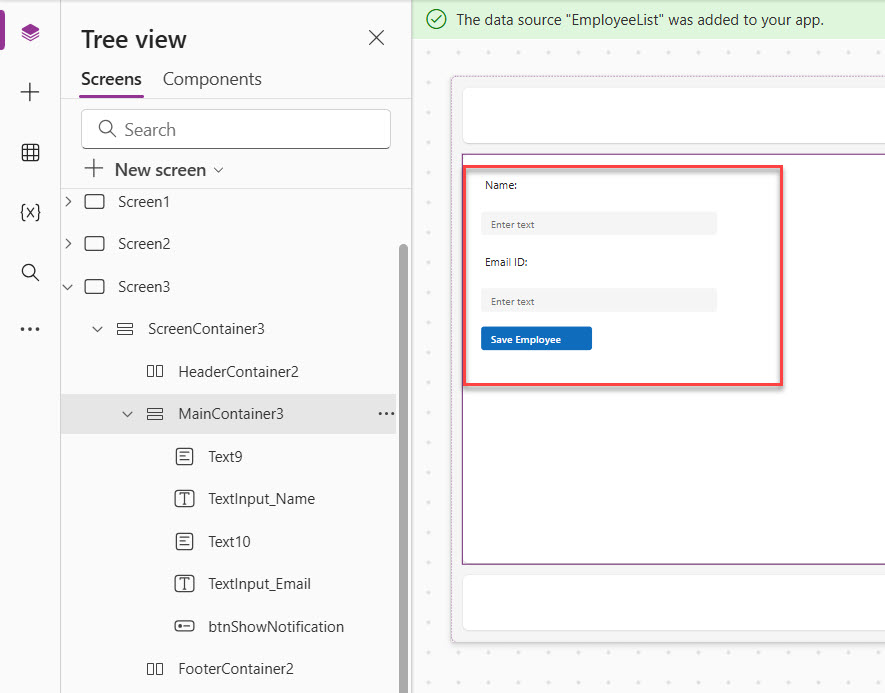
Now, write the formula below in the button’s OnSelect property.
If(
IsBlank(TextInput_Name.Text) || IsBlank(TextInput_Email.Text),
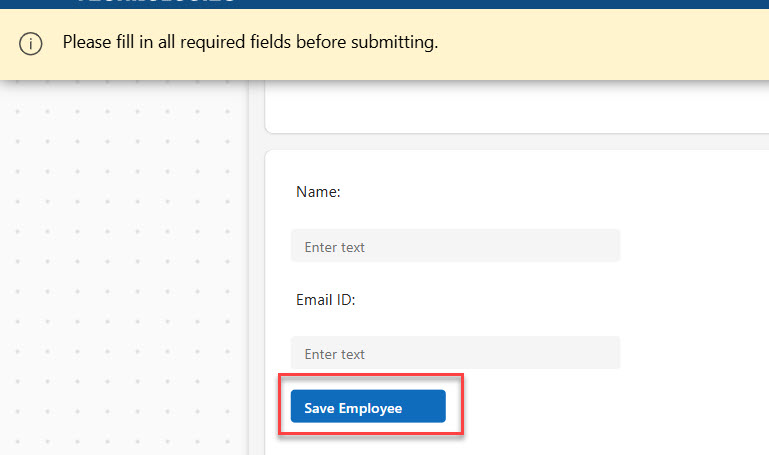
Notify("Please fill in all required fields before submitting.", NotificationType.Warning),
Patch(
EmployeeList,
Defaults(EmployeeList),
{
Title: TextInput_Name.Text,
Email: TextInput_Email.Text
}
);
Notify("Record saved successfully!", NotificationType.Success)
)
Breakdown:
IsBlank()checks if the Name or Email field is empty.||is the OR operator — if either field is blank, the warning shows and the Patch is skipped entirely.- Only when both fields have values does the Patch run, followed by a success notification.
Now, when I click on the button, you can see an error message like below:
This is a clean validation pattern that prevents incomplete records from being submitted to your data source.
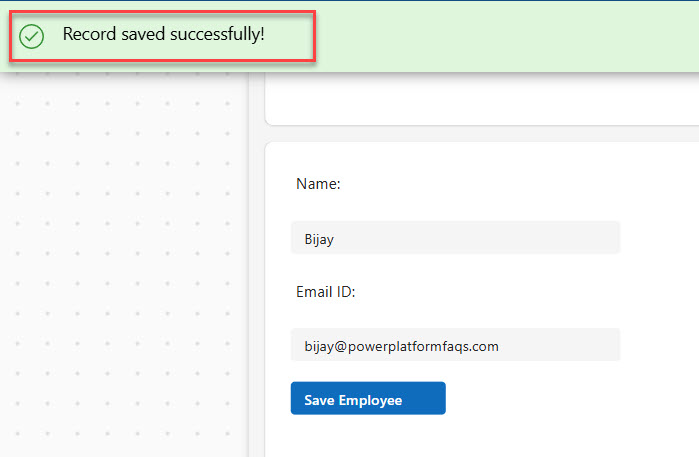
If I enter values in both text boxes, then the data is saved to the SharePoint list and displays a success notification message like in the screenshot below:
Use Case 3: Notify After Deleting a Record
Deleting a record is a destructive action. Always confirm it.
Remove(TaskList, Gallery_Tasks.Selected);
If(
    IsError(Remove(TaskList, Gallery_Tasks.Selected)),
    Notify("Failed to delete the record. Please try again.", NotificationType.Error),
    Notify("Task deleted successfully.", NotificationType.Success)
)
A simpler version that works well in most scenarios:
Remove(TaskList, Gallery_Tasks.Selected);
Notify("Task deleted successfully.", NotificationType.Success)
Use the more robust version with error checking in production apps where reliability matters.
Check out Data Table Control in Power Apps Canvas App
Use Case 4: Show a Dynamic Notification Based on User Action
Sometimes you want the notification text to include dynamic values — like the name of the item that was saved or the current user’s name.
Patch(
    LeaveRequests,
    Defaults(LeaveRequests),
    {
        EmployeeName: User().FullName,
        LeaveType: Dropdown_LeaveType.Selected.Value,
        StartDate: DatePicker_Start.SelectedDate,
        EndDate: DatePicker_End.SelectedDate
    }
);
Notify(
    "Leave request submitted for " & User().FullName & ". HR will review within 2 business days.",
    NotificationType.Success,
    8000
)
What’s different here:
User().FullNamedynamically inserts the logged-in user’s full name into the message.- The timeout is set to
8000ms (8 seconds) — slightly longer than the default to give users time to read the longer message.
This kind of personalized notification makes apps feel professional and well-built.
Use Case 5: Notify Based on a Condition from SharePoint Data
You can also trigger notifications based on data lookups. For example, warn users if they’re trying to book a resource that’s already at capacity.
If(
    CountRows(
        Filter(RoomBookings, RoomName = Dropdown_Room.Selected.Value, BookingDate = DatePicker.SelectedDate)
    ) >= 1,
    Notify("This room is already booked on the selected date. Please choose another.", NotificationType.Warning),
    Patch(
        RoomBookings,
        Defaults(RoomBookings),
        {
            RoomName: Dropdown_Room.Selected.Value,
            BookingDate: DatePicker.SelectedDate,
            BookedBy: User().Email
        }
    );
    Notify("Room booked successfully!", NotificationType.Success)
)
How this works:
Filter()checks if there’s already a booking record for the same room and date.CountRows()counts those results.- If the count is 1 or more, a warning fires and the booking is blocked.
- If the room is free, the booking is saved and the user gets a success message.
Read How to Calculate the Difference Between Two Dates in Power Apps
Advanced Tips to Use Power Apps Notify()
Once you’re comfortable with the basics, here are some more advanced techniques that I use in enterprise-level Power Apps.
Tip 1: Chain Notify with Set() to Log Notification State
Sometimes you want to track whether a notification has been shown, perhaps to prevent it from showing twice or to reset a variable after a successful action.
Set(varFormSubmitted, false);
Patch(ProjectTracker, Defaults(ProjectTracker), {Title: txtTitle.Text});
Set(varFormSubmitted, true);
Notify(
    If(varFormSubmitted, "Project added to tracker!", "Something went wrong."),
    If(varFormSubmitted, NotificationType.Success, NotificationType.Error)
)
This pattern uses a boolean variable (varFormSubmitted) to control both the message text and the notification type dynamically.
Tip 2: Use Notify Inside OnFailure and OnSuccess
If you’re using Power Apps modern controls or a SubmitForm workflow, you can place Notify directly inside OnSuccess and OnFailure event handlers on the form:
OnSuccess:
Notify("Form submitted successfully!", NotificationType.Success, 5000);
ResetForm(MyForm);
Navigate(HomeScreen, ScreenTransition.Fade)
OnFailure:
Notify("Submission failed. Please check all fields and try again.", NotificationType.Error)
This is cleaner than embedding error-check logic in a button’s OnSelect. Each event handler has a single responsibility.
Tip 3: Build a Centralized Notification Helper
In complex apps with many screens, you don’t want to repeat Notify formulas everywhere. Instead, set up a context variable or global variable to hold the notification message and type, then use a single Notify call in a consistent location — like an app-level timer or a shared component.
// On any screen's button
Set(gblNotifyMessage, "Settings saved.");
Set(gblNotifyType, NotificationType.Success);
Set(gblShowNotify, true)

// On the screen's OnVisible or a Timer's OnTimerEnd
If(
    gblShowNotify,
    Notify(gblNotifyMessage, gblNotifyType);
    Set(gblShowNotify, false)
)
This approach keeps your Notify logic centralized and easy to manage as your app grows.
Tip 4: Combine Notify with IsError()
Power Apps has an IsError() function that checks if an expression returned an error. You can wrap your Patch inside IfError() and use Notify for each branch.
IfError(
    Patch(
        ClientRecords,
        Defaults(ClientRecords),
        {ClientName: txtClientName.Text, Status: "Active"}
    ),
    Notify("Failed to save client record: " & FirstError.Message, NotificationType.Error),
    Notify("Client record saved successfully!", NotificationType.Success)
)
Why this is better:
IfError()catches any patch failure automatically.FirstError.Messagegives you the actual error message from the system, which you can surface to the user or log somewhere.- This is the most reliable error-handling pattern for Patch operations in production apps.
Check out Power Apps Multiple IF Statements
Common Mistakes (And How to Avoid Them)
I’ve made all these mistakes. Learn from my pain.
Mistake 1: Messages That Are Too Long
Don’t do this:
Notify("Your form has been successfully submitted to the database and the administrator has been notified via email. You will receive a confirmation email within 24 hours. Thank you for your patience.")That’s too much text. Users won’t read it all. Keep it short:
Notify("Form submitted! Check your email for confirmation.", NotificationType.Success)Mistake 2: Using the Wrong Type
Don’t use Success for errors or Error for successes. It confuses people.
Wrong:
Notify("Error occurred", NotificationType.Success)Right:
Notify("Error occurred", NotificationType.Error)The color and type should match your message.
Mistake 3: Too Many Notifications
Don’t spam users with notifications. One is usually enough.
Bad practice:
Notify("Saving...", NotificationType.Information);
Patch(YourData, ...);
Notify("Saved!", NotificationType.Success);
Notify("You can close this form now", NotificationType.Information)
That’s three notifications in a row. Pick the most important one:
Patch(YourData, ...);
Notify("Saved successfully!", NotificationType.Success)
Mistake 4: Forgetting About Errors
Always plan for things to go wrong. Don’t just show success messages.
Include error handling:
If(Connection.Connected,
    Patch(YourData, ...);
    Notify("Saved!", NotificationType.Success),
    Notify("No internet connection", NotificationType.Error)
)
Mistake 5: Putting Notify before the action completes
// Wrong
Notify("Record saved!", NotificationType.Success);
Patch(DataSource, Defaults(DataSource), {Title: txtInput.Text})
If you put Notify before Patch, the success message shows before the data is actually saved. If the Patch fails, the user already saw “Record saved!” — which is misleading. Always put Notify after the action it’s confirming.
Mistake 6: Hardcoding error messages without dynamic context
// Not ideal
Notify("Error occurred.", NotificationType.Error)
This tells the user nothing actionable. Always try to include the actual error detail using FirstError.Message or SubmitForm.Error so users or support teams know what went wrong.
Mistake 7: Setting the timeout too short for long messages
If your notification message is two or three sentences, the default 10-second timeout may not be enough for all users to read it. For longer messages, increase the timeout to 15000 or 20000 ms, or set it to 0 for a sticky notification.
Mistake 8: Using Notify as a substitute for proper validation
Notify should complement validation — not replace it. Don’t rely solely on a warning notification to stop bad data from getting into your data source. Always use IsBlank(), IsMatch(), or other validation checks to gate your Patch or SubmitForm actions.
Advanced Tips for Power Apps Notify()
Once you’re comfortable with the basics, here are some tricks I use.
Tip 1: Use Variables for Messages
If you need to show the same message in multiple places, use a variable:
Set(SuccessMessage, "Your data has been saved");
Notify(SuccessMessage, NotificationType.Success)
This makes it easier to update the message later. Change it once, and it updates everywhere.
Tip 2: Include Dynamic Content
You can include variables or user data in your notifications:
Notify("Welcome back, " & User().FullName & "!", NotificationType.Information)Or show specific details:
Notify("Record ID: " & Gallery1.Selected.ID & " has been deleted", NotificationType.Warning)Tip 3: Combine with Other Functions
Notify works great with other Power Apps functions.
With concurrent execution:
Concurrent(
    Patch(DataSource1, ...),
    Patch(DataSource2, ...)
);
Notify("All records updated", NotificationType.Success)
With navigation:
SubmitForm(Form1);
Notify("Redirecting...", NotificationType.Information);
Navigate(Screen2, ScreenTransition.Fade)
Tip 4: Test Different Timeouts
The default 10 seconds might be too long or too short. Test different values:
- Quick confirmations: 2000-3000 milliseconds
- Standard messages: 5000-7000 milliseconds
- Important information: 10000-15000 milliseconds
Find what works for your users.
Check out Power Apps Switch Function
Best Practices for using Notify() in Power Apps
Here’s what I always recommend for apps that are going live for real users.
- Always provide feedback after every user action — Submissions, deletions, updates, and navigations should all result in some form of notification or visual confirmation.
- Match notification type to context — Use Success for completions, Error for failures, Warning for cautions, and Information for neutral status updates. Don’t use Error for something that isn’t actually an error.
- Keep messages short and actionable — Aim for one or two sentences max. Tell the user what happened and, if relevant, what to do next.
- Use dynamic text where it adds value — Including the user’s name or the item title makes the notification feel relevant and personalized.
- Test notifications on different screen sizes — The notification banner appears at the top of the screen. On mobile devices, this can overlap with app controls. Test on phones and tablets to make sure nothing important is hidden.
- Avoid notification spam — If a process runs in a loop or a timer fires repeatedly, don’t show a Notify on every cycle. Use a variable flag to control when notifications appear.
- Log errors as well as showing them — For critical operations in enterprise apps, combine Notify with a
Patchto an error log table. This way, you have an audit trail even after the notification disappears.
Troubleshooting Common Issues
Issue 1: Notification Doesn’t Appear
Check these things:
- Is your Notify function actually running? Add it to a button and test it.
- Did you spell everything correctly?
- Is there another notification showing at the same time?
Issue 2: Notification Appears But Disappears Too Quickly
Increase the timeout value:
Notify("Your message", NotificationType.Success, 15000)Issue 3: Wrong Color Showing
Double-check your NotificationType. Make sure you’re using:
- NotificationType.Success (not “Success”)
- NotificationType.Error (not “Error”)
The capitalization matters.
Conclusion
The Power Apps Notify function makes a massive difference to the user experience of your apps. A single line of code turns a silent, confusing interface into one that actively communicates with users and builds their confidence in what the app is doing.
Start with basic notifications. Add them to your buttons and forms. Show success and error messages. Once that’s working, you can move on to dynamic messages, error handling with IfError(), and validation patterns.
The key things to remember: always put Notify after the action it confirms, match the notification type to the situation, keep messages short and clear, and use FirstError.Message whenever you need to surface real error details to users or your support team.
And if you get stuck or have questions, you can always reach out to the Power Apps community or leave a comment below. We’re all figuring this stuff out together.
You may also like the following tutorials:

Bijay Kumar is a Microsoft MVP in Business Applications with over 18 years of experience in the IT industry and more than 12 years as a Microsoft MVP, recognized for his contributions to the Microsoft community. He is the Founder of TSinfo Technologies and the creator of the popular technology platforms SPGuides.com and EnjoySharePoint.com. Bijay also runs the SPGuides YouTube channel, where he shares practical tutorials on Microsoft 365, SharePoint, Power Platform, and Copilot technologies. Read more.