
Your employees keep asking the same questions every day — “How do I submit a leave request?” “What’s the IT helpdesk number?” “Where do I find the expense form?” Your support team is buried. And you know there has to be a better way.
Microsoft Copilot Studio is that better way. It’s a low-code, graphical platform from Microsoft that lets you build AI-powered agents (also called chatbots or copilots) without writing a single line of code. Think of it as a visual drag-and-drop tool where you define what your bot knows, what it says, and what actions it can take — all from a browser.
For example, an HR team at a 300-person company can build an internal helpdesk agent in Teams that answers leave balance queries, routes IT tickets, and escalates complex issues to a live agent — all in one afternoon.
In this article, I’ll show you 5 ways to use Microsoft Copilot Studio to build and deploy AI agents for your business.
What Is Microsoft Copilot Studio?
Microsoft Copilot Studio (previously known as Power Virtual Agents) is a tool in the Microsoft Power Platform family. You access it at copilotstudio.microsoft.com. It lets you create agents — intelligent assistants that can hold conversations, answer questions, trigger workflows, and even act autonomously on your behalf.
An agent in Copilot Studio is made up of:
- Topics — individual conversation blocks that define what the agent says and does when a user asks something
- Nodes — building blocks inside each topic (like Message nodes, Question nodes, and Condition nodes) that control the conversation flow
- Knowledge sources — documents, SharePoint sites, or websites the agent can search to generate answers
- Tools — Power Automate flows, connectors, or HTTP requests that let the agent take real-world actions
Agents can be deployed to Microsoft Teams, websites, mobile apps, Facebook, and any channel supported by the Azure Bot Service.
Two Orchestration Modes to Know
Before you start building, you need to understand the two orchestration modes in Copilot Studio. This is the single most important concept for beginners.
- Classic orchestration: The agent uses trigger phrases — specific keywords or sentences you define — to match user input to the right topic. Think of it as a keyword-matching system with NLU (Natural Language Understanding) on top. Best for structured, predictable conversations.
- Generative AI orchestration: The agent uses a large language model (LLM) to dynamically decide which topic, tool, or knowledge source to use. It reads the description of each topic to understand intent. Best for open-ended, free-form conversations.
You can mix both modes in one agent. Now let’s build one.
Scenario used throughout this guide: You’re building an HR Helpdesk Copilot for Contoso Ltd, a company of 300 employees. The agent will live in Microsoft Teams and answer common HR questions — leave balances, payroll dates, and expense policy — while also logging support tickets in SharePoint.
Method 1 – Build a Manually Authored Topic (Classic Orchestration)
Use this method when you need the agent to follow a very specific, controlled conversation flow — like collecting employee details before showing leave balance information. This is the best starting point for any beginner.
Step 1: Open Copilot Studio
Go to copilotstudio.microsoft.com and sign in with your Microsoft 365 account. Select your environment from the top-right dropdown. Always use your organization’s environment, not the default one, to keep agents organized.
Step 2: Create a New Agent
Select Create from the left nav, then choose New agent. Give it a name — for example, Contoso HR Helpdesk. Add a short description like “Helps employees with leave, payroll, and expense queries.” Select Create.
Step 3: Add a New Topic
Navigate to Topics in the left menu. Select Add a topic → From blank. A blank authoring canvas opens with a Trigger node at the top.
Step 4: Set Trigger Phrases
Select the three dots (…) on the Trigger node → Properties. In the Phrases panel, add 5–8 trigger phrases such as:
How many leave days do I have?
Check my leave balance
Annual leave remaining
How much leave is left?
Leave balance query
These phrases train the NLU model to recognize when an employee is asking about leave.
Step 5: Add a Question Node
Select the + icon under the Trigger node → Ask a question. A Question node appears. Type: “Sure! What is your employee ID?” Under Identify, select User’s entire response. This stores the answer in a variable — name it Topic.EmployeeID.
Step 6: Add a Message Node
Select + → Send a message. Type: “Thank you, {Topic.EmployeeID}. Your leave balance request has been logged. HR will respond within 24 hours.” The curly braces reference the variable you captured earlier.
Step 7: End the Conversation
Select + → Topic management → End conversation. Optionally select End with survey to collect satisfaction data.
Step 8: Save and Test
Select Save in the top bar. Open the Test your agent panel on the right. Type one of your trigger phrases and walk through the conversation.
Pro Tip: Use 5–10 varied trigger phrases per topic. If two topics have overlapping phrases (e.g., “leave” appearing in both a Leave Balance topic and a Leave Request topic), the agent will misfire. Keep trigger phrases unique and specific to avoid topic conflicts.
Check out Environment Strategy for Copilot Studio: Dev, Test, Prod Best Practices
Method 2 – Use Generative AI to Answer Questions from a Knowledge Source
Use this method when you want the agent to answer questions it wasn’t explicitly programmed for — by reading documents, SharePoint pages, or websites. This is the fastest way to build a broad FAQ-style agent.
Step 1: Go to Knowledge
In your Contoso HR Helpdesk agent, select Knowledge from the left navigation menu.
Step 2: Add a Knowledge Source
Select Add knowledge → choose from the options:
- Files (upload PDFs or Word docs — e.g., the HR Policy handbook)
- SharePoint (point to an HR SharePoint site)
- Public website (e.g., your company’s benefits page)
Select SharePoint, paste the URL of your HR SharePoint site, then select Add.
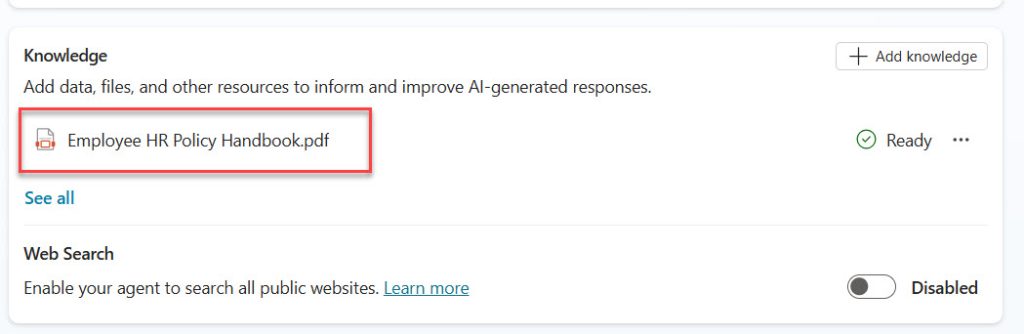
You can see in the screenshot below that I have uploaded a PDF.
Step 3: Enable Generative Answers
Go to Settings → Generative AI. Make sure the Allow the agent to use its own general knowledge toggle is configured to your preference. You can also control whether the agent uses only your uploaded sources or the broader web.
Step 4: Set Orchestration Mode to Generative
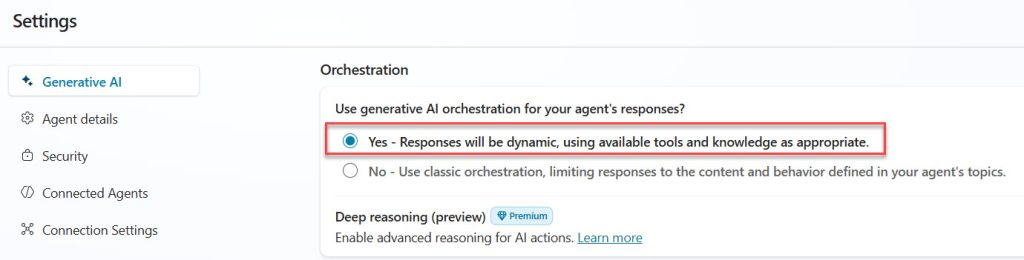
In Settings → Generative AI → How should your agent decide how to respond?, select Generative (Preview). This switches the agent from trigger-phrase matching to AI-driven intent detection.
Here is a screenshot for your reference.
Step 5: Test a Question Not in Any Topic
Open the Test panel and type: “What is the company’s maternity leave policy?” The agent will search your SharePoint knowledge source and generate a plain-language answer — without you writing a single topic node.
How does this work?
The agent sends the user’s question to the Azure OpenAI GPT model along with content retrieved from your knowledge source. It generates a grounded, conversational answer in real time. It cites the source document so employees can verify.
Pro Tip: Generative AI answers are only available with a standalone Copilot Studio subscription — not the Teams-only plan. If your agent is purely Teams-based on a Microsoft 365 license, you must use classic orchestration with manually authored topics.
Read How Generative AI Works Inside Copilot Studio
Method 3 – Trigger a Power Automate Flow from a Topic
Use this method when the agent needs to do something — not just say something. For example: log a support ticket in SharePoint, send an email notification, or look up data from an API. This is where Copilot Studio becomes a true automation hub.
Step 1: Design the Scenario
In the HR Helpdesk copilot, you want employees to raise an IT support ticket directly from the chat. The agent collects the issue description and severity, then logs it as a SharePoint list item.
Step 2: Create a Power Automate Flow
In Copilot Studio, go to Topics → open or create your Log IT Ticket topic. Select + → Call a tool → Create a new flow. This opens Power Automate in a new tab.
The flow template pre-built for Copilot Studio has:
- A Run a flow from Copilot trigger — this receives inputs from the agent
- An action block where you build your logic
Step 3: Configure Flow Inputs
In Power Automate, select the Run a flow from Copilot trigger. Add two inputs:
- IssueDescription (Text)
- Severity (Text)
Then add a Create item action from SharePoint. Map the fields:
Site Address: https://contoso.sharepoint.com/sites/IT
List Name: IT Support Tickets
Title: [IssueDescription]
Severity: [Severity]
Status: New
Add a Respond to Copilot action at the end. Add an output variable: TicketID (Text). Set its value to the ID of the new SharePoint item.
Step 4: Save and Return to Copilot Studio
Save the flow. Return to Copilot Studio. Your new flow now appears as an available tool in the topic canvas.
Step 5: Wire the Flow into the Topic
Before the Call a tool node, add two Question nodes to collect:
- “Please describe your issue.” → store in Topic.IssueDescription
- “How severe is this issue? (Low / Medium / High)” → store in Topic.Severity
Then in the Call a tool node, select your Power Automate flow. Map:
- IssueDescription →
Topic.IssueDescription - Severity →
Topic.Severity
Capture the output TicketID → store in Topic.TicketID.
Step 6: Confirm to the Employee
Add a Message node after the flow call: “Your ticket has been logged. Your ticket ID is {Topic.TicketID}. IT will contact you within 4 hours.”
How does this work?
When the agent reaches the Call a tool node, it passes the captured variables to the Power Automate flow as input parameters. The flow runs, creates the SharePoint item, and returns the ticket ID to the agent — all within the live conversation.
Pro Tip: Power Automate flows connected to Copilot Studio run under the connection credentials of the flow author, not the end user. Make sure the person who builds the flow has the correct permissions on SharePoint. If you need user-specific access, use the authentication node with Azure AD sign-in before calling the flow.
Check out How to Choose an AI Model in Copilot Studio: GPT-5, Claude, and More
Method 4 – Use Adaptive Cards for Rich Interactive Responses
Use this method when a plain text reply isn’t enough — you need to show a formatted card with buttons, images, drop-downs, or input fields. For example, displaying an employee’s leave summary with action buttons (“Apply Leave” / “View History”) directly inside Teams.
Step 1: Open the Adaptive Card Node
In your Leave Balance topic, after collecting the employee ID, select + → Adaptive Card. This node renders a structured visual card in the chat interface.
Step 2: Build the Card in the Designer
Copilot Studio has a built-in Adaptive Card designer. Select Edit JSON and paste this example card:
{
  "type": "AdaptiveCard",
  "version": "1.5",
  "body": [
    {
      "type": "TextBlock",
      "text": "Leave Balance Summary",
      "weight": "Bolder",
      "size": "Medium"
    },
    {
      "type": "FactSet",
      "facts": [
        { "title": "Annual Leave", "value": "12 days remaining" },
        { "title": "Sick Leave", "value": "5 days remaining" },
        { "title": "Employee ID", "value": "${EmployeeID}" }
      ]
    }
  ],
  "actions": [
    {
      "type": "Action.Submit",
      "title": "Apply for Leave",
      "data": { "action": "applyLeave" }
    },
    {
      "type": "Action.Submit",
      "title": "View Leave History",
      "data": { "action": "viewHistory" }
    }
  ]
}
Replace ${EmployeeID} with your variable reference using Copilot Studio’s Power Fx expression: =Topic.EmployeeID.
Step 3: Handle Card Responses
After the Adaptive Card node, add a Condition node. Check the value of the card’s output variable (automatically captured when a user clicks a button). Branch the conversation:
- If
action = applyLeave→ redirect to your Apply Leave topic - If
action = viewHistory→ show a message with a SharePoint link
How does this work?
Adaptive Cards are JSON-defined visual templates rendered natively by the Teams or web client. The user’s button click returns a data payload back to the agent, which the Condition node reads to route the conversation.
Pro Tip: Adaptive Cards render beautifully in Microsoft Teams but may appear differently (or not at all) in simpler channels like direct-line web chat. Always test your agent in the actual channel you plan to deploy it to. Check the Channels page in Copilot Studio for channel-specific preview tools.
Read How to Monitor Token Usage by AI Model in Copilot Studio
Method 5 – Extend the Agent with a Custom Connector
Use this method when you need the agent to call an external system that doesn’t have a built-in Power Automate connector — for example, a third-party HRMS system, a payroll API, or a custom internal API. This is the most advanced method but still achievable without deep coding.
Step 1: Create a Custom Connector in Power Automate
Go to make.powerautomate.com → Custom connectors → New custom connector → Create from blank. Name it Contoso HRMS Connector.
Under General, enter the base URL of your HRMS API, e.g., https://api.contoso-hrms.com/v1.
Under Security, configure authentication — most APIs use either API key or OAuth 2.0. For this example, use API key. Set the parameter name to x-api-key and location to Header.
Under Definition, add an action called GetLeaveBalance:
- HTTP verb: GET
- Path:
/employees/{employeeId}/leave-balance - Response schema (paste your API’s JSON schema):
{
  "type": "object",
  "properties": {
    "annualLeave": { "type": "integer" },
    "sickLeave": { "type": "integer" },
    "employeeId": { "type": "string" }
  }
}
Select Create connector.
Step 2: Use the Custom Connector in a Power Automate Flow
Create a new flow with a Run a flow from Copilot trigger. Add an input: EmployeeID (Text). Add the GetLeaveBalance action from your custom connector. Pass EmployeeID as the employeeId parameter. Return annualLeave and sickLeave as output variables via the Respond to Copilot action.
Step 3: Call the Flow from a Copilot Studio Topic
Back in your Leave Balance topic in Copilot Studio, after the employee ID question, add a Call a tool node → select the flow you just built. Map EmployeeID → Topic.EmployeeID. Store outputs in Topic.AnnualLeave and Topic.SickLeave.
Step 4: Display the Live Data
Add a Message node: “Hi! You have {Topic.AnnualLeave} annual leave days and {Topic.SickLeave} sick leave days remaining.”
How does this work?
The custom connector acts as an authenticated bridge between your Power Automate flow and your external HRMS API. The agent calls the flow mid-conversation, the flow hits the API, and the live data comes back into the chat in real time — all transparent to the employee.
Pro Tip: Custom connectors require a premium Power Automate license (Power Automate Premium or a per-flow plan). If your organization only has standard Microsoft 365 licenses, you won’t have access to custom connectors. Check with your admin before designing a solution that relies on this method.
Things to Keep in Mind
- Licensing has two layers: To build agents, you need both a Copilot Studio tenant license and a Copilot Studio User License assigned to each maker. End users who chat with your agent do NOT need a special license.
- Teams-only plan has serious limitations: The Teams plan (available in select Microsoft 365 subscriptions) only supports classic orchestration and can only publish agents to Teams. You cannot use generative AI features or deploy to other channels without upgrading to the standalone plan.
- Trigger phrase conflicts break conversations: In classic mode, if two topics share very similar trigger phrases (e.g., “leave request” and “leave balance”), the agent may consistently pick the wrong topic. Keep trigger phrases distinct and test with varied phrasings before publishing.
- Power Automate connections authenticate as the flow author: Flows called from Copilot Studio run under the credentials of whoever built the flow — not the logged-in user. If your flow accesses sensitive SharePoint data, ensure the author account has the right permissions and is a service account, not a personal account.
- Environment selection matters: Always build and publish in the correct Power Platform environment. Agents built in the default environment are visible to everyone in your tenant. Use a dedicated environment for production agents to control access and governance.
- Session timeouts are short: By default, a Copilot Studio conversation session times out after 30 minutes of inactivity. Variables are cleared on timeout. If your agent workflow takes a long time (e.g., waiting for an approval), design the flow so it doesn’t depend on the same session to continue.
You now have a complete picture of what Microsoft Copilot Studio is and five practical ways to use it — from manually authored topics and generative AI knowledge responses, to Power Automate integrations, Adaptive Cards, and custom API connectors.
Start with Method 1 or Method 2 if you’re new to the platform; move to Methods 3–5 as your agent grows in complexity, and your use cases demand real-time data and richer interactions. I hope you found this article helpful.

Bijay Kumar is a Microsoft MVP in Business Applications with over 18 years of experience in the IT industry and more than 12 years as a Microsoft MVP, recognized for his contributions to the Microsoft community. He is the Founder of TSinfo Technologies and the creator of the popular technology platforms SPGuides.com and EnjoySharePoint.com. Bijay also runs the SPGuides YouTube channel, where he shares practical tutorials on Microsoft 365, SharePoint, Power Platform, and Copilot technologies. Read more.