If you’ve ever built a Copilot Studio agent and then wondered “how do I actually move this to production without breaking everything,” you’re in the right place. This is one of the most common pain points I see teams hit, especially those new to Power Platform ALM (Application Lifecycle Management).
Microsoft has solid guidance now. In this tutorial, I’ll walk you through everything you need to know to build a proper environment strategy for Copilot Studio — the Dev, Test, and Prod setup that keeps production stable while letting you innovate safely.
I’m going to explain this as I would for a colleague who’s just picked up Copilot Studio and wants to do things right from the start. Just practical, actionable guidance that you can apply today while working with Copilot Studio.
Why Environment Strategy Matters (And Why You Should Care)
Copilot Studio makes it incredibly fast to go from idea to working agent. You can build something impressive in an hour. That speed is amazing — but it also means agents can reach production maturity quickly, and without proper lifecycle practices, you end up with:
- Agents that break when moved because hardcoded URLs or connection references don’t work in the new environment
- No way to track what changed or who deployed something
- Production instability because someone made a direct change in the live environment
- Emergency fixes that block ongoing work because you’re trying to fix production while feature development is happening in the same space
The solution is environment isolation. You create separate spaces for different stages of your agent’s lifecycle, and changes flow in one direction only: Dev → Test → Prod.
This isn’t some fancy enterprise requirement. It’s basic best practice that emerges naturally once your agent serves real users and downtime has a cost.
The Three-Environment Model: Dev, Test, Prod
Let’s start with the foundation. The most tried-and-tested pattern in Power Platform is three environments:
| Environment | What You Do Here | Solution Type | Who Uses It |
|---|---|---|---|
| Development (Dev) | Author and test your agent daily | Unmanaged | Makers/developers |
| Test | Validate functionality, run evaluations, UAT | Managed | QA team, stakeholders |
| Production (Prod) | Live agent serving real users | Managed | End users |
Here’s what makes this work:
Dev is where you build. This is your active authoring space. You create topics, configure tools, add knowledge sources, and test conversations. Everything lives in an unmanaged solution — you can add, edit, or remove components freely.
Test is where you validate. Before anything touches production, it goes here. You run automated evaluations, do user acceptance testing (UAT), and confirm the agent works correctly with test-specific configuration (like test SharePoint libraries or test API endpoints). This uses a managed solution — it’s read-only, sealed. Nobody can edit it directly.
Prod is where users interact. This is your live environment. The agent here serves real users with real data. It also uses a managed solution, and changes only happen through the deployment pipeline — never by editing directly.
Changes flow in one direction: Dev → Test → Prod. This keeps production stable and predictable.
How to Create These Environments in Power Platform
You create environments in the Power Platform Admin Center (aka.admin.microsoft.com). The process is like below:
Open the Power Platform Admin Center
- Navigate to the Power Platform Admin Center (https://admin.powerplatform.microsoft.com) and then sign in using your Microsoft 365 or Power Platform administrator account.
- In the left navigation pane, click Manage, then Select Environments. This page displays all environments available in your tenant, including:
- Production
- Sandbox
- Developer
- Trial
- Default Environment
- At the top of the Environments page, click the + New button.
Here is a screenshot for your reference.
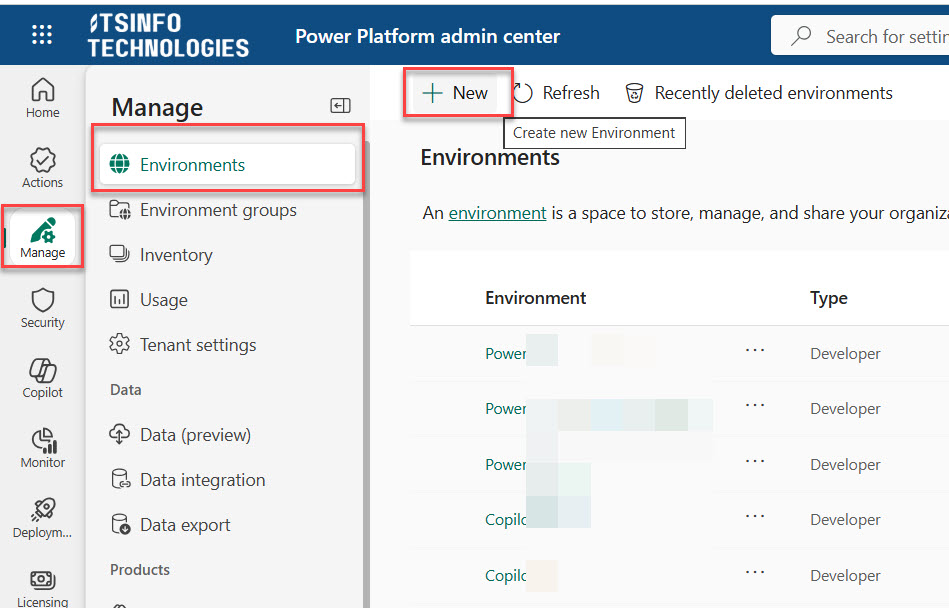
- This launches the environment creation wizard.
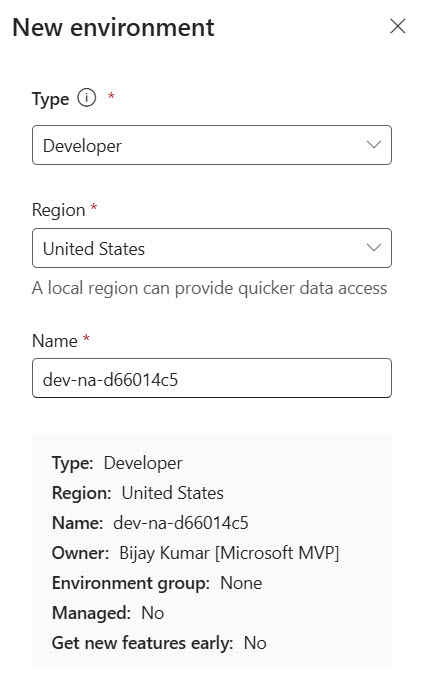
Here, fill in the details to create an environment.
- Type: Developer
- Creates a personal development environment for building and testing Power Platform solutions.
- Not intended for production use.
- Region: United States
- Determines the geographic location where the environment and data are stored.
- Helps meet performance and compliance requirements.
- Name: dev-na-d66014c5
- Unique identifier for the environment.
- Used to distinguish it from other environments in the tenant.
- Owner
- The user who creates and manages the environment.
- Has full administrative access.
- Environment Group: None
- The environment is not assigned to any environment group.
- Environment groups help organize and manage multiple environments.
- Managed: No
- The environment is not a Managed Environment.
- Standard governance and monitoring features apply.
- Get New Features Early: No
- Early access features are disabled.
- The environment will receive new features during standard Microsoft releases.
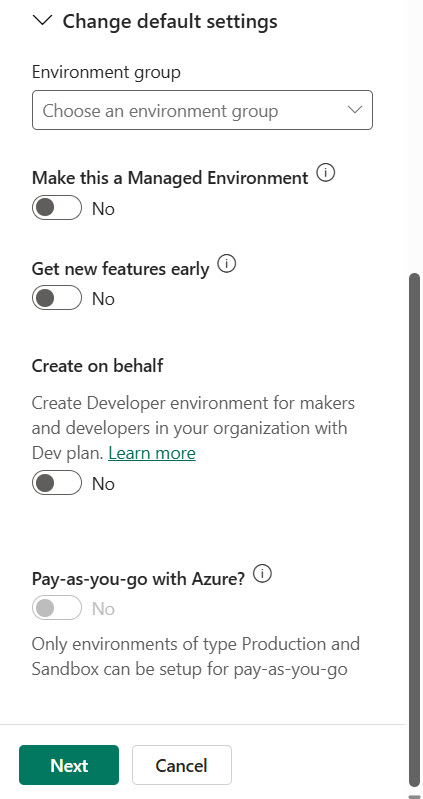
You can also look at the settings below.
- Environment Group
- Assigns the environment to a specific environment group for centralized administration.
- Make this a Managed Environment
- Enables advanced governance, security, monitoring, and usage insights.
- Recommended for enterprise and production scenarios.
- Get New Features Early
- Provides access to preview and upcoming Power Platform features before general availability.
- Useful for testing and learning new capabilities.
- Create on Behalf
- Allows administrators to create a Developer environment for another user.
- Commonly used in organizations to provision environments for makers and developers.
- Pay-as-you-go with Azure
- Links the environment to an Azure subscription for usage-based billing.
- Available only for Production and Sandbox environments, not Developer environments.
Here is a screenshot for your reference.
Do this for all three environments. Give them clear names so everyone knows which one is which.
When You Might Need More Environments
The Dev-Test-Prod foundation is solid for most teams. But as your agent matures and becomes more business-critical, you might want to add two optional environments:
Preview Environment: Catch Platform Regressions Early
Power Platform and Copilot Studio update continuously. Sometimes an update introduces a regression that breaks your agent. A Preview environment on the First Release ring gives you an early warning.
Here’s how it works:
- First Release gets platform updates weeks before the standard ring
- You deploy your current production solution into Preview
- You run evaluations on a schedule
- When evals start failing in Preview but still pass in Production, you have an early warning: something in the upcoming update might need attention
- You get weeks to investigate and adapt instead of reacting when production breaks
This is one of the most valuable yet underutilized practices in Power Platform ALM. A Preview environment with scheduled evals turns platform updates from a reactive concern into a proactive one.
Production-Aligned Dev Environment: Handle Emergencies Without Shipping Unfinished Work
Imagine this: your primary Dev environment has work in progress. A critical bug surfaces in Production. You can’t wait for the current development cycle to complete, and you can’t ship half-finished features alongside a hotfix.
The solution is a production-aligned development environment — a secondary Dev environment that holds an unmanaged copy of whatever is currently running in Prod. When an emergency arises:
- You make the fix there
- Export it as a managed solution
- Promote it directly through the pipeline (Prod-Aligned Dev → Test → Prod)
- Your primary Dev environment and its in-progress work remain untouched
Normal cycle: Dev → Test → Prod
Hotfix cycle: Prod-Aligned Dev → Test → Prod
This isn’t overhead for day one. Add it when the agent is mature enough that production downtime has a real cost. But plan for it from the start — retrofitting emergency processes during an actual emergency is how mistakes happen.
The Full Environment Picture
| Environment | Release Ring | What Lives Here | Why |
|---|---|---|---|
| Dev | Standard | Unmanaged solution (active work) | Daily authoring |
| Prod-Aligned Dev | Standard | Unmanaged solution (mirrors Prod) | Hotfixes |
| Test | Standard | Managed solution | Validation, UAT |
| Preview | First Release | Managed solution (mirrors Prod) | Regression detection |
| Production | Standard | Managed solution | Live users |
Start with Dev, Test, and Prod. Add Preview and Prod-Aligned Dev as the agent matures.
Solutions: The Unit of Deployment
If environments are where your agent lives, solutions are how it travels between them. A solution is a container — a package that holds every component your agent depends on and makes the entire set portable and promotable as a single unit.
What Goes Inside a Copilot Studio Solution
Everything your agent depends on must live inside a single solution:
- The agent itself
- Its tools (APIs, connectors, external integrations, workflows)
- Its environment variables (configuration that differs per environment)
- Its knowledge source references
- And everything else it needs to function
Anything created outside a solution is invisible to your deployment pipeline and cannot be promoted cleanly. This is the single most common mistake teams make early on — building components in the default environment without a solution, only to discover they cannot move them.
The fix is simple: create your solution first, then create everything else inside it.
How to Set Up Your Solution
- Go to your Dev environment in Power Platform
- Click Solutions → New solution
- Name it (e.g., “Contoso-Copilot-Agent”)
- Set the Publisher (use your organization’s publisher)
- Click Create
- Set it as your preferred solution — this ensures new components are automatically added to it rather than floating in the default solution
From that point on, every component must be created inside this solution. When you create a new topic, tool, or environment variable, make sure you’re creating it within the solution context.
Managed vs. Unmanaged Solution: The Critical Difference
Solutions exist in two forms:
| Type | Where it lives | What you can do | Purpose |
|---|---|---|---|
| Unmanaged | Development | Add, edit, remove components freely | Active authoring |
| Managed | Test, Production | Read-only. Cannot be edited directly. | Stable, sealed deployment artifact |
When you export a solution from Dev, you choose to export it as managed or unmanaged. The best practice when promoting your agent is to export as managed. This managed package is what gets imported into Test and later into Production.
It’s sealed — nobody can edit it in place without going back to the dev environment. If a change is needed, it must be made in Dev, re-exported, and re-promoted. This one-way flow is what keeps Production stable.
Check out How Generative AI Works Inside Copilot Studio
Deploying With Confidence: Power Platform Pipelines
With your environments established and your solution containing all agent assets, how does the solution actually move from Dev to Test to Prod?
You could do this manually — export a .zip from Dev, navigate to Test, import it, repeat for Prod. This works, but it’s error-prone, undocumented, and doesn’t scale. It also leaves no trace of what was deployed, when, or by whom.
Power Platform Pipelines solve this. A pipeline is a pre-configured promotion path that connects your environments in sequence. Once set up, promoting your solution is a single action: select the solution, select the stage (Dev to Test, or Test to Prod), and deploy. The pipeline handles the managed export, the import into the target, and records the deployment in its history.
What a Pipeline Gives You
- Repeatability — the same process every time, no manual steps to forget
- Audit trail — who deployed what, when, and to which environment
- Rollback visibility — deployment history shows exactly which version is in each environment
- Guardrails — you can require approvals before a deployment proceeds to the next stage
What a Pipeline Does Not Do
- It does not validate that your agent works correctly after import — that’s what evaluations are for
- It does not set environment-specific configuration values — those must be in place before the solution arrives
- It does not manage secrets — those live in Azure Key Vault, referenced through environment variables
How to Set Up a Pipeline
- Go to Power Platform Admin Center
- Click Pipelines → New pipeline
- Name it (e.g., “Copilot-Agent-Pipeline”)
- Add your source environment (Dev)
- Add your target environments (Test, then Prod)
- Configure deployment stages with pre-deployment and post-deployment steps if needed
- Click Save
Once configured, deploying is simple:
- Go to your solution in Dev
- Click Export to pipeline
- Select the target stage (Test or Prod)
- Click Deploy
The pipeline handles everything automatically.
Read Monitor Token Usage by AI Model in Copilot Studio
Configuration Without Hardcoding: Environment Variables
The principle is simple: nothing environment-specific gets hardcoded. API endpoints, SharePoint URLs, thresholds, feature flags — all go into environment variables.
Environment variables have two layers that are important to understand:
- Definition — the schema (name, data type, description). This travels with the solution.
- Value — the actual content. This is set per environment and does not travel with the solution.
This separation is what makes portability possible. When you import your managed solution into Test, it brings the variable definitions but not the values.
The Test environment already has its own values configured. The same workflow runs unchanged across Dev, Test, and Prod because it reads its configuration from whichever environment it happens to be running in.
Supported Environment Variable Types
| Type | Use Case |
|---|---|
| String | URLs, identifiers, configuration strings |
| Number | Thresholds, limits, numeric config |
| Boolean | Feature flags |
| Data source | SharePoint lists, Dataverse tables |
| Secret | Azure Key Vault references |
How to Create an Environment Variable
- In your Dev environment, open your solution
- Click Add existing → More → Environment variable
- Click New
- Fill in:
- Name (e.g., “API Endpoint”)
- Schema name (e.g., “contoso_ApiEndpoint”) — this is what you’ll reference in your agent
- Type (String, Number, Boolean, etc.)
- Description (helpful for team members)
- Do not set a current value if it will differ across environments
- Click Save
Now reference this variable in your agent by using the schema name: contoso_ApiEndpoint
The Critical Mistake to Avoid
Do not set a current value on an environment variable inside the solution definition if that value will differ across environments. Values baked into the solution definition will override environment-specific values and silently break your portability.
Set values directly in each target environment after import.
Check out How to Choose an AI Model in Copilot Studio
Preparing Variables Before Deployment
When your pipeline promotes a solution to a new environment, the variable definitions arrive but the values do not. This means environment variable values must be configured in the target environment before the solution is imported — otherwise workflows that depend on those variables will fail at runtime.
Include this as an explicit step in your promotion process: verify that every expected variable has a value in the target before deploying.
How Values Are Supplied
There are two models depending on how you deploy:
With Power Platform Pipelines (in-product): When a solution containing environment variables is deployed, the pipeline prompts you to provide or confirm values for the target environment — just as a manual import would. If values already exist in the target, they are pre-filled. If they do not, you supply them at deployment time.
With CI/CD pipelines (Azure DevOps or GitHub Actions): You use a deployment settings file — a JSON file that maps each variable’s schema name to its target-specific value:
{
  "EnvironmentVariables": [
    {
      "SchemaName": "contoso_ApiEndpoint",
      "Value": "https://api-test.contoso.com"
    },
    {
      "SchemaName": "contoso_MaxRetries",
      "Value": "3"
    }
  ]
}
This file is passed as a parameter to the solution import task, pre-populating values during import without manual intervention.
In both models, the principle is the same: the solution carries the variable definitions, and the target environment (or its settings file) supplies the values. The pipeline never embeds environment-specific configuration into the solution artifact itself.
Secrets: Azure Key Vault Integration
For secrets — API keys, tokens, credentials — secret environment variables backed by Azure Key Vault provide a secure, auditable approach. The agent references a Key Vault secret rather than holding the value directly, and the platform resolves it at runtime. When a key rotates, you update Key Vault — no solution change or redeployment needed.
How to Set Up Key Vault Secrets
- Create Azure Key Vaults per environment tier:
kv-agent-devkv-agent-testkv-agent-prod
- Store secrets with identical names across them (e.g., “ApiKey”, “AuthToken”)
- In each environment, create a secret environment variable:
- Type: Secret
- Value: Reference to the Key Vault secret (e.g.,
@{appKeyVault}@contoso_ApiKey)
- Structure your vaults so only the vault reference in each environment’s variable value differs. The workflow logic is identical everywhere — it asks for a secret by name, and the environment resolves it to the correct vault.
This approach means:
- Secrets never touch your solution
- Key rotation happens without redeployment
- You have audit trails for secret access
- Each environment uses its own isolated secrets
Knowing It Works: Evaluations and Testing
Deploying correctly does not guarantee behaving correctly. Evaluations close that gap.
An evaluation is a defined set of test inputs and expected outputs that measures whether your agent is selecting the right tools, triggering the right logic, and producing acceptable responses. It serves as your quality gate — giving confidence that a promotion is safe.
Agent Evaluation in Copilot Studio (Built-In Automated Testing)
Microsoft recently introduced Agent Evaluation — automated testing built directly into Copilot Studio. This lets you validate your agent’s responses against predefined expectations using multiple evaluation methods.
With Agent Evaluation, you can:
- Create reusable test sets (up to 100 test cases per set)
- Define success criteria per question
- Run tests under specific user identities
- Analyze pass/fail results and quality scores
How to Create a Test Set
Step 1: Open Your Agent in Copilot Studio
- Go to Microsoft Copilot Studio
- Open the agent you want to test
- Navigate to the Evaluation tab
Step 2: Create a Test Set
A test set is a collection of questions your agent should handle correctly. You can create test cases in multiple ways:
- AI-generated questions based on the agent description and knowledge
- Manual entry of questions and expected responses
- Reuse questions from test chat history
- Import a CSV file with up to 100 test cases
Each test case can include:
- Question
- Expected response (where required)
- Evaluation method
- Threshold for success
Step 3: Configure User Context
You can run evaluations under a specific user profile:
- Ensures the agent accesses the same data and connectors as real users
- Helps identify permission-related issues early
This is especially important for agents using secured SharePoint, Dataverse, or external connectors.
Evaluation Methods You Can Choose
Makers can choose from a wide range of test methods:
- Exact or partial matches — for strict checklist compliance
- Advanced similarity metrics — for semantic alignment
- Intent recognition — for understanding whether the right logic triggered
- Relevance and completeness — for overall helpfulness
You can also set custom thresholds to ensure your agent meets your organization’s unique standards for accuracy and relevance.
Where Evaluations Fit in Your ALM Process
Evaluations are not a standalone activity. They integrate directly into the promotion lifecycle:
- After changes in Dev — did anything regress? Run evals before exporting.
- Before promotion to Test — evals passing is the signal that a solution is ready to move forward.
- On a schedule in Preview — will the next platform update break us? Automated scheduled evals answer this continuously.
- After import in the target — did the deployment land cleanly? A post-deployment smoke eval confirms the agent is functional in its new environment.
Automating Evaluations in Your Pipeline
Evaluations can be triggered programmatically, which means they can become an automated gate in your promotion pipeline. Rather than relying on a human to remember to run them, you configure the pipeline to execute evaluations after each deployment and block further promotion if results fall below a threshold.
This transforms evaluations from a manual best practice into an enforced quality gate — no deployment reaches Production unless the agent demonstrably works.
The Copilot Studio Kit for Automated Testing
For more advanced automated testing, you can use the Power CAT Copilot Studio Kit. This integrates Power Automate cloud flows with Dataverse and the Copilot Studio Kit to validate agent functionality with security and data integrity tests.
The deployment process with the Kit requires three environments:
- Pipeline host environment: Hosts the pipelines and their extensions. It’s the central control point.
- Development (source) environment: Where you develop and test the agent. Kit is installed here.
- Target (production) environment: The final destination where the agent is published after passing validation.
High-level steps:
- Open the Deployment Pipeline Configuration app
- Configure the pipeline with name and linked development environments
- Add deployment stages to define target environments
- Enable pre-export and pre-deployment steps
- Trigger on deployment request — the flow pauses, runs automated tests, evaluates results, and decides whether to proceed
Security and Governance: Environment-Level Controls
Your environment strategy isn’t just about deployment — it’s also about security. Each environment should have appropriate controls based on its purpose.
Environment-Level Settings to Configure
For Production:
- Lockbox — prevent unmanaged customizations
- Dataverse audit — enable logging for compliance
- IP firewall — restrict access to known IPs
- IP cookie binding — add another layer of authentication
- Environment auditing — enable for compliance tracking
For All Environments:
- Microsoft Entra Conditional Access — apply for corporate devices and networks
- MFA — enable multifactor authentication for all users
- RBAC — use Power Platform role-based access control to assign appropriate roles (admin, maker, end-user)
- Restricted user access — limit authoring access to specific security groups
Data Policies
Establish environment-level or tenant-level data policy rules for your agent to restrict unused connectors based on the agent’s use case:
- Restrict non-business connectors in production
- Allow broader connector access in Dev for testing
- Define which first-party (1P) and third-party (3P) connectors are permitted
Authentication Models
Establish the permitted authentication model for your Copilot agent:
- Authentication via Microsoft Entra ID (recommended for production)
- Manual authentication (for specific scenarios)
- No authentication required (only for public-facing agents with appropriate safeguards)
Additionally, decide on restricting or permitting web channel access to ensure an appropriate security level.
Least Privilege Principle
Restrict agent permissions to essential data sources only:
- In production, use a service principal account for deployment and custom connector authentication
- Don’t give agents broader access than they need
- Review and approve integrated app registrations, VNets, keys, and endpoints in Azure for production resources
Before You Promote: A Checklist
Before deploying your agent to Test or Prod, make sure you’ve covered these items:
- ✓ All agent assets live inside the solution
- ✓ Solution set as preferred solution in Dev
- ✓ No hardcoded environment-specific values anywhere
- ✓ Environment variable values configured in the target environment
- ✓ Secrets are in Key Vault, referenced via secret environment variables
- ✓ Pipeline configured with correct stage sequence
- ✓ Solution exported as managed for Test and Prod
- ✓ Evaluations pass before and after deployment
- ✓ Smoke test passes in the target after import
- ✓ Production knowledge sources (SharePoint libraries, documents) are properly referenced
- ✓ Data policies and RBAC are correctly configured in production
Common Pitfalls (And How to Avoid Them)
Pitfall 1: Creating Components Outside a Solution
Problem: You build topics, tools, and variables in the default environment without a solution. Later, you can’t export or promote them.
Fix: Create your solution first. Set it as preferred. Create everything inside it.
Pitfall 2: Hardcoding Environment-Specific Values
Problem: You hardcode “https://api-contoso.com” directly in your agent. It works in Dev but breaks in Prod because Prod uses a different endpoint.
Fix: Use environment variables. Reference contoso_ApiEndpoint instead of the actual URL. Set the value per environment.
Pitfall 3: Setting Current Values in Solution Definition
Problem: You set a current value on an environment variable in your solution definition. When you import to Test, it overrides Test’s value and breaks your agent.
Fix: Don’t set current values in the solution definition. Set values directly in each target environment after import.
Pitfall 4: Editing Directly in Production
Problem: Someone makes a quick fix directly in Production because “it’s just a small change.” Now production is unaligned with your solution, and you have no audit trail.
Fix: Never edit directly in Production. All changes go through Dev → Test → Prod via the pipeline. If it’s urgent, use the Prod-Aligned Dev environment for hotfixes.
Pitfall 5: Skipping Evaluations
Problem: You deploy without running evaluations. The agent breaks in production because a tool changed or a knowledge source is missing.
Fix: Run evaluations before every deployment. Make evals passing a requirement for promotion. Set up automated evals in your pipeline.
Pitfall 6: Using the Default Environment for Development
Problem: You build your agent in the Default environment. Later, you can’t isolate it, secure it properly, or promote it cleanly.
Fix: Create a dedicated Dev environment from the start. Close down the Default environment to the bare minimum to avoid ongoing security headaches.
Real-World Example: Deploying an HR Copilot
Let’s walk through a concrete example. You’re building an HR Copilot that answers employee questions about policies, benefits, and leave procedures.
Environment Setup
- Dev: “HR-Copilot-Dev” — where you build the agent
- Test: “HR-Copilot-Test” — where HR team validates
- Prod: “HR-Copilot-Prod” — where employees access it
Solution Structure
Create solution “HR-Copilot-Agent” in Dev. Inside it:
- Agent: “HR Policy Copilot”
- Tools: SharePoint connector (for policy documents), Dataverse table (for leave requests)
- Environment variables:
hrcontoso_SharePointUrl(String) — SharePoint site URLhrcontoso_LeaveTableId(Data source) — Dataverse table referencehrcontoso_ApiKey(Secret) — Key Vault reference for external HR API
Environment Variable Values
In Dev:
hrcontoso_SharePointUrl= “https://contoso-dev.sharepoint.com/sites/hr-policies”hrcontoso_LeaveTableId= “dev-leave-table-id”hrcontoso_ApiKey= referenceskv-hr-dev@hrApiKey
In Test:
hrcontoso_SharePointUrl= “https://contoso-test.sharepoint.com/sites/hr-policies”hrcontoso_LeaveTableId= “test-leave-table-id”hrcontoso_ApiKey= referenceskv-hr-test@hrApiKey
In Prod:
hrcontoso_SharePointUrl= “https://contoso.sharepoint.com/sites/hr-policies”hrcontoso_LeaveTableId= “prod-leave-table-id”hrcontoso_ApiKey= referenceskv-hr-prod@hrApiKey
Evaluation Test Set
Create a test set with 20 questions:
- “What is the leave policy for new employees?”
- “How do I request maternity leave?”
- “What benefits are available after 6 months?”
- “How do I check my remaining leave days?”
For each, define the expected response type and set the evaluation method (semantic similarity with a threshold of 0.8).
Deployment Flow
- In Dev: Build agent, test in test pane, run evaluations
- Evals pass: Export solution as managed to pipeline
- Pipeline deploys to Test: Solution imported, values already configured
- In Test: HR team validates, runs evaluations again
- Evals pass: Promote to Prod via pipeline
- In Prod: Agent published, employees can access it
Hotfix Scenario
A critical bug surfaces: the leave request tool is returning wrong data.
- Prod-Aligned Dev: Import current production solution as unmanaged
- Fix the bug: Edit the tool in Prod-Aligned Dev
- Run evaluations: Confirm fix works
- Export to pipeline: Deploy through Test → Prod
- Primary Dev untouched: Ongoing feature work continues without interruption
Getting Started: Your Action Plan
If you’re just starting with Copilot Studio ALM, here’s what to do:
Week 1: Set Up the Foundation
- Create Dev, Test, and Prod environments in Power Platform Admin Center
- Create your first solution in Dev and set it as preferred
- Build a simple agent inside the solution
- Create environment variables for any configuration that might change
Week 2: Add Pipelines and Testing
- Set up a pipeline connecting Dev → Test → Prod
- Create your first test set with 10-20 questions
- Run evaluations and make sure they pass
- Deploy your agent to Test using the pipeline
Week 3: Harden Production
- Configure security settings in Prod (Lockbox, auditing, RBAC)
- Set up environment variable values in Prod
- Deploy to Prod with evaluations passing
- Document your process for the team
Week 4+: Iterate and Improve
- Add more test cases to your evaluations
- Set up scheduled evals in a Preview environment (if you have one)
- Refine your pipeline with approval gates
- Train your team on the process
The Payoff
When this is set up correctly, promoting your agent is a single pipeline action. The same logic runs against the correct endpoints, credentials, and data for each environment automatically. Secrets rotate without redeployment. Platform updates are validated early. Emergency fixes have a clean path that preserves ongoing development work.
The setup takes a few hours. The confidence it provides compounds every week the agent is in production.
You’ll stop worrying about “did I break something?” and start focusing on “how can I make this better?” That’s the real value of a solid environment strategy.
Final Thoughts
The environment strategy for Copilot Studio isn’t about following a rigid template. It’s about creating a foundation that lets you build safely, test thoroughly, and deploy confidently. The Dev-Test-Prod pattern is your starting point. Add Preview and Prod-Aligned Dev as your needs grow.
The key is to start early. Don’t wait until you’ve built five agents and realize you have no way to manage them. Set up your environments, create your solution, and build your first agent inside it. Make environment variables your default. Run evaluations before every deployment. Use the pipeline instead of manual exports.
These habits become second nature quickly. And when you need to make that emergency fix or validate that a platform update won’t break anything, you’ll be grateful you did.
If you’re building Copilot Studio agents for real users, this is the foundation you need. Everything else — advanced tools, complex orchestration, multi-channel deployment — builds on top of this.

Bijay Kumar is a Microsoft MVP in Business Applications with over 18 years of experience in the IT industry and more than 12 years as a Microsoft MVP, recognized for his contributions to the Microsoft community. He is the Founder of TSinfo Technologies and the creator of the popular technology platforms SPGuides.com and EnjoySharePoint.com. Bijay also runs the SPGuides YouTube channel, where he shares practical tutorials on Microsoft 365, SharePoint, Power Platform, and Copilot technologies. Read more.