If you’ve ever built a multi-screen app in Power Apps and wondered how to move users from one screen to another — smoothly, intelligently, and with data passing between those screens — the Navigate function is your answer.
In this tutorial, I’ll walk you through everything from the basic syntax to advanced patterns like conditional navigation and passing context between screens. Whether you’re building a leave request app, a field inspection tool, or a customer portal, you’ll use Navigate constantly. Let me show you how to use the Power Apps navigate function with some real examples.
Why Navigate Matters in Real Business Apps
Think about any business app. You have a home screen, a form screen, a details screen, a settings screen. Without a reliable way to move users between those screens based on their actions, your app is basically a static page.
The Navigate function is what makes your app feel like a real application. It gives you control over:
- When a user moves to another screen
- How the transition looks visually
- What data travels with the user as they navigate
In enterprise scenarios, this gets especially important. Imagine a SharePoint-connected HR app where a manager selects an employee record from a gallery, and Navigate takes them to a detailed review screen — with that specific employee’s data already loaded. That’s exactly the kind of smooth experience users expect from a professional app.
What Is the Power Apps Navigate Function?
The Navigate function does one main thing: it takes users from one screen to another in your Power Apps application.
Think of it like clicking a link on a website. You’re on the homepage, you click “About Us,” and boom – you’re on a different page. That’s basically what Navigate does in Power Apps.
Syntax:
Navigate( ScreenName [, Transition [, UpdateContextRecord ]] )
Let’s break down each parameter:
- ScreenName (Required) — The name of the screen you want to navigate to. This is the only required parameter.
- Transition (Optional) — The visual effect applied during the transition. If you skip this, it defaults to ScreenTransition.None, which is an instant switch.
- UpdateContextRecord (Optional) — A record that sets or updates context variables on the destination screen. This is how you pass data between screens.
The simplest possible Navigate call looks like this:
Navigate(Screen2)
That’s literally all you need to jump from one screen to another. No animation, no data — just move the user.
Screen Transition Options in Power Apps Navigate Function
Power Apps gives you five built-in transition effects. Here’s a quick breakdown:
| Transition | What It Does |
|---|
| Transition | What It Does |
|---|---|
| ScreenTransition.None | Instant switch, no animation (default) |
| ScreenTransition.Fade | Screen fades out then fades in |
| ScreenTransition.Cover | New screen slides in from the right |
| ScreenTransition.CoverRight | New screen slides in from the left |
| ScreenTransition.UnCover | Current screen slides away to reveal new screen |
For most professional apps, I prefer ScreenTransition.Fade or ScreenTransition.None. Fade looks clean and subtle. None is fast and feels snappy. The slide transitions can feel a bit heavy in enterprise apps unless you’re deliberately mimicking mobile navigation.
Example:
Navigate(DetailsScreen, ScreenTransition.Fade)
Check out Power Apps Notify Function
Step-by-Step: Your First Navigate Implementation
Let me walk you through setting up basic screen navigation from scratch.
Step 1: Create Your App and Screens
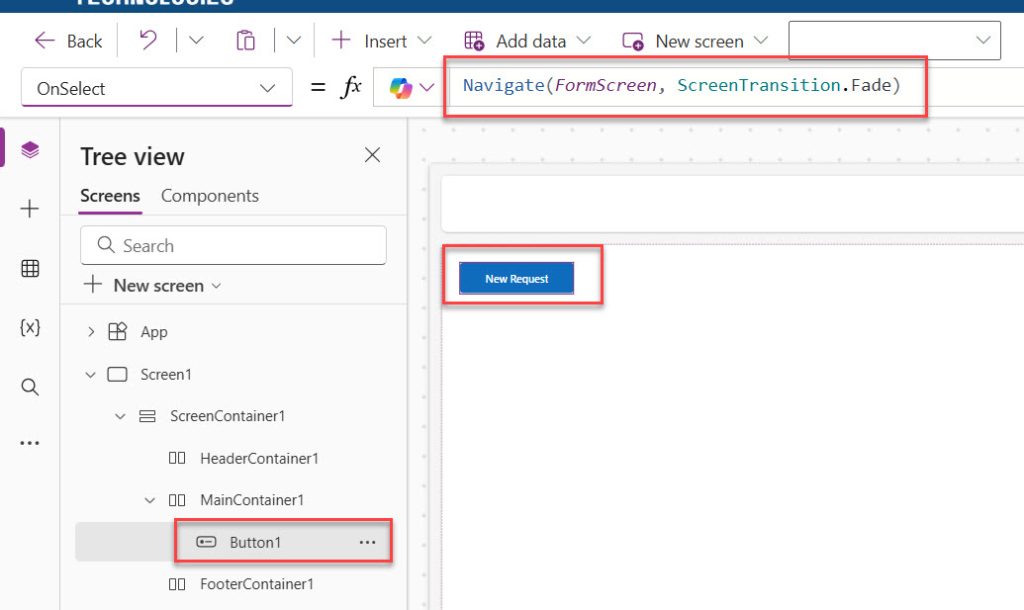
Open Power Apps Studio at make.powerapps.com, create a blank Canvas app, and add two screens. Name them something meaningful — HomeScreen and FormScreen, for example. Naming your screens descriptively is a habit that pays off big in larger apps.
Step 2: Add a Button to HomeScreen
Click Insert → Button on HomeScreen. Change its Text property to “New Request” or whatever makes sense for your app.
Click the button, go to the OnSelect property in the formula bar, and type:
Navigate(FormScreen, ScreenTransition.Fade)
You can see the formula in the screenshot below:
Step 4: Add a Back Button on FormScreen
On FormScreen, add another button. Label it "Back" and in its OnSelect property use:
Back()
The Back() function returns the user to the previously visited screen — it’s the natural companion to Navigate. I’ll cover it more later.
Step 5: Preview and Test
Press F5 or click the Play button. Click your “New Request” button and watch the fade transition. Click Back to return. That’s your first Navigate implementation working.
Read Power Apps Switch Function
Passing Data Between Screens with UpdateContextRecord
This is where Navigate becomes genuinely powerful. You can pass information from one screen to another. The third parameter lets you set context variables on the destination screen at the moment of navigation.
Syntax:
Navigate(ScreenName, Transition, {VariableName: Value})
Real-world example: You have a gallery showing a list of support tickets. When a user taps a ticket, you want the details screen to show that specific ticket’s information.
On the gallery item’s OnSelect property:
Navigate(
    TicketDetailsScreen,
    ScreenTransition.Fade,
    {SelectedTicket: ThisItem}
)
On TicketDetailsScreen, you now have access to a context variable called SelectedTicket. You can use it in labels and controls like this:
SelectedTicket.Title
SelectedTicket.Status
SelectedTicket.AssignedTo
You can pass multiple values at once:
Navigate(
    ReviewScreen,
    ScreenTransition.None,
    {
        CurrentUser: User().FullName,
        SelectedItem: ThisItem,
        IsEditMode: true
    }
)
On the destination screen, those become immediately available context variables: CurrentUser, SelectedItem, and IsEditMode.
Passing Multiple Variables
You’re not limited to just one variable. You can pass as many as you need:
Navigate(DetailsScreen, ScreenTransition.Fade, {
    varProduct: ThisItem,
    varUserName: User().FullName,
    varCurrentDate: Today()
})
Just separate each variable with a comma. Keep them organized and use clear names (I like to prefix my variables with “var” so I always know what’s a variable).
Check out Power Apps Collect Function
Context Variables vs. Global Variables in Navigation
This is one of the areas where I see developers get confused. Here’s the key difference:
- Context variables (set via Navigate’s third parameter or UpdateContext()) are local to the screen. They get created on the destination screen when you navigate to it, and they live only there.
- Global variables (set via Set()) are available across the entire app, from any screen.
When to use context variables via Navigate:
When the data is only relevant to that specific screen — like a selected record from a gallery.
When to use global variables with Set() before Navigate:
When you need data to persist across multiple screens, or be accessible from screens that Navigate’s context can’t directly reach.
Example of using Set() with Navigate:
Set(gblCurrentEmployee, ThisItem);
Navigate(EmployeeDetailScreen, ScreenTransition.Fade)
Then on any screen, you access gblCurrentEmployee. The gbl prefix is a naming convention many developers use to keep global variables easy to identify.
Check out Set Control Value in Button Click on Power Apps
Real-World Use Cases: Power Apps Navigate Function
Now, let me show you some real-world use cases of the Power Apps navigate function.
Use Case 1: Master-Detail Navigation
You have a list of customers, and clicking on one shows their details.
In your customer gallery’s OnSelect:
Navigate(CustomerDetailsScreen, ScreenTransition.Cover, {varSelectedCustomer: ThisItem})On the CustomerDetailsScreen, add a back button with:
Navigate(CustomerListScreen, ScreenTransition.UnCover)This creates that natural “forward and back” flow.
Use Case 2: Multi-Step Forms
You’re building a registration form split across three screens. Each “Next” button should navigate forward and carry the data entered so far.
Screen1 (Button to go to Screen2):
Navigate(Screen2, ScreenTransition.Cover, {
    varFirstName: txtFirstName.Text,
    varLastName: txtLastName.Text
})
Screen2 (Button to go to Screen3):
Navigate(Screen3, ScreenTransition.Cover, {
    varEmail: txtEmail.Text,
    varPhone: txtPhone.Text
})
Screen3 can now access all the variables you’ve set along the way.
Use Case 3: Role-Based Navigation
You want managers to land on a different screen than regular employees after login.
If(
    User().Email = "manager@company.com",
    Navigate(ManagerDashboard, ScreenTransition.Fade),
    Navigate(EmployeeDashboard, ScreenTransition.Fade)
)
Use Case 4: Conditional Navigation After Save
After a user submits a form (using Patch() to save to SharePoint), navigate them to a confirmation screen only if the save succeeded.
If(
    IsBlank(Errors(YourDataSource)),
    Navigate(ConfirmationScreen, ScreenTransition.Fade),
    Notify("There was an error saving your record. Please try again.", NotificationType.Error)
)
Use Case 5: Navigating from a Gallery
This is probably the most common pattern in all of Power Apps development. In a gallery’s OnSelect property:
Navigate(
    ItemDetailScreen,
    ScreenTransition.None,
    {CurrentItem: ThisItem}
)
Then on ItemDetailScreen, your form’s Item property is simply CurrentItem, and all the fields populate automatically.
Check out Create a Custom Theme in Power Apps
Working with Navigate and SharePoint
Since you’re working with SharePoint, here’s a common scenario:
You have a SharePoint list connected to your app, and you want to show item details when someone clicks on an item.
In your gallery (connected to SharePoint), use:
Navigate(ItemDetailsScreen, ScreenTransition.Cover, {varSharePointItem: ThisItem})On the ItemDetailsScreen, you can show all the SharePoint columns:
- varSharePointItem.Title
- varSharePointItem.Description
- varSharePointItem.Category etc.
If you want to edit that item, you can set your form’s Item property to:
varSharePointItemAnd your form will automatically load that SharePoint item for editing.
Advanced Tips for Using the Navigate Function in Power Apps
Here are some advanced tips for using the navigate function in Power Apps.
Tip 1: Run Actions Before and After Navigate
Navigate can be chained with other actions using semicolons. You can do work before or after the navigation call in the same OnSelect formula.
UpdateContext({IsLoading: true});
Navigate(ReportScreen, ScreenTransition.Fade);
UpdateContext({IsLoading: false})
Important note: Navigate executes and the screen changes, but any code after Navigate in a sequence may not fully execute in the way you expect since the context shifts. For complex workflows, test carefully and handle logic on the destination screen’s OnVisible property instead.
Tip 2: Use OnVisible for Screen Initialization
A pattern I use constantly is to put data loading or variable initialization in the screen’s OnVisible property rather than in the Navigate call. This way the screen sets itself up whenever it’s opened, regardless of where the user came from.
On the screen’s OnVisible:
Set(gblPageTitle, "Employee Details");
Refresh(EmployeeList)
Tip 3: Named Screen Navigation with Variables
In larger apps, avoid scattering literal screen names all over your formulas. Instead, store the target screen name in a global variable or use a consistent naming convention so that if you rename a screen, you only have to update one place.
Tip 4: Combine Navigate with Notify()
Give users feedback before transitioning, especially for confirmations:
Notify("Record saved successfully!", NotificationType.Success);
Navigate(HomeScreen, ScreenTransition.Fade)
Tip 5: Disable Controls During Navigation
If your app loads data when navigating, temporarily disable or hide controls to prevent users from clicking multiple times while a screen loads.
Check out Data Table Control in Power Apps Canvas App
Common Mistakes (And How to Avoid Them)
Let me save you some headaches. Here are mistakes I’ve made (and seen others make) with Navigate:
Mistake 1: Forgetting the curly braces for variables
Wrong:
Navigate(DetailsScreen, ScreenTransition.Cover, varProduct: ThisItem)Right:
Navigate(DetailsScreen, ScreenTransition.Cover, {varProduct: ThisItem})Those curly braces matter. Without them, your formula won’t work.
Mistake 2: Using Navigate in the wrong property
Navigate works in behavior properties like:
- OnSelect (for buttons and galleries)
- OnSuccess (for forms)
- OnChange (for controls)
It doesn’t work in properties that expect values, like the Text property of a label.
Mistake 3: Trying to navigate to a screen that doesn’t exist
Power Apps won’t know what to do if you type:
Navigate(DetailScreen)…when your screen is actually called “DetailsScreen” (with an ‘s’). Double-check your screen names.
Mistake 4: Not considering what happens when users press the back button
Power Apps has a built-in back button behavior. If you’re not careful with your navigation logic, users might get stuck in loops or end up on unexpected screens.
Mistake 5: Passing too much data through Navigate context
Don’t try to pass entire collections or huge records through the third parameter. It can cause performance issues. Instead, use a global variable to hold a collection, and just pass a simple ID or key through Navigate.
Mistake 6: Hardcoding Navigate(HomeScreen) everywhere as “Back”
If a user arrives at a detail screen from two different places in your app, hardcoding Navigate(HomeScreen) breaks the expected experience for one of those paths. Use Back() or track where the user came from using a global variable.
Mistake 7: Relying on OnSelect ordering after Navigate
Power Apps doesn’t guarantee that code written after Navigate() in a sequence will run predictably. Place post-navigation logic in the destination screen’s OnVisible property.
Mistake 8: Using Navigate inside a For-Each loop or iteration
Navigate is a behavior function — it should be triggered by user action, not embedded inside data-processing loops. This will throw an error or produce unexpected behavior.
Check out How to Calculate the Difference Between Two Dates in Power Apps
Navigate vs Back: What’s the Difference?
Power Apps also has a Back() function. Here’s when to use each:
Use Navigate when:
- Moving forward in your app
- Going to a specific screen
- Passing new data to a screen
Use Back when:
- You want to return to the previous screen
- You want Power Apps to handle the navigation history
- You’re creating a back button
The Back function is simpler:
Back()You can also specify a transition:
Back(ScreenTransition.UnCover)Conclusion
In this tutorial, I explained how to use the navigate function in Power Apps with some real examples.
Here’s what you need to remember:
- Basic navigation: Navigate(ScreenName)
- Add transitions for better UX: Navigate(ScreenName, ScreenTransition.Cover)
- Pass data between screens: Navigate(ScreenName, ScreenTransition.Cover, {varName: Value})
- Use Back() for return navigation
- Test your navigation flow from a user’s perspective
Start with simple navigation, then add transitions and variables as you need them. Don’t try to do everything at once.
And honestly? The best way to learn is to just build something. Create a simple two-screen app, add a button, and practice navigating back and forth. Then add a variable. Then add a gallery. You’ll get the hang of it pretty quickly.
You may also like the following tutorial:
- How to Set Dropdown Value On Button Click in Power Apps
- Power Apps Multiple IF Statements
- Power Apps Modern Date Picker with Time

Bijay Kumar is a Microsoft MVP in Business Applications with over 18 years of experience in the IT industry and more than 12 years as a Microsoft MVP, recognized for his contributions to the Microsoft community. He is the Founder of TSinfo Technologies and the creator of the popular technology platforms SPGuides.com and EnjoySharePoint.com. Bijay also runs the SPGuides YouTube channel, where he shares practical tutorials on Microsoft 365, SharePoint, Power Platform, and Copilot technologies. Read more.