
In many business applications, displaying manager information for the current logged-in user is a common requirement. Whether you are building an employee directory, leave request system, approval workflow, or organizational dashboard, having access to manager details can help create more personalized and automated experiences in Power Apps.
Fortunately, Power Apps makes this process simple by using the Office365Users connector. With built-in functions like Office365UsersV2.Manager() and Office365Users.UserProfile(), you can quickly retrieve manager-related information such as the manager’s name, email address, designation, department, and profile picture.
In this Power Apps tutorial, we will learn how to get manager details for the current user step-by-step with practical examples. By the end of this, you will be able to integrate manager information seamlessly into your canvas apps and improve your business solutions with dynamic organizational data.
I have also explained how to handle the error when no manager is assigned to the logged-in user in Power Apps. This is quite important while building real-world business applications.
If you want to be an expert in Power Apps, check out the complete Power Apps training course.
What You’ll Need First
Before you can pull manager details, you need to add the Office 365 Users connector to your app. This is a free, standard connector — no premium license needed.
Here’s how to add it:
- Open your canvas app in Power Apps Studio.
- Click Data in the left panel.
- Click Add data.
- Search for Office 365 Users and select it.
- Click Connect.
You should be able to see it like in the screenshot below:
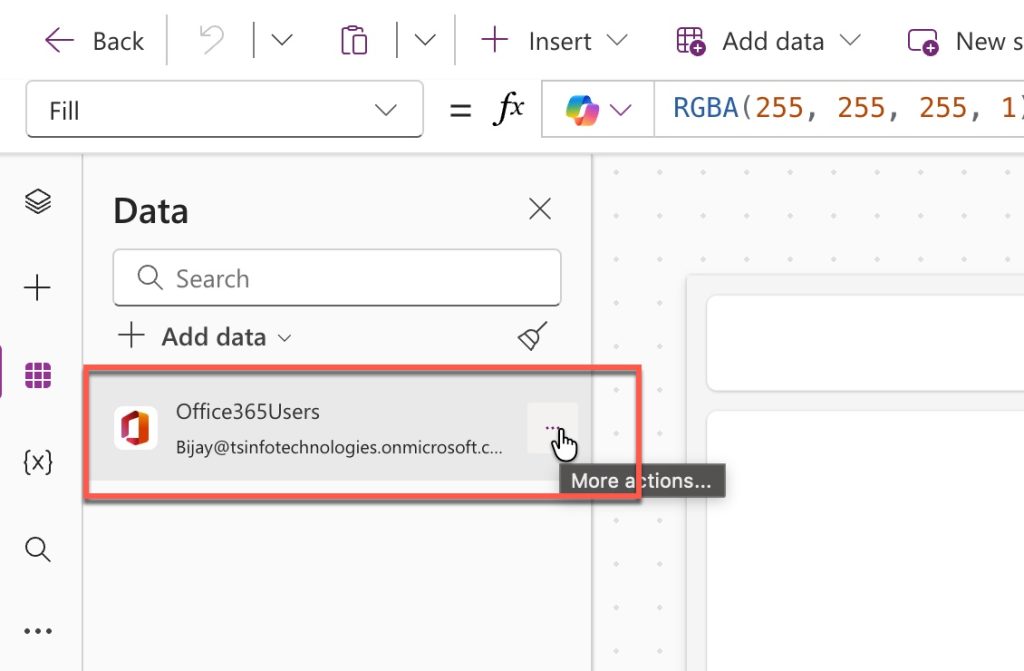
That’s it. Once it’s connected, you now have access to a whole range of user profiles and manager functions.
The Core Formula: ManagerV2
The function you’ll use most is Office365Users.ManagerV2(). It takes one input — the email address or user ID of the person whose manager you want — and returns the manager’s full profile.
To get the manager of the currently logged-in user, the formula looks like this:
Office365Users.ManagerV2(User().Email)
User().Email automatically gives you the email of whoever is signed into the app. Pass that into ManagerV2() and you get back the manager’s details as a record object.
From that object, you can pull individual properties like this:
| What you want | Formula |
|---|---|
| Manager’s display name | Office365Users.ManagerV2(User().Email).displayName |
| Manager’s email address | Office365Users.ManagerV2(User().Email).mail |
| Manager’s job title | Office365Users.ManagerV2(User().Email).jobTitle |
| Manager’s department | Office365Users.ManagerV2(User().Email).department |
| Manager’s office location | Office365Users.ManagerV2(User().Email).officeLocation |
| Manager’s mobile phone | Office365Users.ManagerV2(User().Email).mobilePhone |
| Manager’s city | Office365Users.ManagerV2(User().Email).city |
So if you have a label control and want it to show the manager’s name, set its Text property to:
Office365Users.ManagerV2(User().Email).displayName
Done. Power Apps will call the Office 365 API, look up the manager in your organization’s directory, and display their name.
Check out Display Manager Name and Email in a Power Apps Gallery
Store It in a Variable for Better Performance
Calling ManagerV2() on every control is not a great idea. Every formula evaluation triggers an API call, which means if you have five fields all using the manager’s details, that’s five separate calls to the API on every screen refresh. This slows your app down.
The better approach: call ManagerV2() once and store the result in a variable. Then reference the variable everywhere.
Do this in the OnStart property of your App, or in the OnVisible property of the screen where you need the manager info:
Set(
    varManager,
    Office365Users.ManagerV2(User().Email)
)
Now your variable varManager holds the entire manager profile object. Use it like this across your controls:
- Manager name label: varManager.displayName
- Manager email field: varManager.mail
- Manager job title: varManager.jobTitle
- Manager department: varManager.department
One API call. All fields populated. Much faster.
To make it simple and easy for you, I have created a responsive canvas app and bound all the manager details on a button click. For this, I have added a Power Apps button control and a few text labels. And the screen looks like the screenshot below.
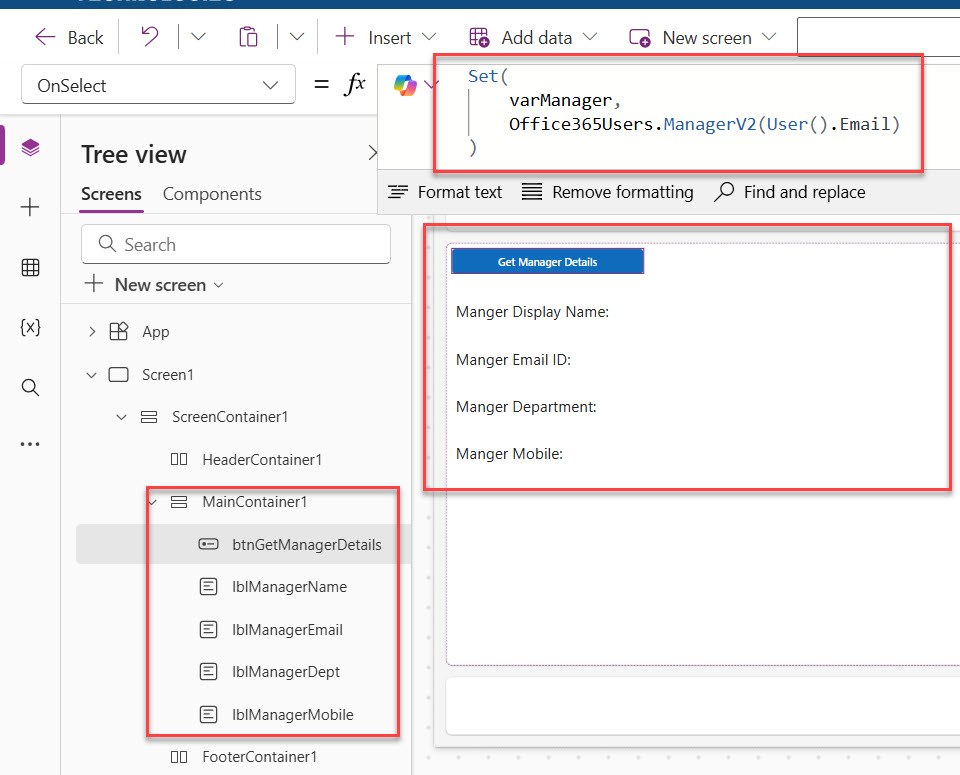
Then I wrote the following formula in the button’s onselect property:
Set(
    varManager,
    Office365Users.ManagerV2(User().Email)
)
Then, in each Text label control, I assigned the value in the Text property as follows:
- “Manger Display Name:” &varManager.displayName
- “Manger Email ID:” &varManager.mail
- “Manger Department:” &varManager.department
- “Manger Mobile:” &varManager.mobilePhone
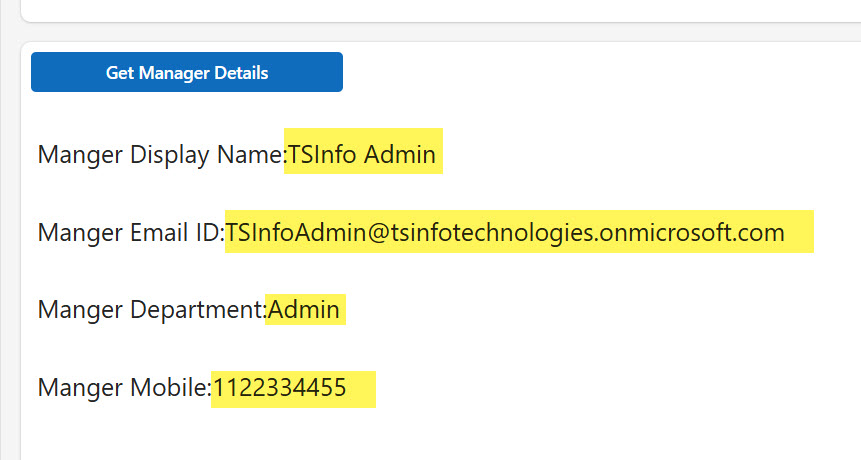
Once you preview the app and click on the button, you can see the manager’s details such as display name, email id, department, and mobile number. Check the screenshot below:
Handle the “No Manager” Error
Here’s something that catches a lot of people off guard: if a user has no manager assigned in Microsoft Entra ID (Azure AD), the ManagerV2() function throws an error. This typically happens with admin accounts, external contractors, or users where the manager field hasn’t been filled in.
If you don’t handle this, your app will show a red error on the screen when it can’t find a manager. Not a great experience.
The fix is to wrap the call in an IfError() function:
Set(
    varManager,
    IfError(
        Office365Users.ManagerV2(User().Email),
        {
            displayName: "No manager found",
            mail: "",
            jobTitle: "",
            department: ""
        }
    )
)
What this does: if the ManagerV2() call fails for any reason, it falls back to a blank record with a safe default value like “No manager found”. Your app continues to work without breaking, and you can show a friendly message to the user instead of an error.
You can also use this to show a notification — for example, in the OnVisible property of your screen:
If(
    IsError(Office365Users.ManagerV2(User().Email)),
    Notify("No manager is assigned to your profile. Please contact HR.", NotificationType.Warning)
)
Practical Example 1: Pre-Fill Manager in a Leave Request Form
Let’s say you’re building a leave request form in Power Apps connected to a SharePoint list. You want the manager’s name and email to auto-populate so the user doesn’t have to type them.
Step 1: Add the Office 365 Users connector.
Step 2: In the screen’s OnVisible property, set the manager variable:
Set(
    varManager,
    IfError(
        Office365Users.ManagerV2(User().Email),
        {displayName: "No manager assigned", mail: "", jobTitle: ""}
    )
)
Step 3: Add a Text Input for “Manager Name” and set its Default property to:
varManager.displayName
Step 4: Add another Text Input for “Manager Email” and set its Default to:
varManager.mail
Now when the form loads, both fields are automatically filled with the current user’s manager’s name and email. The user just fills in their leave dates and clicks Submit.
Practical Example 2: Pass Manager Email to Power Automate
This is probably the most common use case. You want the manager’s email address so you can trigger an approval flow via Power Automate.
When the user submits the form, and you call Power Automate using a Power Apps button, you can pass the manager email like this on the button’s OnSelect property:
'YourFlowName'.Run(
    User().FullName,
    User().Email,
    varManager.mail,
    TextInput_RequestDetails.Text
)
In your Power Automate flow, the manager’s email is received as an input and you can use it to send an approval request, an email, or kick off a Teams notification — whatever your business process requires.
Check out How to Get User Details in Power Apps?
Practical Example 3: Get the Manager of a Different User
Sometimes you don’t want the current user’s manager — you want the manager of someone a user has selected in a people picker. The formula works the same way; you just swap out the email.
Say you have a Combo Box called cmbEmployee that lets users search for a colleague. To get that selected person’s manager:
Set(
    varSelectedManager,
    IfError(
        Office365Users.ManagerV2(cmbEmployee.Selected.UserPrincipalName),
        {displayName: "No manager found", mail: ""}
    )
)
Run this in the Combo Box’s OnChange property so it updates every time the user picks a different employee.
Practical Example 4: Show Manager’s Profile Photo
Want to go one step further and show the manager’s profile picture? You can get it using UserPhotoV2():
Office365Users.UserPhotoV2(varManager.mail)
Add an Image control to your screen and set its Image property to that formula. Power Apps will pull the manager’s Microsoft 365 profile photo and display it right there in your app.
V1 vs V2 — Which Should You Use?
You might notice there are two versions of this function: Manager() (V1) and ManagerV2(). Always use V2.
The V2 version returns a richer set of properties — including displayName, mail, jobTitle, department, officeLocation, mobilePhone, city, and more. V1 returns fewer fields and uses a slightly different property naming convention. Microsoft recommends V2, so stick with it.
Read Power Apps Notify Function
A Few Things to Watch Out For
Here are some gotchas I’ve personally run into when working with manager details in Power Apps:
- Manager not assigned in Entra ID: As mentioned, always wrap ManagerV2() in IfError(). In most organizations, some users — especially senior leadership or service accounts — don’t have a manager set. Your app will crash without that safety net.
- mail vs userPrincipalName: The
mailproperty gives you the user’s SMTP email (the one they use for Outlook). The userPrincipalName (UPN) is their sign-in identity, which is usually the same but can differ in some organizations. If you’re routing emails, use.mail. If you’re looking up other users in the connector, both usually work but.mailis more reliable. - Testing in Power Apps Studio: The preview inside Studio might show your own details as the manager (since you’re the one building it and you might not have a manager set in your test tenant). Always publish and test with a real user account.
- Performance: Call ManagerV2() once in OnStart or OnVisible and store it in a variable. Don’t scatter the function call across multiple control properties.
- Connector sharing: When you share the app with others, make sure the Office 365 Users connection is also shared or each user creates their own connection. Without it, the manager lookup won’t work for other users.
Once you have the manager variable set up properly with error handling, everything else is just referencing properties.
Conclusion
In this Power Apps tutorial, we explored how to get manager details for the current logged-in user using Microsoft 365 services and connectors. By leveraging functions like Office365Users.ManagerV2() and related user profile methods, you can easily retrieve important manager information such as display name, email address, job title, department, and profile picture directly inside your app.
This approach is extremely useful when building employee directories, approval workflows, leave management systems, onboarding applications, or any business solution that depends on organizational hierarchy. It helps create smarter and more personalized Power Apps experiences without requiring manual data maintenance.
I hope this tutorial helped you understand the complete process of fetching manager details in Power Apps with practical examples. Try implementing these methods in your own applications to build more dynamic and user-friendly business solutions.
You may also like:
- The formula uses scope which is not presently supported for evaluation in Power Apps
- How to Send Emails from Power Apps
- Power Apps Modern Checkbox Control

Bijay Kumar is a 13-times Microsoft MVP in Business Applications with over 18 years of experience in the IT industry, recognized for his contributions to the Microsoft community. He is the Founder of TSinfo Technologies and shares practical, tested tutorials on Power Apps, Power Automate, Copilot Studio, and Power BI here on Power Platform FAQs. Read more.