You’re building a Power Apps application, and suddenly you realize you need to know who’s using it. Maybe you want to show a personalized welcome message, route approvals to the right manager, or simply log who submitted a form. Whatever the reason, getting user details in Power Apps is one of those everyday tasks that every maker needs to know.
In this tutorial, I’ll walk you through all the main ways to get user details in Power Apps, from the simplest one-liner to pulling in rich profile information like department, job title, and manager. By the end, you’ll know exactly which method to use for your specific situation.
Why User Details Matter in Your Apps
Before we jump into the how-to part, let’s talk about why this matters.
Think about any professional app you use daily. It knows who you are, right? It greets you by name, shows your relevant data, and tracks your actions. Your Power Apps should do the same thing.
Here are some common scenarios where you’ll need user information:
- Personalization: Displaying “Welcome back, Sarah!” is much friendlier than a generic greeting
- Data filtering: Showing users only their own records or team-specific information
- Approval workflows: Automatically routing requests to the correct manager
- Audit trails: Tracking who created or modified records
- Permissions: Showing or hiding features based on who’s logged in
These are everyday requirements in business apps.
Now, let’s look at how to actually get this information.
Method 1: The User() Function (The Quickest Way)
The simplest way to get user information in Power Apps is the User() function. This function gives you basic details about the person currently using your app.
The User() function is built right into Power Apps. No connectors needed, no extra setup. It’s the fastest way to get basic info about the person currently signed in to the app.
What You Can Get
Here’s what the User() function gives you out of the box:
| Property | Formula | What It Returns |
|---|---|---|
| Full Name | User().FullName | The user’s display name from Microsoft Entra ID (e.g., “Alex B”) |
| Email Address | User().Email | Their work email (e.g., alex@company.com) |
| Profile Image | User().Image | Their Microsoft 365 profile photo |
| Entra Object ID | User().EntraObjectId | A unique GUID identifying the user |
How to Display the User’s Name
Let’s say you want to show a welcome message on your app’s home screen. Here’s how:
- Open your canvas app in Power Apps Studio.
- Insert a Text Label control onto the screen.
- Set its Text property to:
"Welcome back, " & User().FullName & "!"
That’s it. When anyone opens the app, they’ll see their own name in that label. Power Apps figures out the rest automatically.
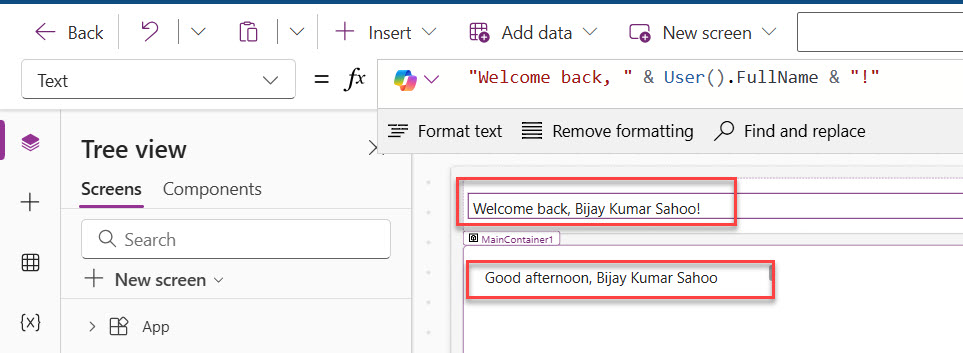
Here’s a real-world example. You want to create a personalized welcome message that says “Good morning, John!” (or “Good afternoon” or “Good evening” depending on the time).
Set your label’s Text property to:
If(
    Hour(Now()) < 12,
    "Good morning, " & User().FullName,
    If(
        Hour(Now()) < 17,
        "Good afternoon, " & User().FullName,
        "Good evening, " & User().FullName
    )
)
This formula checks the current hour and adjusts the greeting accordingly. Simple, but effective.
I have added the formula in the Power Apps canvas app, and you can see the exact output in the screenshot below:
How to Display the Profile Picture
Want to show the user’s profile photo in the top corner of your app (like most enterprise apps do)?
- Insert an Image control.
- Set its Image property to:
User().Image
Power Apps will pull the photo directly from their Microsoft 365 account.
How to Use the Email in a Form
Say you have a form where one field should auto-populate the user’s email. Select the Default property of that text input field and set it to:
User().Email
Now, when users open the form, their email is already filled in. They don’t have to type it.
The EntraObjectId — Why It’s Better Than Email for Matching
Here’s something I want to highlight that many people miss. The User().EntraObjectId gives you a unique GUID (a long string like “a1b2c3d4-1234-5678-abcd-ef0123456789”) that uniquely identifies this user in your organization’s directory.
Why does this matter? Because email addresses can change. Someone gets married, changes their name, moves departments — their email might change. Their Entra Object ID never changes. If you’re storing user identity in Dataverse or using it to match records reliably, the GUID is your best bet.
Check out Power Apps Navigate Function
Method 2: The Office 365 Users Connector (The Detailed Profile)
The User() function is great for basic information, but what if you need the user’s department, job title, office location, manager name, or phone number? That’s where the Office 365 Users connector comes in.
Setting It Up
Before you can use this connector, you need to add it to your app:
- In Power Apps Studio, click Data in the left panel.
- Click Add data.
- Search for Office 365 Users and select it.
- Click Connect.
That’s it. Now you have access to a much richer set of user profile data.
Getting the Current User’s Full Profile
The cleanest way to get your current user’s extended profile is with MyProfileV2():
Office365Users.MyProfileV2()
This returns an object with tons of properties. You can reference them like this:
Office365Users.MyProfileV2().displayName
Office365Users.MyProfileV2().mail
Office365Users.MyProfileV2().department
Office365Users.MyProfileV2().jobTitle
Office365Users.MyProfileV2().officeLocation
Office365Users.MyProfileV2().city
Office365Users.MyProfileV2().country
Office365Users.MyProfileV2().mobilePhone
A Practical Example — Auto-Fill a Request Form
Imagine you’re building an IT request form. You want it to auto-fill the user’s name, email, department, and manager so they don’t have to fill those in manually.
First, in the OnStart property of the app (or on the screen’s OnVisible), store the profile in a variable:
Set(varUserProfile, Office365Users.MyProfileV2())
Then in your form fields, use the variable as the default:
- Name field default: varUserProfile.displayName
- Email field default: varUserProfile.mail
- Department field default: varUserProfile.department
- Job Title field default: varUserProfile.jobTitle
This way, the form loads with everything pre-filled, and the user just needs to type their actual request. Clean experience, less friction.
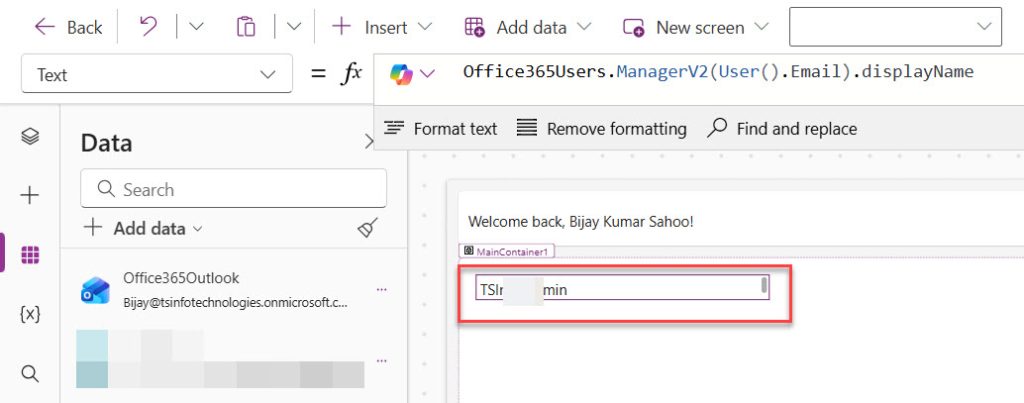
Getting the Current User’s Manager
This is one of my favorite use cases. Power Apps can pull the manager from Active Directory in one line:
Office365Users.ManagerV2(User().Email).displayName
You can see the exact output in the screenshot below:
Want the manager’s email? Change .displayName to .mail:
Office365Users.ManagerV2(User().Email).mail
This is incredibly useful for approval workflows where the manager’s email needs to be passed to a Power Automate flow.
Getting Details for Any User (Not Just the Current One)
Sometimes you don’t want info about the person using the app — you want details about someone they’ve looked up or selected. You can pass any email address to UserProfileV2():
Office365Users.UserProfileV2("john.doe@company.com").displayName
Office365Users.UserProfileV2("john.doe@company.com").department
Office365Users.UserProfileV2("john.doe@company.com").jobTitle
You can also combine this with a Combo Box control where the user searches for a colleague:
- Insert a Combo Box control.
- Set its Items property to:
Office365Users.SearchUser({searchTerm: Self.SearchText})
- Set DisplayFields to [“DisplayName”].
Now users can search for any colleague in the organization and you can use the selected person’s email to pull their full profile using UserProfileV2().
Finding a User’s Manager
Here’s a really useful one. Need to route an approval to someone’s manager? Use:
Office365Users.ManagerV2(User().Email).displayNameThis returns the current user’s manager’s name. You can also get their email address:
Office365Users.ManagerV2(User().Email).MailThis is perfect for approval workflows that require automatically sending requests up the chain.
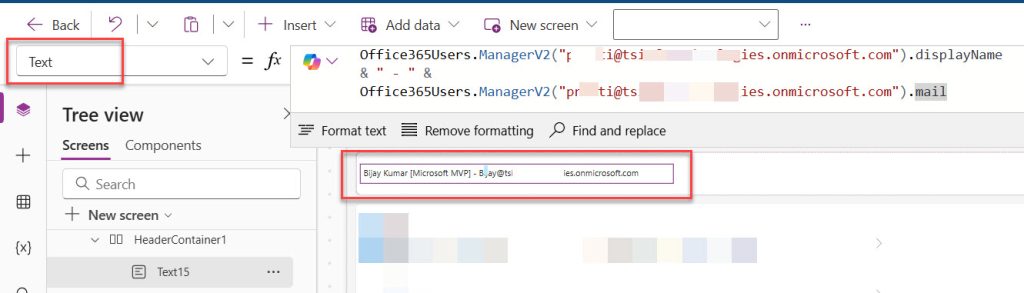
Here is an example that you can try.
I have added a Text label control and added the following formula in the Text property.
Text property:
Office365Users.ManagerV2("p****@tsinfo******.onmicrosoft.com").displayName
& " - " &
Office365Users.ManagerV2("p****@tsinfo******.onmicrosoft.com").mail
Here is the user’s display name and email id. You can see the exact output in the screenshot below.
Check out Power Apps Notify Function
Method 3: SharePoint Person Field
If your app connects to a SharePoint list that has a Person or Group column, you can extract user details directly from that field — no extra connector needed.
When you create a SharePoint connection in Power Apps, person columns come through as records with these properties:
- DisplayName: The person’s name
- Email: Their email address
- Claims: Internal identifier
- Department: Their department (if available)
- JobTitle: Their job title (if available)
Let’s say you have a SharePoint list called Projects with a column called AssignedTo (a Person field). When you connect this list to your gallery, each item in the gallery will have an AssignedTo property.
To get the assigned person’s display name:
ThisItem.AssignedTo.DisplayName
To get their email:
ThisItem.AssignedTo.Email
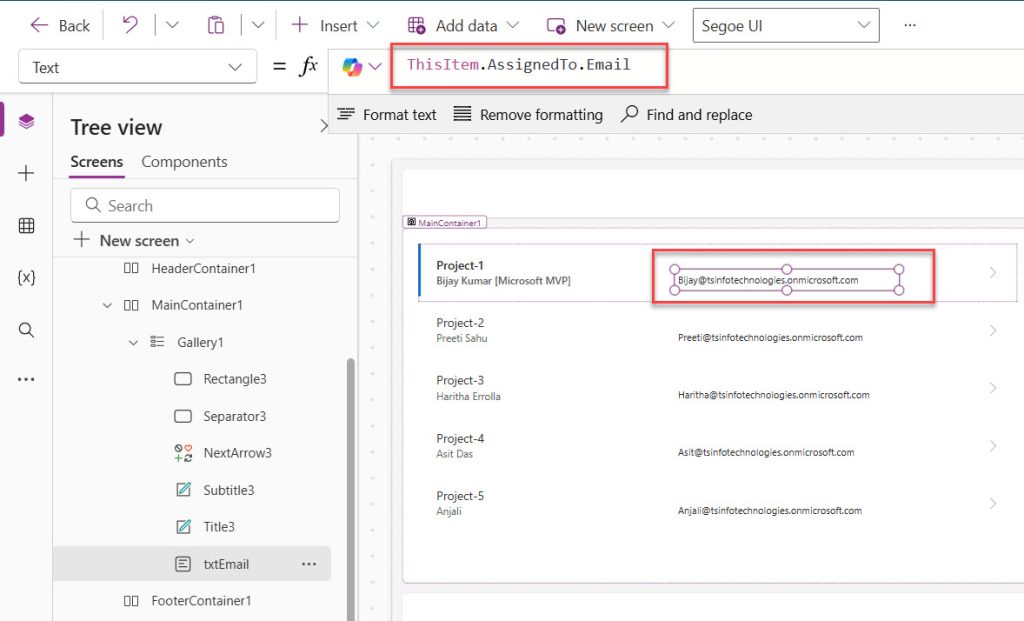
Here, I have added a Power Apps gallery control to the screen. Then I added a Text label control and populated the Email ID of the AssignedTo field.
Text Property:
ThisItem.AssignedTo.EmailYou can see the exact output in the screenshot below:
This is really handy when you want to display who owns or submitted a record without making extra API calls.
This works for any person column in your SharePoint list, not just the system “Created By” field.
Patching a Person Field Back to SharePoint
Going the other direction — writing a person’s value back to a SharePoint person field — requires a specific format. You can’t just pass a plain text email. You need to pass a record like this:
Patch(
    Projects,
    Defaults(Projects),
    {
        AssignedTo: {
            '@odata.type': "#Microsoft.Azure.Connectors.SharePoint.SPListExpandedUser",
            Claims: "i:0#.f|membership|" & User().Email,
            DisplayName: User().FullName,
            Email: User().Email
        }
    }
)
Yes, that Claims field looks a bit odd, but that’s the format SharePoint expects for person fields. Once you have this pattern, just swap in the right email, and you’re good.
Check out Power Apps Collect Function
Method 4: Dataverse Users Table
If your app is built on Dataverse (which is the case for most model-driven apps and many canvas apps), you can query the Users table directly to get rich user information.
Add the Users table as a data source in your app. Then you can look up the current user like this:
LookUp(Users, 'Primary Email' = User().Email)
Store the result in a variable for reuse:
Set(varCurrentUser, LookUp(Users, 'Primary Email' = User().Email))
Then access individual properties:
varCurrentUser.'Full Name'
varCurrentUser.'Business Unit'
varCurrentUser.'Job Title'
One thing to watch out for: email matching in Dataverse can be case-sensitive depending on how the data was entered. If you’re having trouble matching users, try wrapping the email in Lower():
LookUp(Users, Lower('Primary Email') = Lower(User().Email))
Check out Power Apps Switch Function
Storing User Information in Variables in Power Apps
Sometimes you’ll want to store user information in variables rather than calling the functions repeatedly. This makes your app faster and your formulas cleaner.
Using the OnStart Property
Go to your App object (click “App” in the tree view) and add this to the OnStart property:
Set(varCurrentUser, User().Email);
Set(varCurrentUserName, User().FullName);
Set(varUserProfile, Office365Users.MyProfileV2())
Now you can use these variables anywhere in your app:
- varCurrentUser contains the email
- varCurrentUserName contains the full name
- varUserProfile.Department contains the department
- varUserProfile.JobTitle contains the job title
This approach is cleaner and more efficient, especially if you reference user information in multiple places.
Which Method Should You Use to Get User Information?
Here’s a quick summary to help you decide:
- Just need name, email, or photo? → Use User(). It’s the simplest, no connector required.
- Need department, job title, manager, or phone? → Use the Office 365 Users connector with MyProfileV2() or UserProfileV2().
- Working with SharePoint person columns? → Read directly from ThisItem.PersonField.DisplayName or Email.
- Building on Dataverse? → Query the Users table directly.
- Need to uniquely identify users reliably? → Use User().EntraObjectId (GUID).
In many real-world apps, you’ll actually combine these. For example, use User().Email as the key to pull data from a SharePoint list, and separately use Office365Users.MyProfileV2() to pre-fill form fields.
Check out Power Apps Concatenate Strings
Practical Use Case-1: Auto-Populated IT Help Desk Form
Let me put it all together with a simple but complete example. You’re building an IT help desk request form. Here’s how I’d set it up:
Step 1: Add the Office 365 Users connector.
Step 2: In the App’s OnStart property, set a variable:
Set(varUser, Office365Users.MyProfileV2())
Step 3: Add a Form with these default values:
- Requestor Name: varUser.displayName
- Email: varUser.mail
- Department: varUser.department
- Manager Email: Office365Users.ManagerV2(User().Email).mail
Step 4: When the user submits, use Patch() to save to SharePoint or Dataverse with those values stamped in.
Now your help desk form fills itself out. Users just describe their issue and hit submit. That’s the kind of UX that makes users actually like your app.
Practical Use Case-2: Filter Data by User
You have a SharePoint list called “Support Tickets” and you want users to see only their own tickets.
Add a Gallery control to your screen and set its Items property to:
Filter(
    'Support Tickets',
    CreatedBy.Email = User().Email
)
This filters the list to show only tickets where the CreatedBy email matches the current user’s email.
Want to show tickets assigned to the current user instead? Assuming you have an “AssignedTo” column:
Filter(
    'Support Tickets',
    AssignedTo.Email = User().Email
)
Check out How to Send Emails from Power Apps
A Few Things to Keep in Mind
Before I wrap up, here are a few gotchas I’ve run into:
- The User() function in the Studio preview may show your own info even if you’re testing as another user. Use Test mode or publish to get accurate results.
- Office 365 Users connector requires permissions. If you’re sharing the app with others, make sure each user has a connection set up or the connector is shared through a service account or environment variable where appropriate.
- MyProfileV2() vs UserProfile(email) — use MyProfileV2() when you want the current signed-in user. Use UserProfileV2(email) when you want details about a specific person (like someone selected in a people picker).
- Be mindful of delegation. The Office 365 Users connector calls are non-delegable. For large-scale user lookups, use Dataverse, which handles larger datasets better.
- Email addresses might differ between User().Email and what’s stored in SharePoint or Dataverse. Always test with actual user accounts, not just your admin account during development.
Common Mistakes to Avoid
Here are some issues I see people run into:
Mistake 1: Calling Office365Users functions too often
Every time you call an Office365Users function, Power Apps makes a call to Office 365. If you reference the same information multiple times, store it in a variable instead.
Mistake 2: Forgetting delegation warnings
When filtering large lists by user email, watch for delegation warnings. Not all data sources support all filter types. SharePoint generally handles this well, but always test with realistic data volumes.
Mistake 3: Not handling missing data
Not every user has every field filled out. Someone might not have a mobile phone listed or a manager assigned. Use the IsBlank() function to check before displaying:
If(
    IsBlank(varUserProfile.MobilePhone),
    "No phone on file",
    varUserProfile.MobilePhone
)
Mistake 4: Hardcoding email addresses
Never hardcode email addresses for comparisons if you can avoid it. Always use User().Email or stored variables. This makes your app work correctly regardless of who’s using it.
Wrapping Up
Power Apps provides multiple solid ways to retrieve user information. In this tutorial, I explained various methods for displaying user information, including display name, email, phone, department, manager name, and more. Start with the simple User() function for basic needs. When you need more detailed profile information, bring in the Office365Users connector.
Remember these key points:
- Use
User()for email, name, and profile picture - Use Office365Users for detailed profile data like department and manager
- Store frequently-used information in variables
- Person columns from SharePoint already contain user details
- Always test with realistic scenarios
The next time you’re building an app and need to know who’s using it, you’ll know exactly what to do. Do let me know in the comments below if this tutorial helps you.
You may also like the following tutorials:

Bijay Kumar is a Microsoft MVP in Business Applications with over 18 years of experience in the IT industry and more than 12 years as a Microsoft MVP, recognized for his contributions to the Microsoft community. He is the Founder of TSinfo Technologies and the creator of the popular technology platforms SPGuides.com and EnjoySharePoint.com. Bijay also runs the SPGuides YouTube channel, where he shares practical tutorials on Microsoft 365, SharePoint, Power Platform, and Copilot technologies. Read more.