
A few days ago, a client asked me for something simple: let their staff log IT issues without emailing the helpdesk. No dashboards. Just a screen where someone types a title, picks a priority, and hits Save.
That request is exactly what a Form control solves. It reads your data source, generates input controls for each column, and handles the save for you. What’s changed recently is which form you should use. The modern Form control — built on the Microsoft Fluent 2 design system — now gives you responsive spacing, proper theming, and better accessibility defaults out of the box. I’ve switched almost every new client project over to it.
A form in Power Apps is the fastest way to let users add, edit, or view a record without writing a single line of complex code. Whether you’re building a leave request app, an issue tracker, or a client intake tool, the Form control handles data validation, field mapping, and saving for you — so you don’t have to build all of that manually with individual Text input controls.
In this tutorial, I’ll show you how to create a form in Power Apps using the modern Form control, wire up Save and Cancel, handle New and Edit modes, and dodge the mistakes I see most often on real projects.
What Is the Modern Form Control in Power Apps?
A Form is a control in a Power Apps Canvas app — the drag-and-drop style of Power Apps where you design the screen yourself — that binds to a single record and shows its columns as fields.
The modern Form control is Microsoft’s updated version of the classic Edit form and Display form controls. Here’s the important part: both sit on the same underlying form model. You set the same DataSource and Item properties. You use the same functions — SubmitForm, NewForm, EditForm, ViewForm, and ResetForm. So everything you already know carries straight over.
What’s actually different:
- Fluent 2 design — fields, labels, and validation messages match the rest of a modern app.
- Responsive layout — the form adjusts spacing to the available width, so it works on desktop, tablet, and phone without you repositioning controls.
- Theming — the form follows your app theme, so you style everything from one place. If you haven’t set one up, the theme in Power Apps guide is worth ten minutes.
- Built-in accessibility — a clear red required-field indicator and proper screen reader support.
Both classic and modern forms are supported. But for anything new, I start modern.
Pro Tip: In my experience, beginners skip the form control entirely and build a pile of text inputs with a Patch formula. It works, but you throw away required-field validation, error messages, and responsive layout for free. Start with the modern Form. Move to Patch when you genuinely need custom logic.
Before You Start: Turn On Modern Controls
The modern Form control doesn’t appear until you enable it.
- Open your app in Power Apps Studio.
- Go to Settings → Updates (or General, depending on your release).
- Turn on Modern controls and themes.
Modern controls will now appear in the Insert pane. This setting is per-app, so you’ll do it for each new app.
Step 1: Set Up Your Data Source
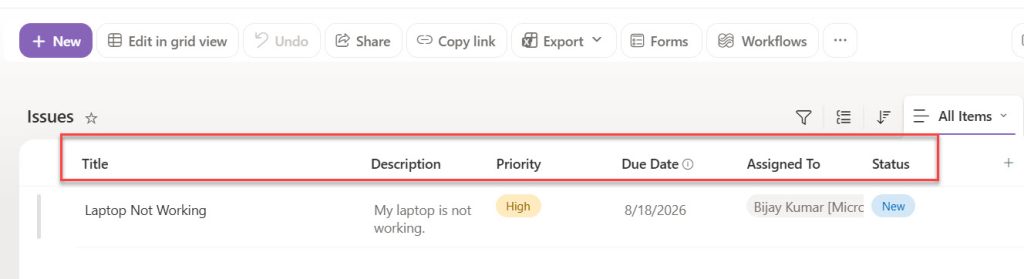
I’ll use one real example throughout: a service desk app backed by a SharePoint list called Issues.
Create the list with these columns:
| Column | Type |
|---|---|
| Title | Single line of text |
| Description | Multiple lines of text |
| Priority | Choice (Low, Medium, High, Critical) |
| Due Date | Date and time |
| Assigned To | Person |
| Status | Choice (New, In Progress, Resolved, Closed) |
Create the columns with the right column types, as it matters a lot. A Choice column gives you a clean dropdown automatically. A plain text column gives users a free-text box where typos quietly wreck your reporting later.
You can see what the SharePoint Online list looks like in the screenshot below:
Step 2: Create the Canvas App
The create experience in Power Apps has changed, so the old “Blank canvas app” route isn’t the best starting point anymore.
- Go to make.powerapps.com and pick your environment from the top right.
- Select Create in the left navigation.
- Under Start from design, choose Header, main section, footer.
You can see the screenshot for your reference:
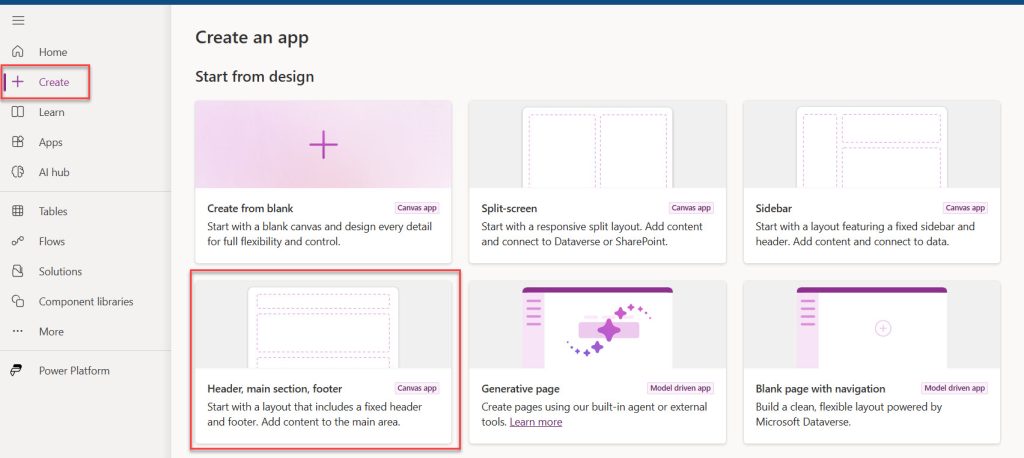
That template gives you a Canvas app with a fixed header and footer and a responsive main area already wired up with containers. You get a responsive shell for free instead of building it yourself. If you want to understand what’s happening under the hood, read how to create a responsive Power Apps canvas app using containers.
- Name the app Service Desk and select Create.
- In the left Tree view, open the Data pane and select Add data.
- Search for SharePoint, pick your connection, paste your site URL, and select the
Issueslist. - You can also change the Direction to Horizontal for the main container.
Your app now has a live connection. If you’d rather start from a spreadsheet, the same pattern applies when you create an app from an Excel file in Power Apps. And if you want a head start on layout, you can also create an app in Power Apps using Copilot.
Step 3: Add a Gallery to Browse Records
A form edits one record at a time. Something has to tell it which record. That’s the Gallery.
- Select Insert → Vertical Gallery.
- Drop it into the main section container.
- Rename it
galIssuesin the Tree view. - Set its Items property to:
Issues- Set the layout to Title and subtitle, then map Title and Priority.
Here is a screenshot for your reference.
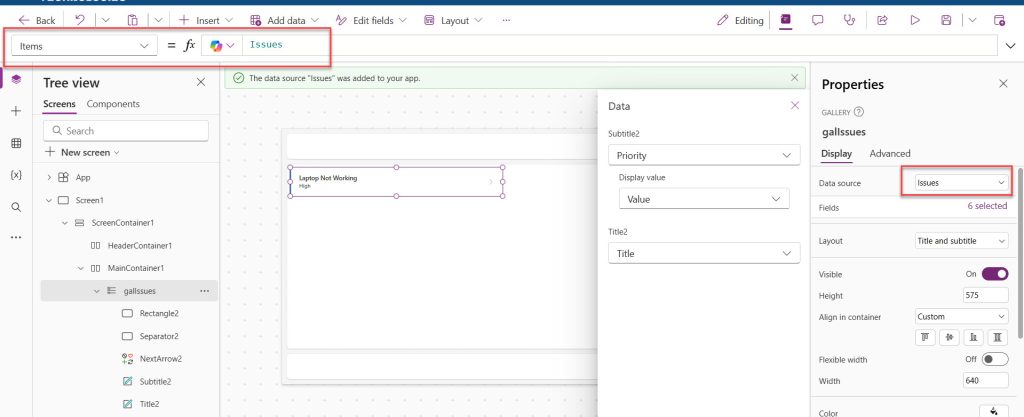
Ensure you change the Subtitle control Text value to
ThisItem.Priority.ValueRenaming controls feels fussy but pays off. galIssues reads clearly in a formula six months from now. Gallery1 does not.
Want rows to feel clickable? You can add hover effects to a Power Apps gallery in a couple of minutes.
Step 4: Insert the Modern Form Control
Now the main event.
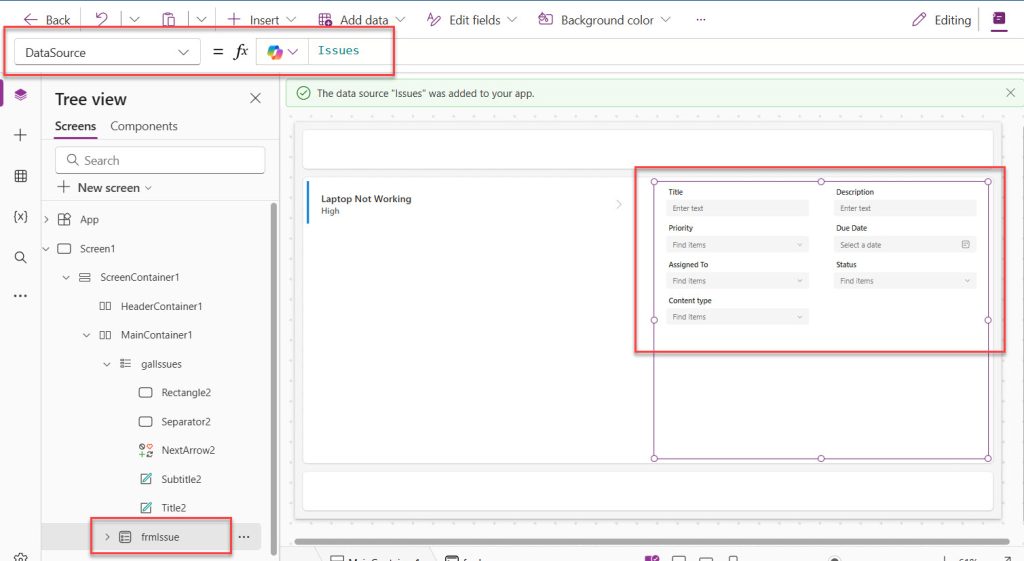
- Select Insert, then search for Form in the modern controls list.
- Drop it onto your form screen and rename it
frmIssue. - Set the DataSource property to:
Issues- Set the Item property to:
galIssues.SelectedThis is how the form control looks like. I have added the form control in the main container. Below is the screenshot for your reference.
Item is the single most important setting on any form. It tells the form which record to load. galIssues.Selected means “whatever row the user just clicked.”
- Set DefaultMode to control how the form opens:
FormMode.EditDefaultMode accepts three values — FormMode.Edit (edit the record in Item, the default), FormMode.New (create a record from data source defaults), and FormMode.View (read-only). In New mode the Item property is ignored entirely, and the form pulls default values from the data source.
- In the properties pane, select Edit fields → Add field, then pick Title, Description, Priority, Due Date, Assigned To, and Status.
Drag fields into a sensible order. I always put the most important field first — users fill forms top to bottom and abandon long ones.
You can see the form looks like below:
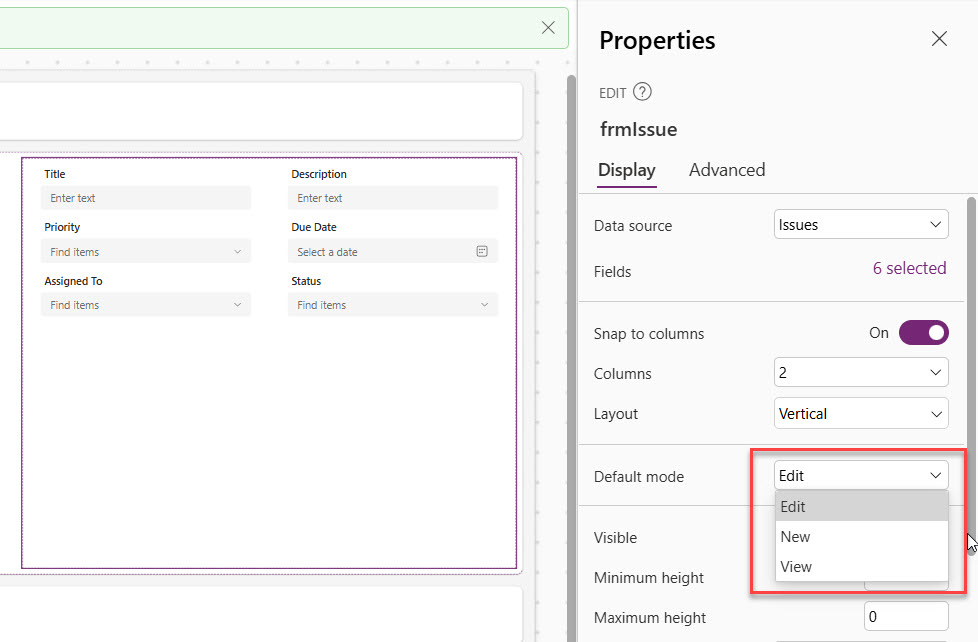
Because this is a modern form, you don’t need to fight with column counts and card widths. The form applies responsive spacing on its own and adapts to the available width. That’s genuinely the biggest day-to-day time saver versus the classic control.
Step 5: Understand Form Modes and Functions
You switch modes with the same functions you’d use on a classic form:
NewForm(frmIssue)
EditForm(frmIssue)
ViewForm(frmIssue)
Here’s how I wire this up in a real app.
Add a New Issue button above the gallery. I added the button in the header container. Set its OnSelect to:
NewForm(frmIssue);If your form is on a different screen, then you can use the following code:
NewForm(frmIssue);
Navigate(scrIssueForm, ScreenTransition.Fade)
This puts the form into New mode and moves to the form screen. If screen transitions are new to you, the Navigate function in Power Apps guide covers every option.
Then set the gallery’s OnSelect to:
EditForm(frmIssue);For different screens, add like below:
EditForm(frmIssue);
Navigate(scrIssueForm, ScreenTransition.Fade)
Now tapping a row opens that record for editing. One form, two jobs.
You can also read the form’s current state at any time with frmIssue.Mode, which returns Edit, New, or View. I use that constantly for conditional labels and buttons.
Step 6: Save the Record with SubmitForm
Add a Save button below the form. Set its OnSelect to:
SubmitForm(frmIssue)This is how the form looks like now:
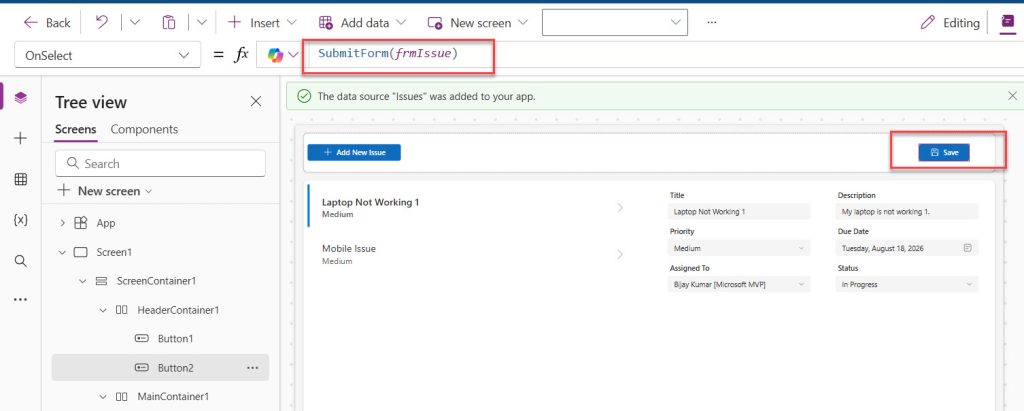
That’s it. When SubmitForm runs, the form validates required fields before it writes anything. If validation passes, it saves the record and runs OnSuccess. If it fails, it runs OnFailure and sets the Error and ErrorKind properties.
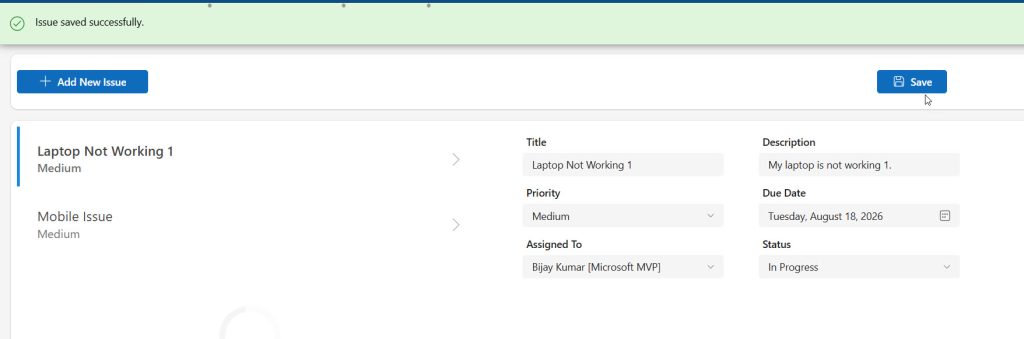
Never put your success message inside the button. Put it in the form’s OnSuccess property:
Notify("Issue saved successfully.", NotificationType.Success);
ResetForm(frmIssue);
Back()
OnSuccess only fires after SharePoint confirms the write. If you put Notify in the button, users see “Saved!” even when the save failed. I’ve watched that bug ship to production more than once. The Notify function in Power Apps article covers the notification types.
This is how the successful message appears like below:
Set OnFailure to:
Notify(
    "Could not save the issue: " & frmIssue.Error,
    NotificationType.Error
)
frmIssue.Error returns a user-friendly message from the data source, and frmIssue.ErrorKind gives you the ErrorKind enum value if you want to branch on the specific failure type. The Switch function in Power Apps is perfect for that.
One property worth knowing: LastSubmit. After a successful save, it holds the record including server-generated values like the SharePoint ID. So if you need to trigger a flow or send an email with the new record’s ID:
Notify("Created issue #" & frmIssue.LastSubmit.ID)That pairs nicely with the guide on how to send emails from Power Apps.
Step 7: Add a Cancel Button and Warn About Unsaved Changes
Add a Cancel button next to Save. Set OnSelect to:
ResetForm(frmIssue);
Back()
ResetForm discards changes in progress and resets the form to default values. Skipping this is a classic beginner bug — the user cancels, opens another record, and sees stale data flash on screen. ResetForm also triggers the form’s OnReset property if you need to clear related variables. On that note, the article on how to reset variables in Power Apps covers the patterns I use alongside this.
The modern form also exposes an Unsaved property, which returns true when the form has changes the user hasn’t saved. I use it to stop people losing work. Set the Cancel button’s OnSelect to:
If(
    frmIssue.Unsaved,
    UpdateContext({locConfirmCancel: true}),
    ResetForm(frmIssue); Back()
)
Then show a simple confirmation container when locConfirmCancel is true. If context variables are unfamiliar, start with the variables in Power Apps guide.
Step 8: Validate Input Before Saving
The modern form handles required fields automatically, and it shows the required indicator in red so users can actually spot it. Mark a column as required in SharePoint and the form picks it up.
But business rules usually need more. The cleanest lever is the form’s Valid property, which returns true when every field — including required ones — holds a valid value.
Set the Save button’s DisplayMode to:
If(
    frmIssue.Valid,
    DisplayMode.Edit,
    DisplayMode.Disabled
)
Now the button greys out until the form is genuinely ready. For extra rules on top, combine them:
If(
    frmIssue.Valid && !IsBlank(Trim(frmIssue.Updates.Title)),
    DisplayMode.Edit,
    DisplayMode.Disabled
)
The Updates property returns a record of the current field values, ready to pass to a function like Patch. Trim strips stray spaces so a user can’t pass validation with a single space character.
If you repeat this rule across screens, move it into a reusable Power Apps user defined function so you maintain it in one place. For bigger rule sets, the multiple If statements in Power Apps guide keeps things readable, and named formulas are great for values you reference everywhere.
Step 9: Set Default Values on New Records
Real forms should pre-fill what they can. Users hate typing things the app already knows.
Select the Status field and set its default to:
If(frmIssue.Mode = FormMode.New, "New", ThisItem.Status.Value)For the Assigned To person column, default it to the current user:
If(
    frmIssue.Mode = FormMode.New,
    Table({
        Claims: "i:0#.f|membership|" & Lower(User().Email),
        DisplayName: User().FullName,
        Email: User().Email
    }),
    ThisItem.'Assigned To'
)
One nice recent improvement: person and group fields in the modern form now show the display name of the selected user instead of a raw identifier. That used to require a workaround. The get user details in Power Apps article explains User() properly, and if you need approval routing, getting manager details for the current user is the logical next step.
Date fields also got more reliable — a date field now keeps its value when the form switches to Edit mode. For standalone date entry outside a form, use the modern date picker with time in Power Apps.
When to Use Patch Instead of a Form
Modern forms cover about 80% of what I build. The rest needs the Patch function, which writes data directly without a form control.
Reach for Patch when:
- You save to two data sources from one screen.
- Your inputs are spread across multiple screens or a custom layout.
- You’re writing a record with no visible input controls at all.
A basic Patch for the same list:
Patch(
    Issues,
    Defaults(Issues),
    {
        Title: txtTitle.Value,
        Description: txtDescription.Value,
        Priority: { Value: drpPriority.Selected.Value }
    }
)
Defaults(Issues) creates a blank new record. Swap it for a specific record to update instead. You can also combine both approaches — use the form’s Updates property inside a Patch when you need to add fields the form doesn’t show. The full Patch function in Power Apps guide walks through both patterns.
Things to Keep in Mind
- Turn on modern controls first. The modern Form control simply won’t appear in the Insert pane until you enable modern controls and themes in app settings. This trips up almost everyone the first time.
- Set the Item property correctly. Most “my form is blank” issues come from an Item property pointing at nothing. Confirm your gallery has a selected record before the form loads. Remember that Item is ignored entirely in New mode.
- Watch delegation on the gallery, not the form. A form loads one record, so it’s fine. But if your gallery filters a large SharePoint list, non-delegable formulas silently return only the first 500 rows. Read the delegation in Power Apps guide before your list grows past a few thousand items.
- Use OnSuccess and OnFailure, not the button. Putting navigation and notifications in the Save button’s OnSelect creates false confirmations when saves fail.
- Let the form handle layout. The modern form applies responsive spacing on its own. Fighting it with fixed heights and manual positioning defeats the point and breaks on phones.
- Keep forms short. Twenty fields on one screen is too many. Split them across steps or tabs. Users abandon long forms, and screens packed with controls slow the app down noticeably.
- Choose Dataverse for complex needs. SharePoint is fine for simple lists. If you need row-level security, business rules, or table relationships, Dataverse saves you a lot of workaround code later.
Frequently Asked Questions
How do I enable the modern Form control in Power Apps?
Open your app, go to Settings → Updates, and turn on Modern controls and themes. The modern Form control then appears in the Insert pane alongside the other Fluent 2 controls. This setting is per-app, so you’ll repeat it for each new app you build.
What is the difference between the classic and modern Form control?
Both share the same form model, so SubmitForm, NewForm, EditForm, and the Item property work identically. The modern control adds Fluent 2 styling, responsive spacing, app theme support, and better accessibility — including a clear red required-field indicator. You no longer manage data cards and column widths manually.
How do I create a blank form for new records?
Insert a modern Form control, set its DataSource to your table, and set DefaultMode to FormMode.New. In New mode the form ignores the Item property completely and pulls default values straight from the data source. You can also call NewForm(frmIssue) from a button.
How do I make a field required in a modern Power Apps form?
The cleanest way is to mark the column as required in SharePoint or Dataverse — the modern form detects it and shows the red required indicator automatically. Then bind your Save button’s DisplayMode to the form’s Valid property so users can’t submit an incomplete record.
Why is my Power Apps form not saving data?
Common causes include an Item property pointing to nothing, a required field left blank, or a column type mismatch, such as passing plain text into a Choice column. Add Notify(frmIssue.Error, NotificationType.Error) to the form’s OnFailure property to see the exact message. You can also check frmIssue.ErrorKind to branch on the specific failure.
How do I get the ID of the record I just created?
Use the form’s LastSubmit property after a successful save, for example frmIssue.LastSubmit.ID. It returns the full record including server-generated values, which is exactly what you need when triggering a flow or sending a confirmation email.
Can I still use Patch with a modern form?
Yes, and the two work well together. The form’s Updates property returns a record of all current field values, so you can pass it into Patch and merge extra fields the form doesn’t display. That’s my go-to pattern when a screen has to write to more than one data source.
You now know how to create a form in Power Apps with the modern Form control — enabling modern controls, connecting a SharePoint list, setting DataSource and Item, switching between New and Edit modes, validating with the Valid property, and saving with SubmitForm. Stick to the simple pattern first: gallery to browse, modern form to edit, button to save, then layer on validation and defaults once it works end to end. I hope you found this article helpful.
You May Also Like
- Build an app from scratch using Power Apps
- Using the Data table control in Power Apps
- Working with the OnStart property in Power Apps
- Building reusable Power Apps components
- Using the Collect function to work with collections
- How to set a dropdown value on button click in Power Apps

Bijay Kumar is a 13-times Microsoft MVP in Business Applications with over 18 years of experience in the IT industry, recognized for his contributions to the Microsoft community. He is the Founder of TSinfo Technologies and shares practical, tested tutorials on Power Apps, Power Automate, Copilot Studio, and Power BI here on Power Platform FAQs. Read more.